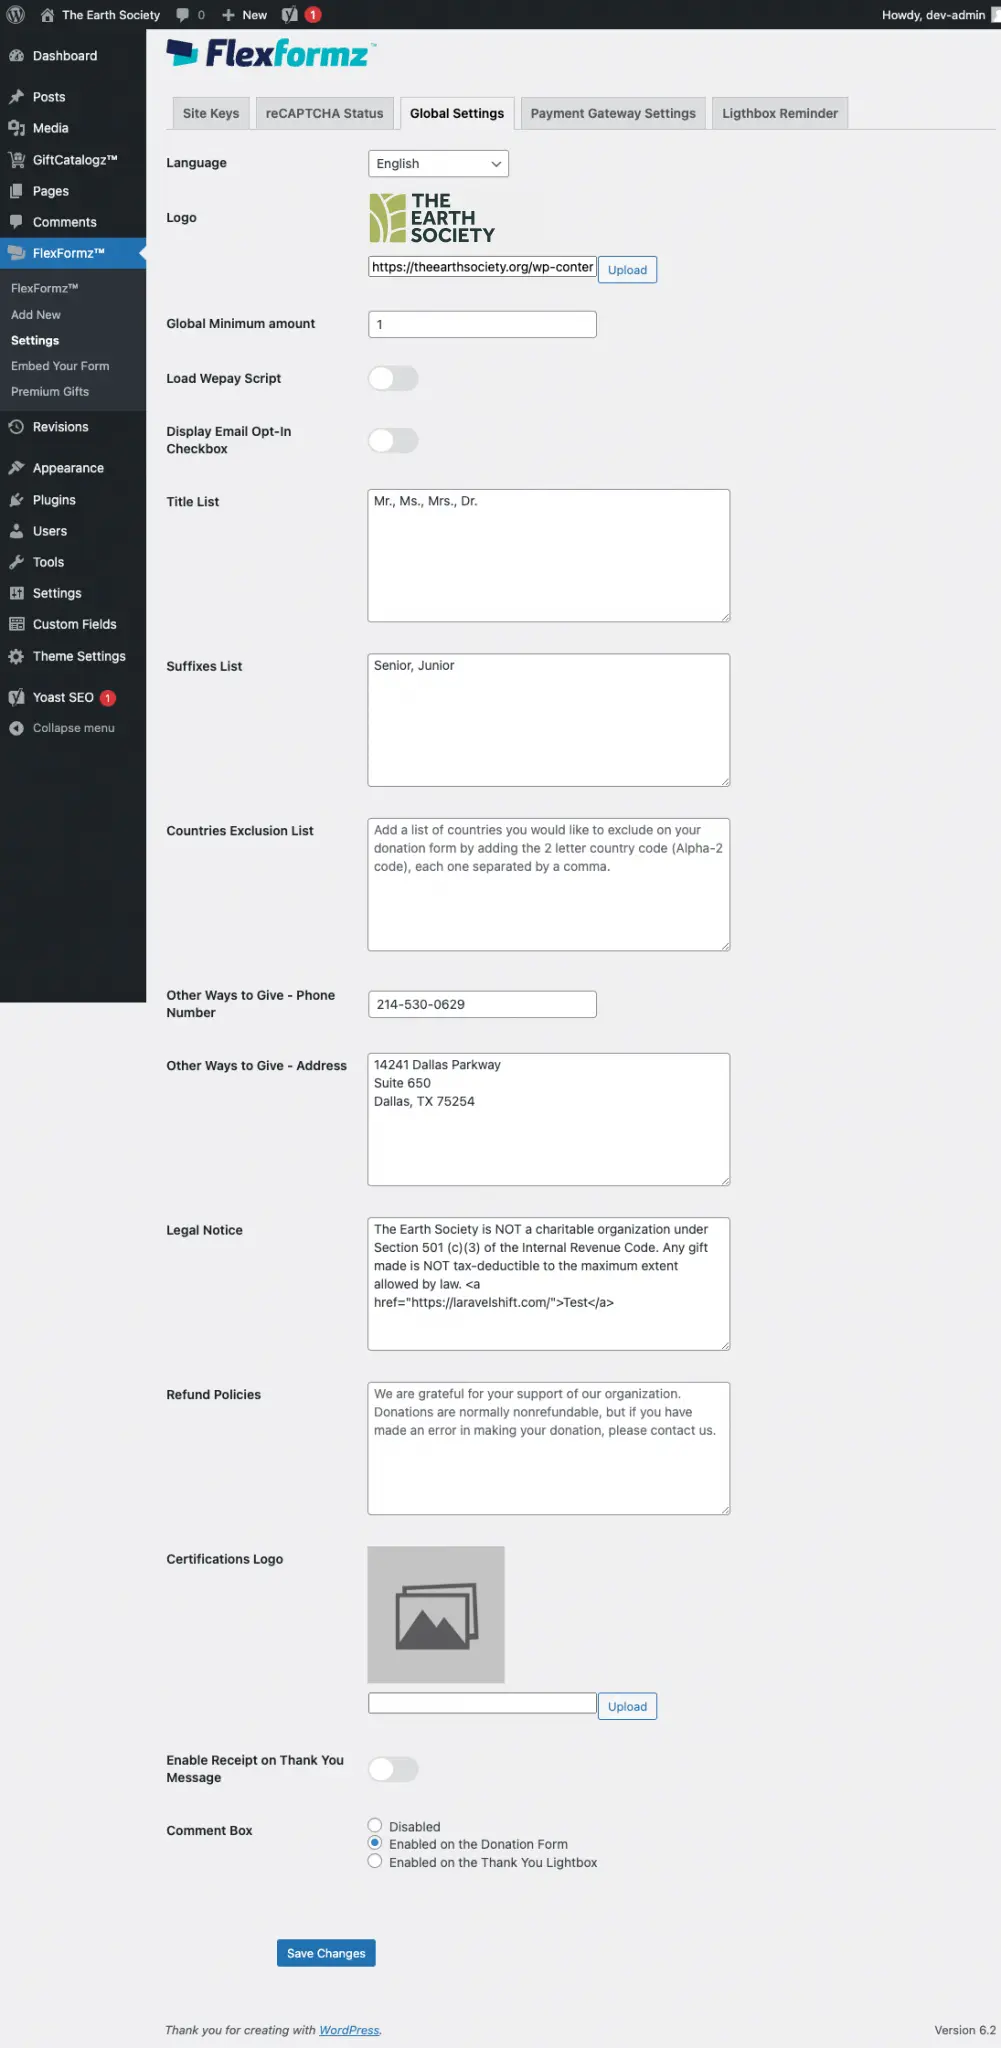
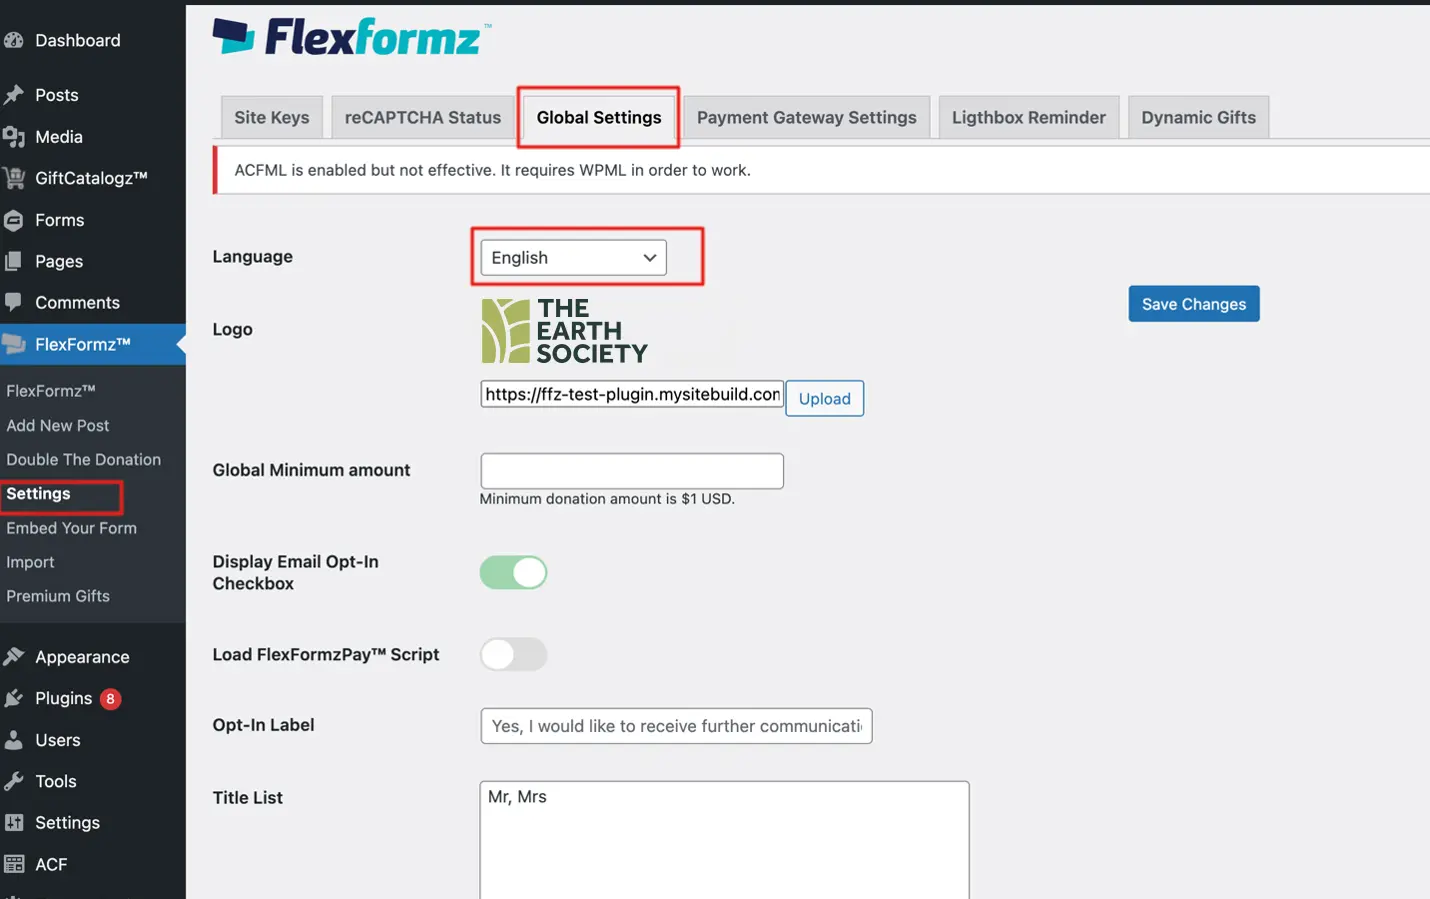
FlexFormz WordPress Global Settings
Inside the FlexFormz WordPress plugin, there are a few settings that you need to set up before creating your FlexFormz. When the FlexFormz plugin is installed and active, a new option is added on the left sidebar. Click/Tap on FlexFormz » Settings to access.
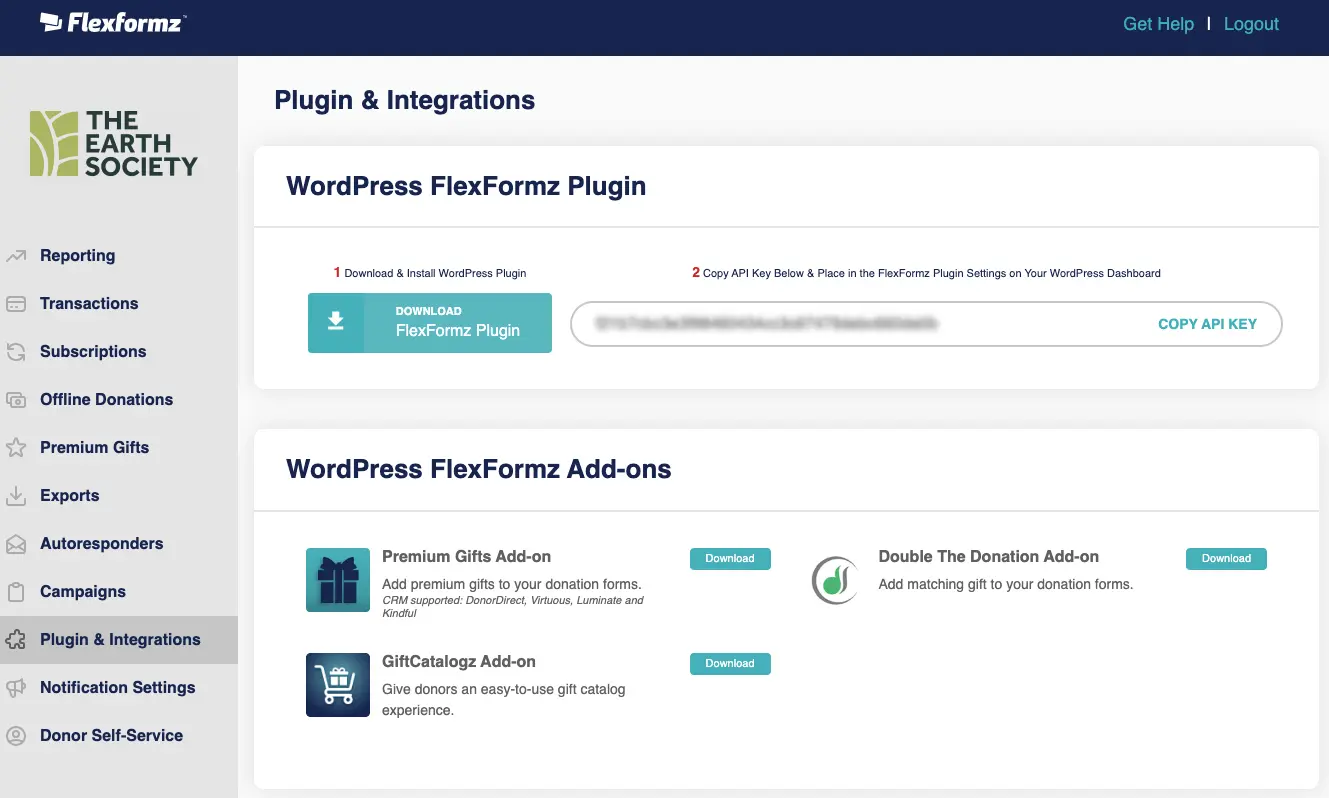
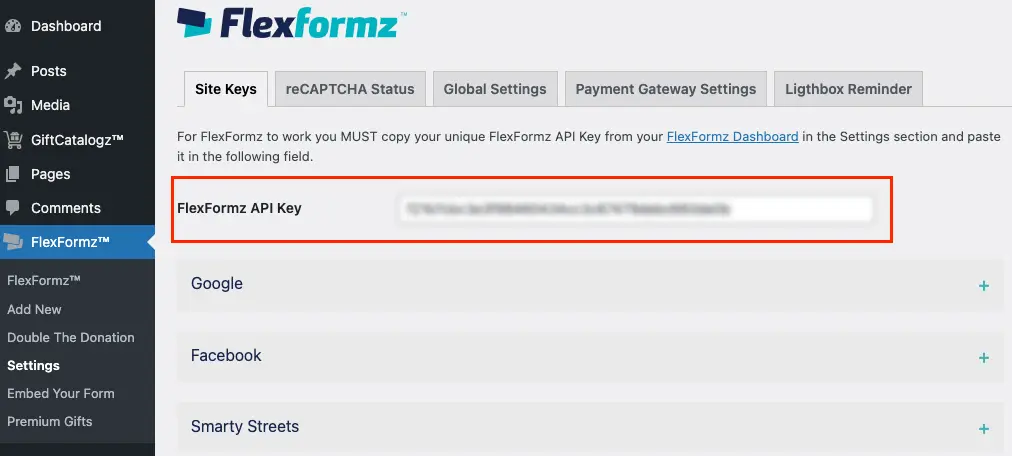
FlexFormz API key
For FlexFormz to work you MUST copy your unique FlexFormz API Key from your FlexFormz Dashboard in the Plugin & Integrations section and paste it in the FlexFormz Settings inside the Site Keys tab of the FlexFormz WordPress plugin.
reCAPTCHA
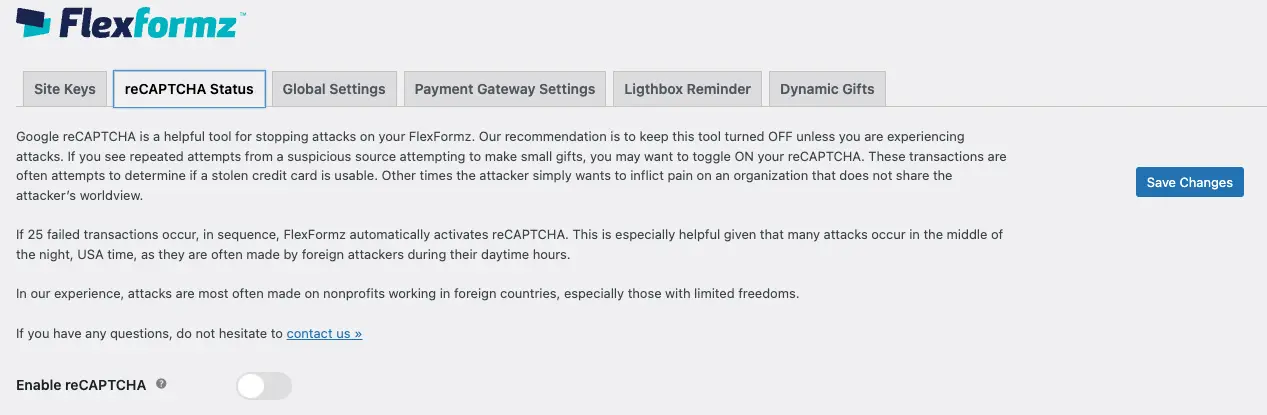
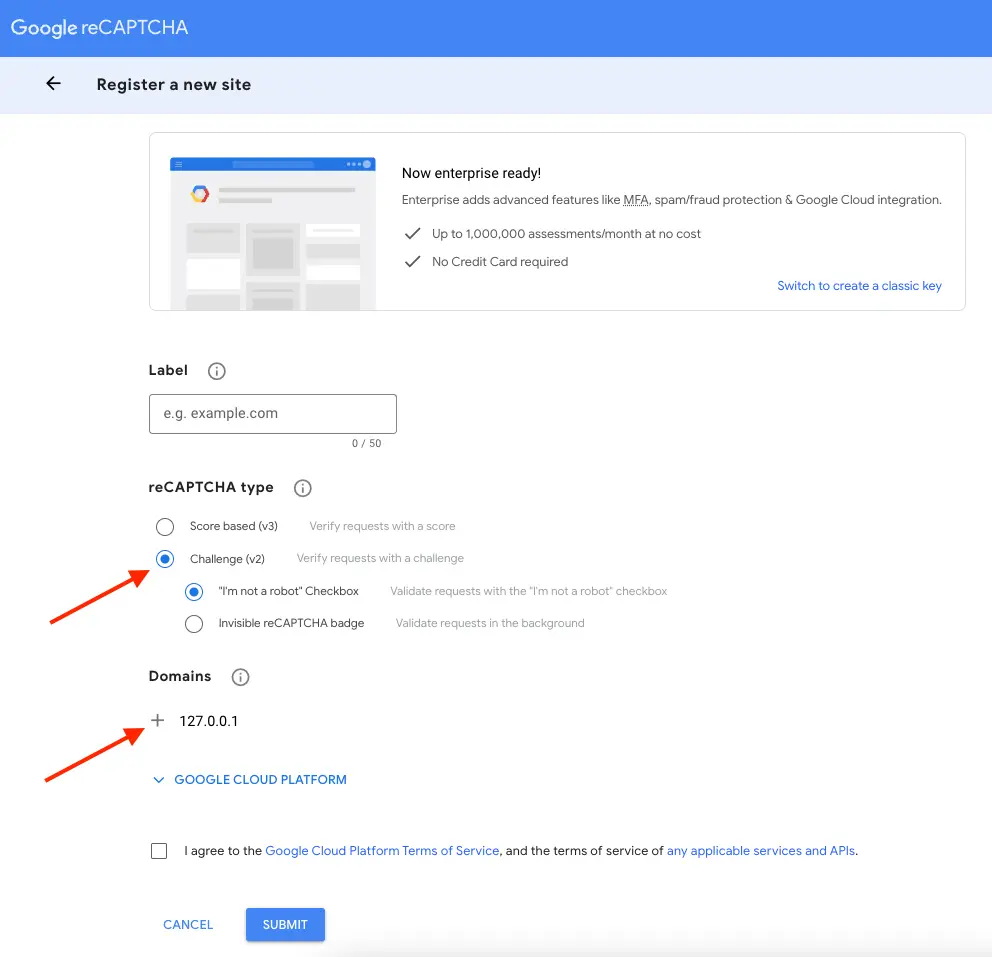
Firstly, go to this link https://www.google.com/recaptcha/admin/create.
Next, scroll down to Register a new site:
- Choose the type of reCAPTCHA: Challenge (v2)
- Enter your domain in Domains setting. In case, you want to test on your localhost, please enter in 127.0.0.1
- Finally, checked on Accept the reCAPTCHA Terms of Service and click Register button
- Once you have clicked on the Register button, Google will generate two keys: Site Key and Secret Key.
- Now log into your site go to the menu FlexFormz -> Settings, and paste the Google reCAPTCHA Keys.
Choosing Your Currency
Choose the currency for your FlexFormz in the general settings of your FlexFormz plugin. We currently support United States Dollar (USD), Canadian Dollar (CAD), and Mexican Pesos (MXN).
By default, USD is selected.

Adding Your Organization’s Logo to FlexFormz
You can set a default logo; this logo will be displayed on the header of all the forms you create. Click/tap on the Upload button to open the WordPress media manager where you can select and upload your logo.

Google Tag Manager (GTM) Container ID
You can add your GTM Container ID in this field for tracking purposes. If you would like to add Google Ecommerce tracking, there are further instructions for configurations needed on your GTM account in the Tracking Code section of the documentation.
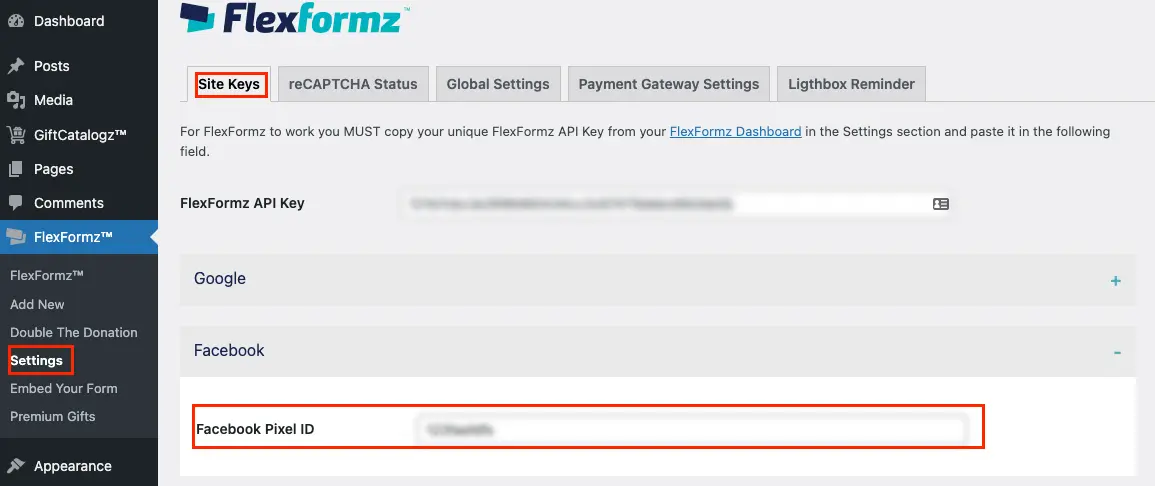
Facebook Pixel ID
You can add your Facebook Pixel ID in this field for tracking purposes.
![]()
Global Minimum Amount
Each individual donation form can be configured to have a minimum amount but this setting can be enforced GLOBALLY in this field. We recommend having a minimum donation amount of at least $3 minimizing fraud without discouraging donors.

Title and Suffix
When you create FlexFormz you have the OPTION of enabling Title and Suffix fields. You must add every title and suffix you want to be displayed on your formz.
Insert all the Titles and Suffixes that you would like with each option separated by a comma.

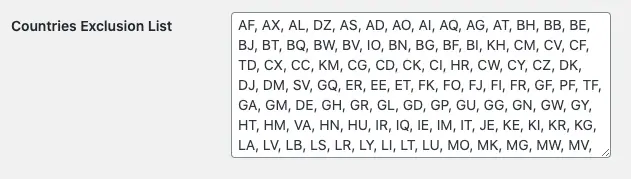
Countries Exclusion List
Add a list of countries you would like to exclude on your donation form by adding the 2 letter country code (Alpha-2 code), each on separated by a comma.
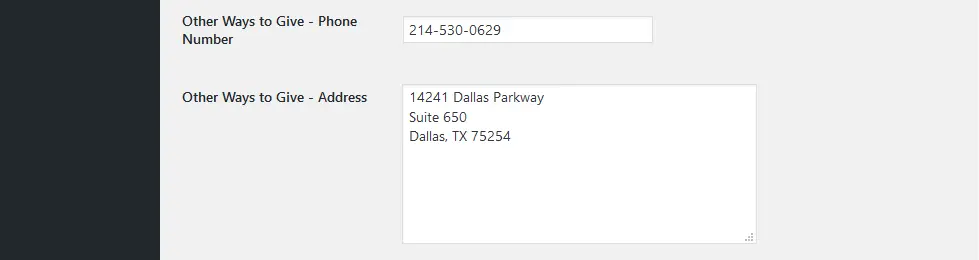
Other Ways to Give
You can display a phone number and/or an address so that donors know how to contact your organization if they do not wish to give online. These options will be displayed only if you add the information to the “Other Ways to Give” phone and address fields. You may also add a legal disclaimer if you wish; just add the desired text to the field. It is blank by default.
You may start creating forms and receiving donations once you have:
- Created your FlexFormz account
- Connected your Stripe account
- Linked your Website to the Dashboard
- Downloaded and Installed the FlexFormz plugin on your Website’s WordPress Dashboard
- Copied and Pasted the FlexFormz API key into the FlexFormz plugin Payment Settings
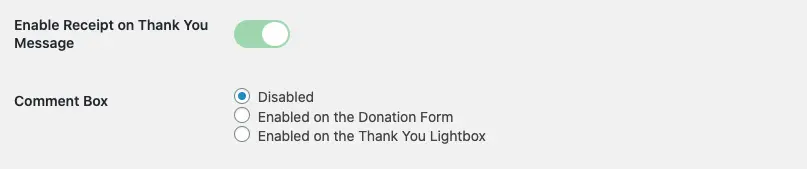
Enable Receipt / Comment Box [Optional]
Enable Receipt on Thank You Message
If you would like to show a brief summary of the transaction to the donor on the thank you message, check the “Show Receipt” checkbox. Please note: This information will appear by default on the donor’s email notification.
Enable Comments on Thank You Message
You can now allow donors to include a personal note or special instructions for your organization before or after their transaction is processed. You may enable this feature to receive feedback from your donor after the transaction has been made. Simply check the “Enable Comments” toggle and then select the checkbox of the desired placement:
SmartyStreets
If you want to enable the SmartyStreets functionality, please refer to the SmartyStreets integration documentation.
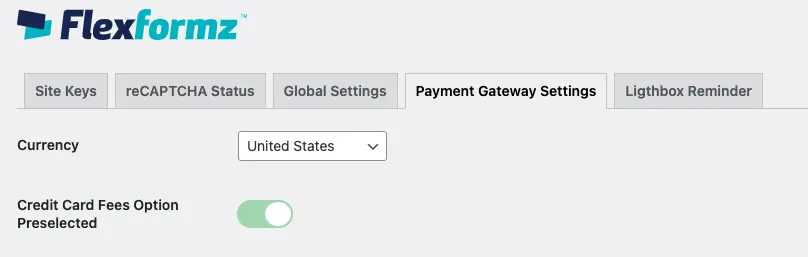
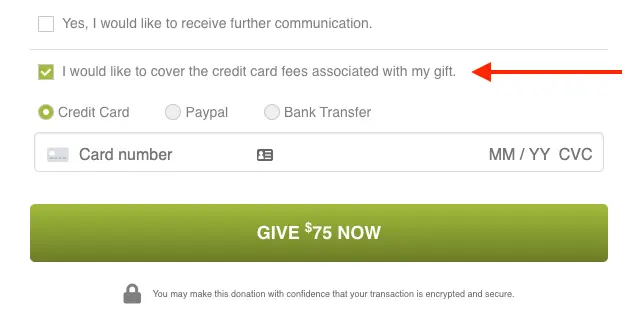
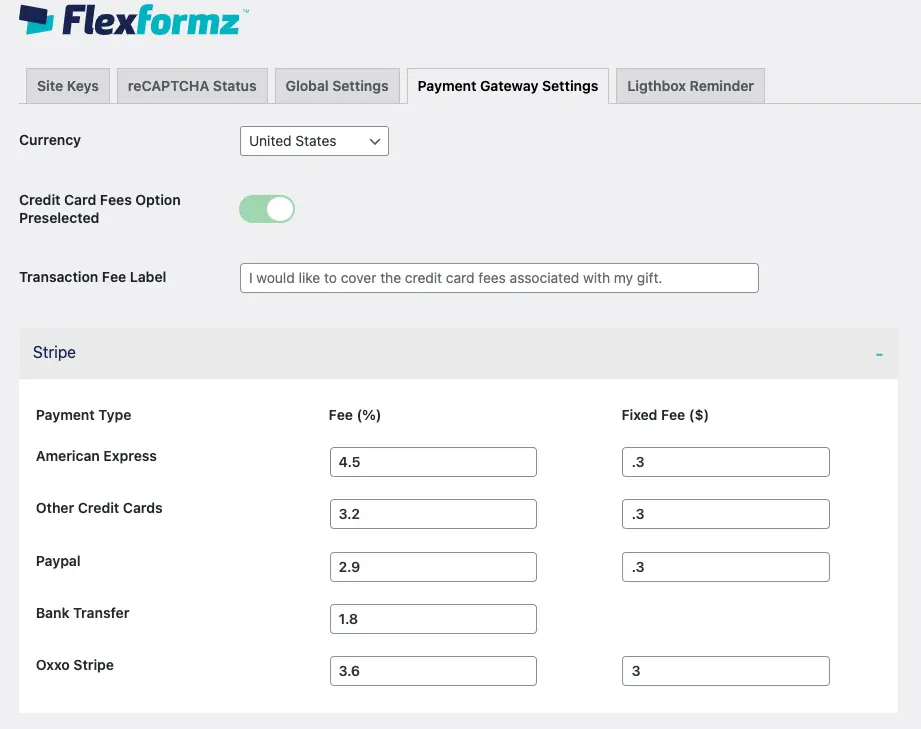
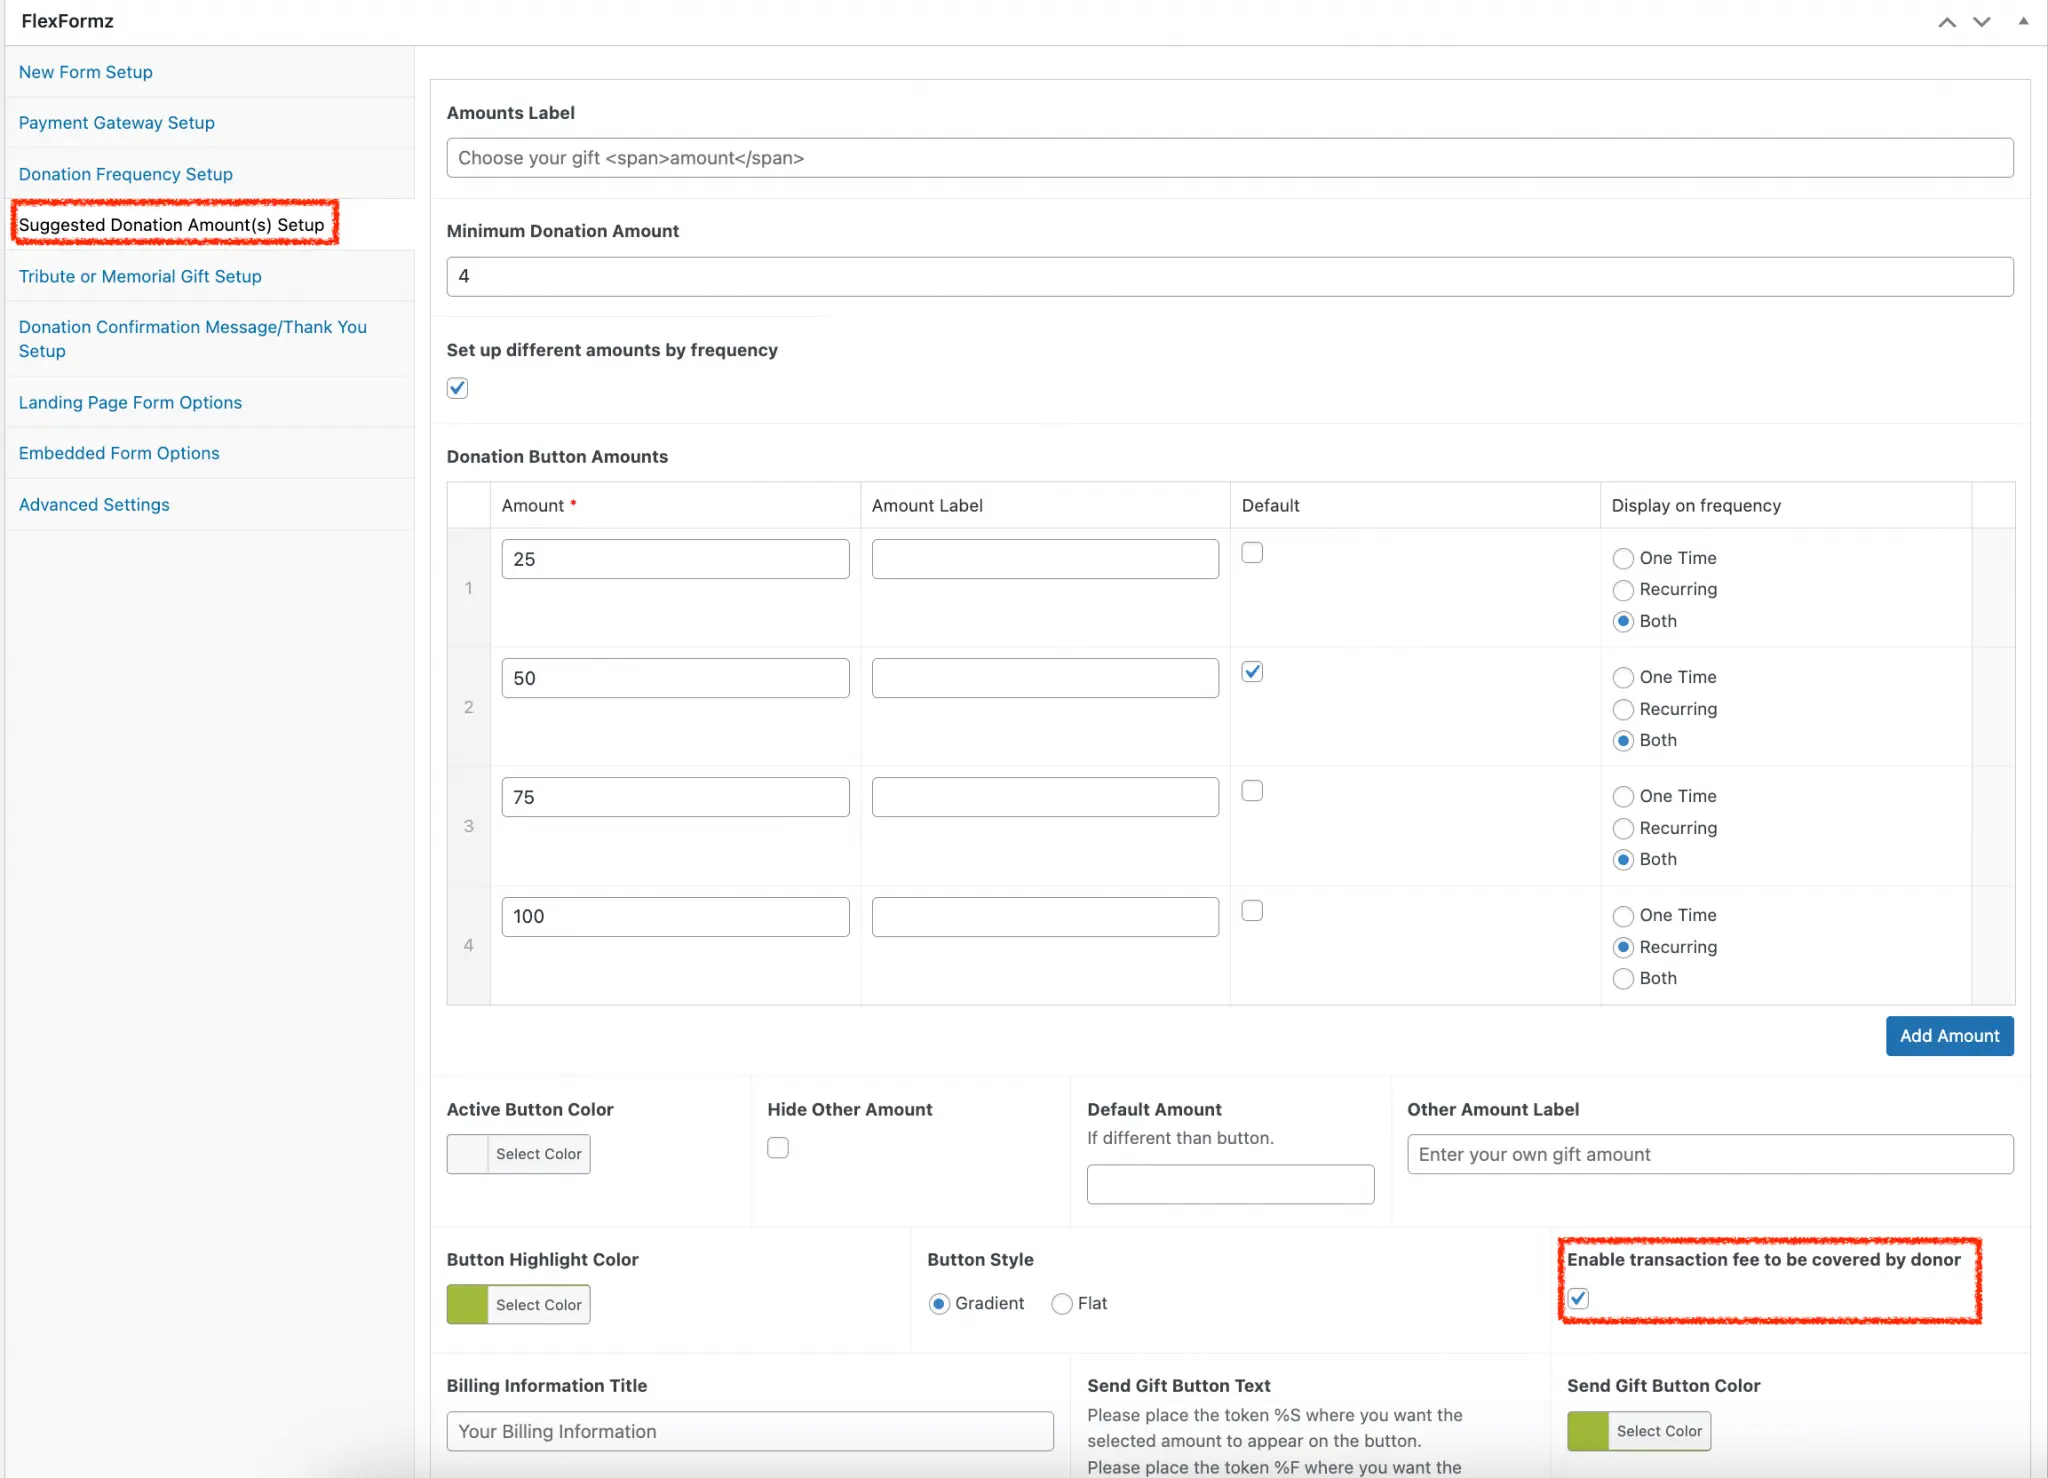
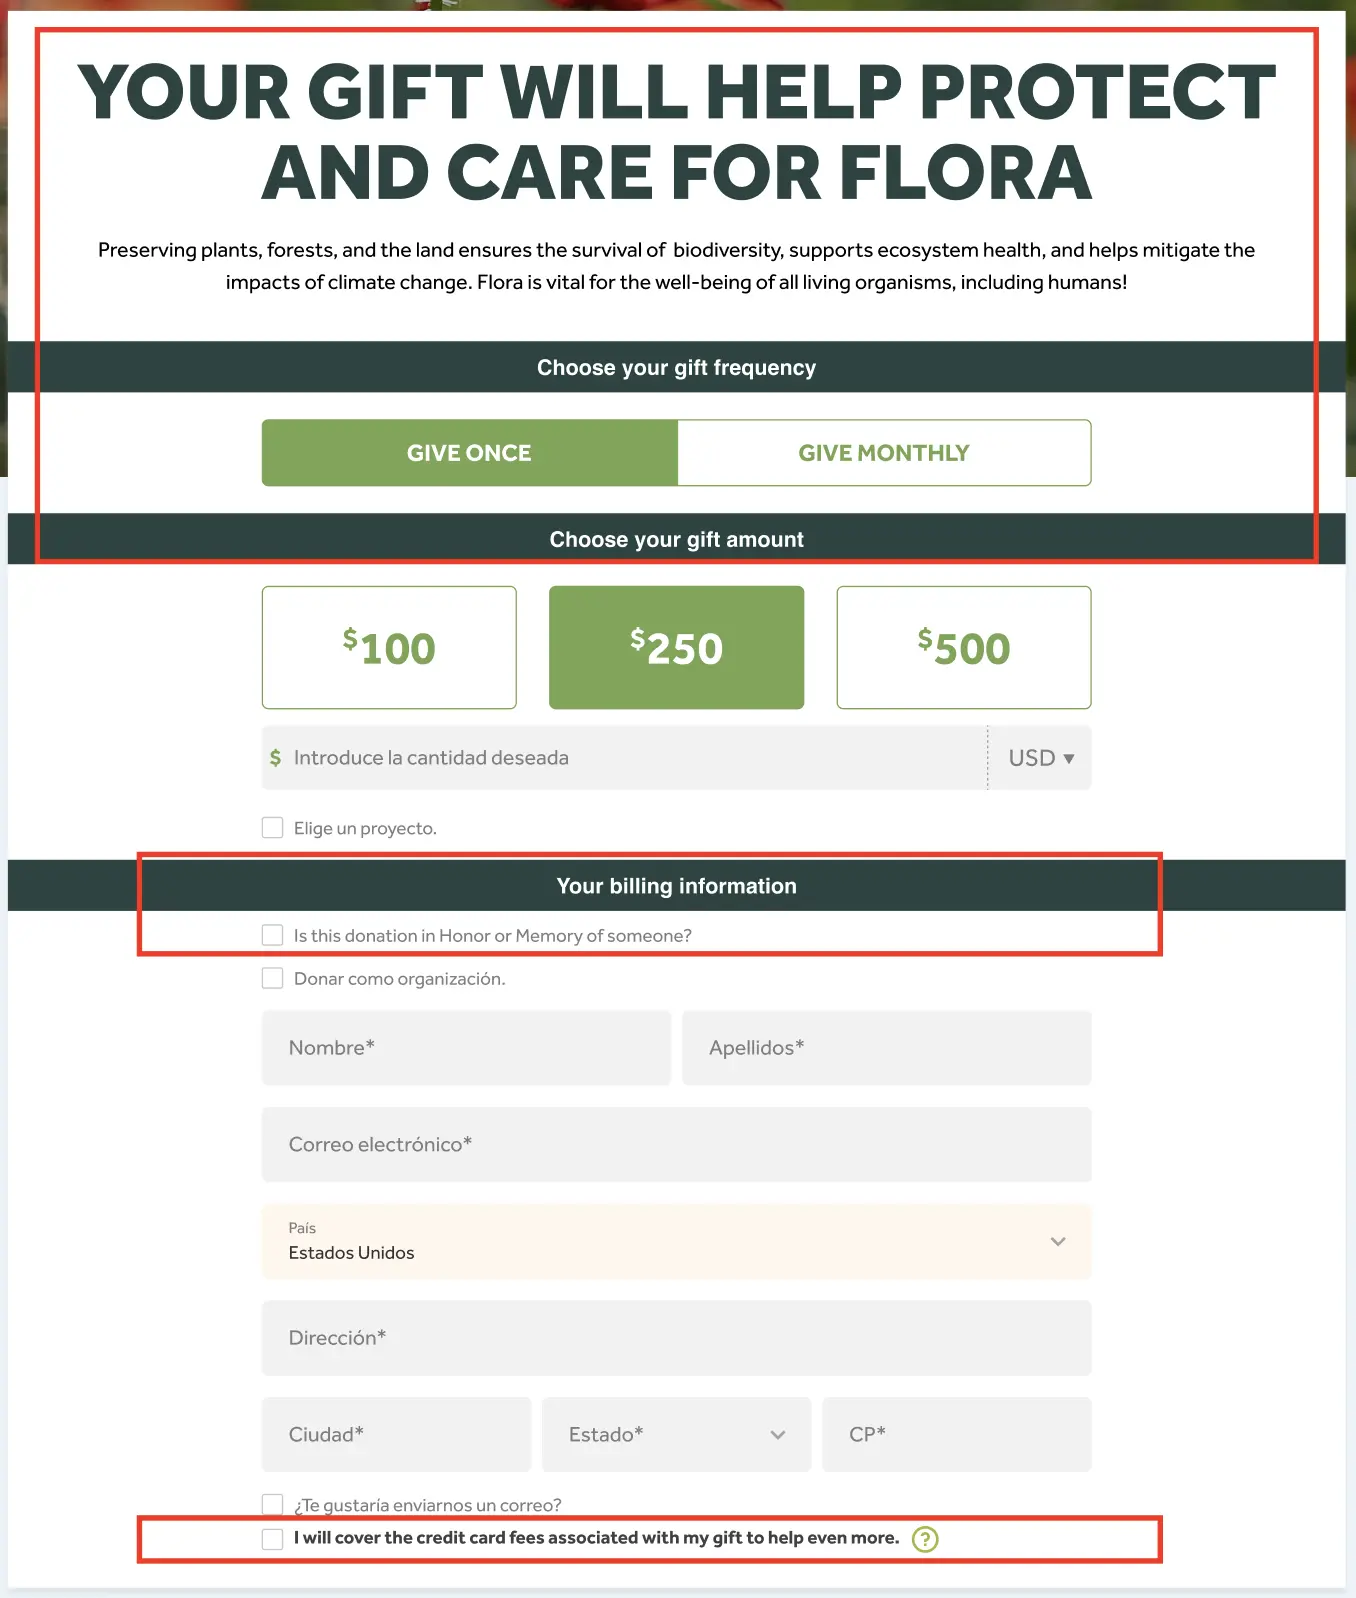
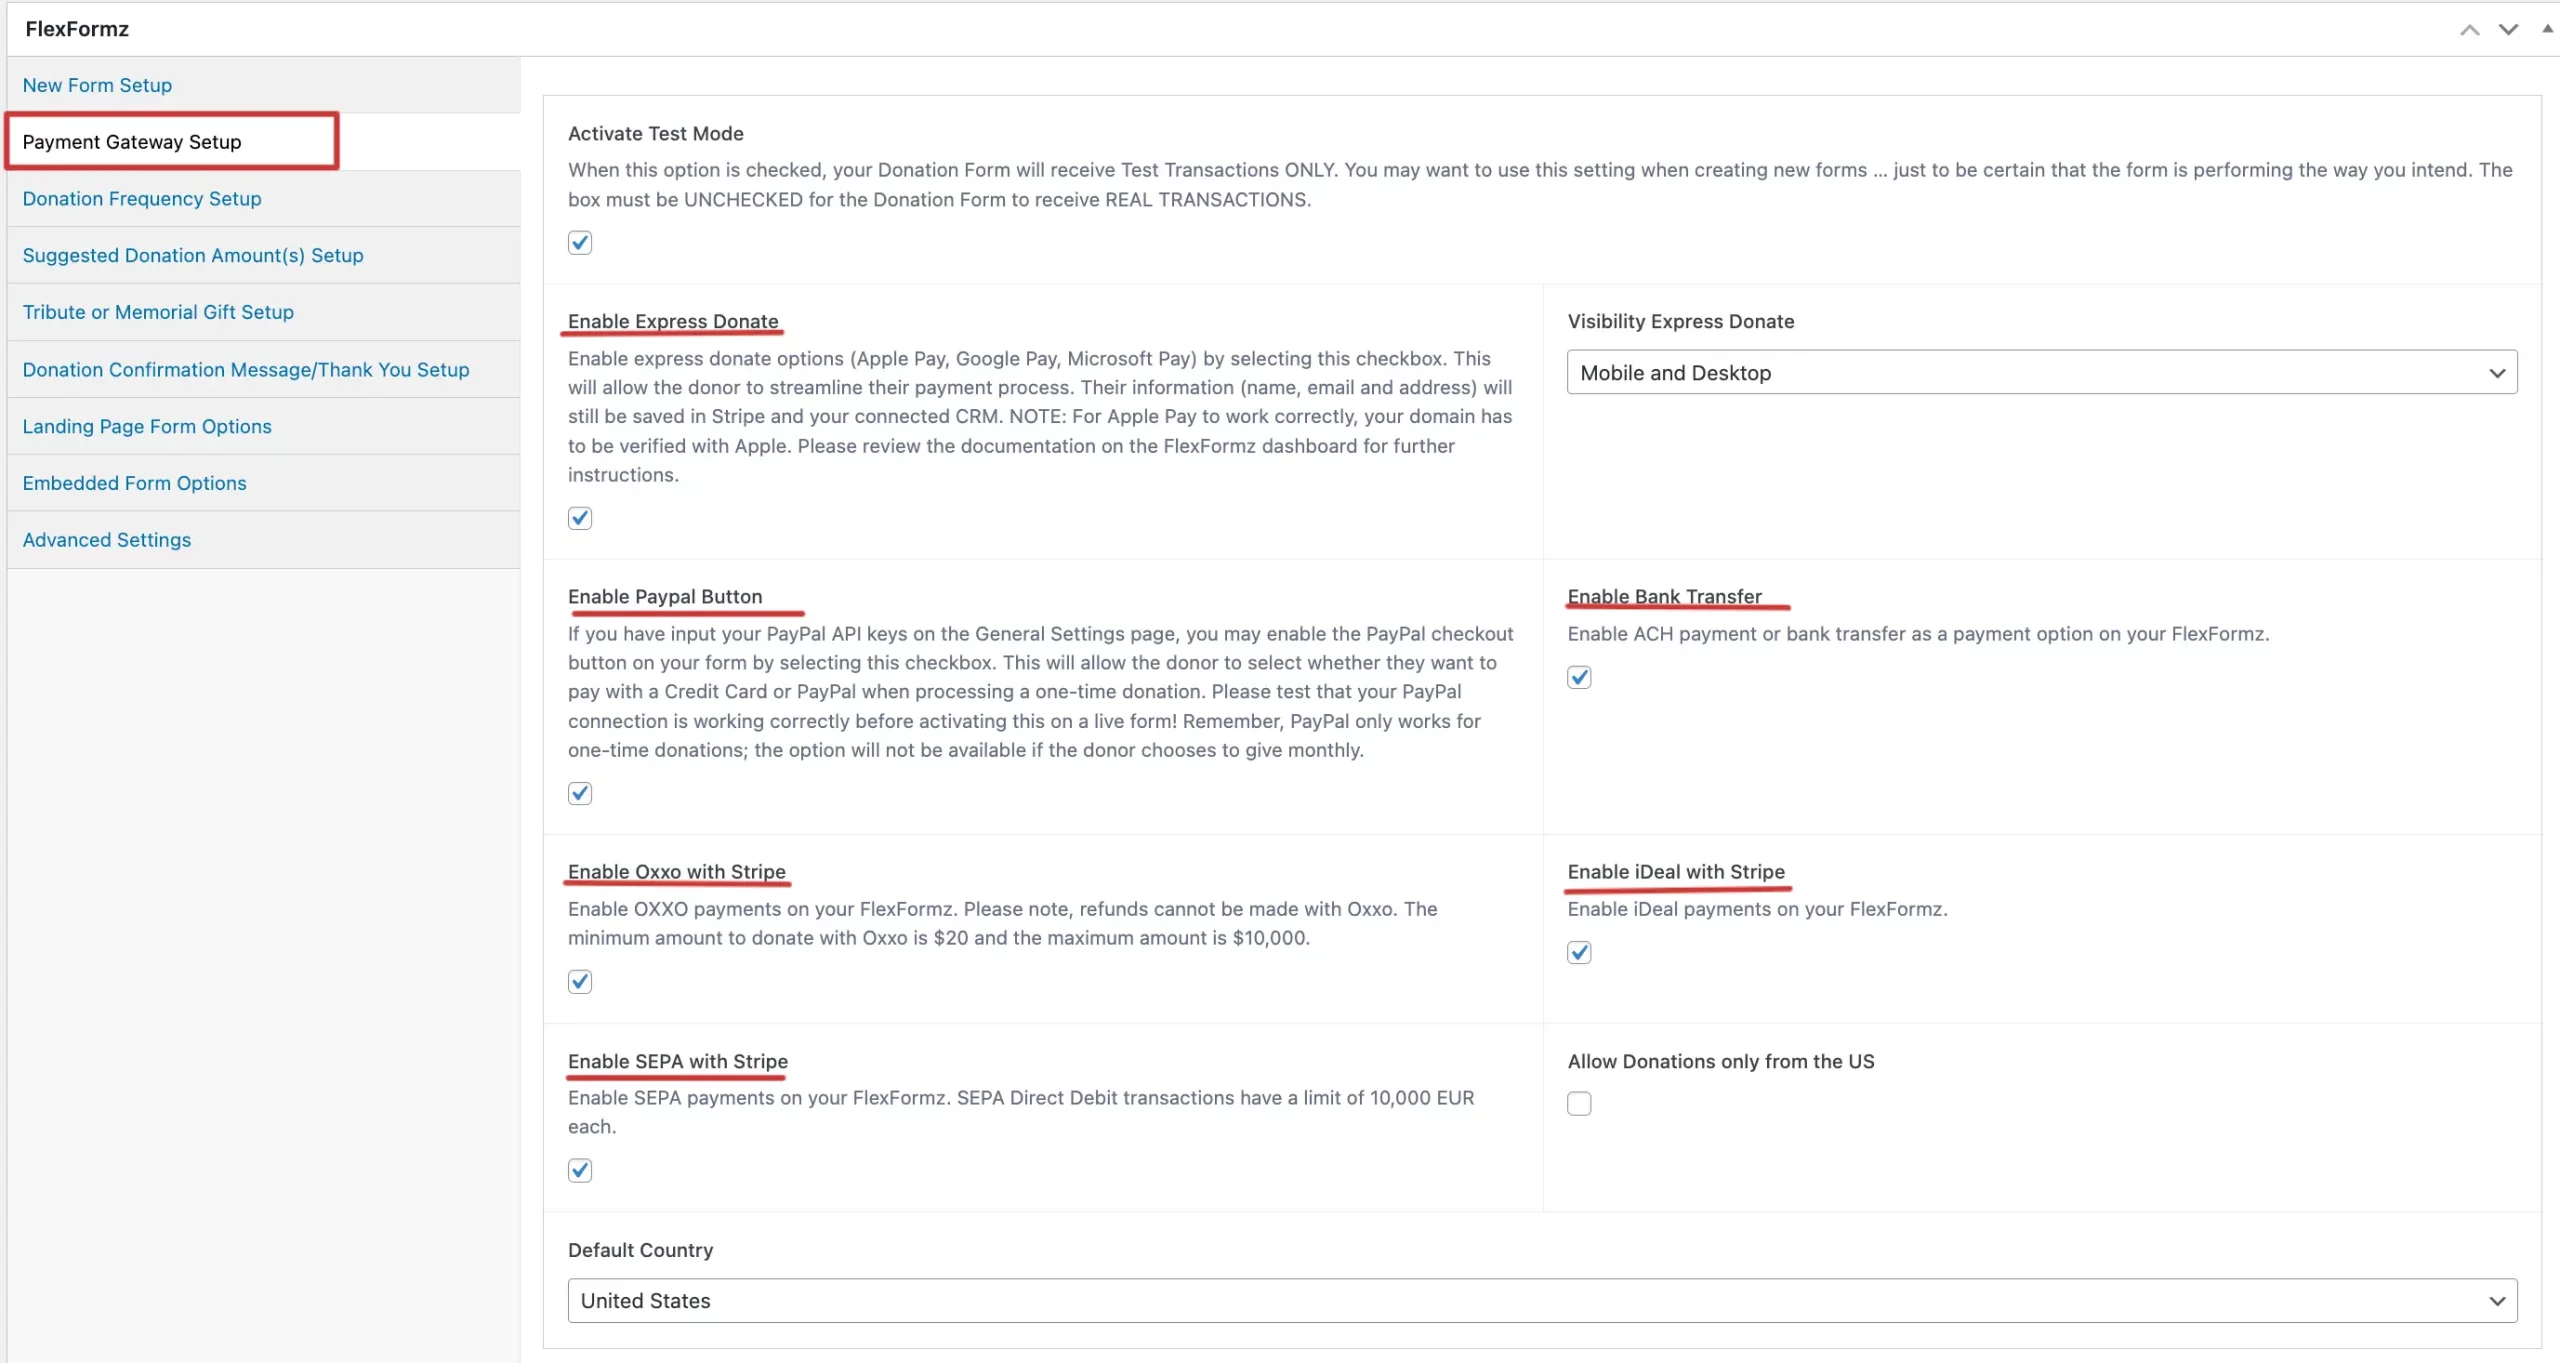
Credit Card Fees
How to activate the option for the donor to cover the Transaction Fees?
Go to the FlexFormz settings inside WordPress and at the bottom of the page, you will see the section Payment Gateway Settings. Check the Credit Card Fees Option Preselected to activate.
If you want to customize the label, insert your desired copy on the Transaction Fee Label.

Fill out the percentages and fix fees with the rates that you currently pay as well as what payment processors you have activated on your forms.
The last step is to enable this feature on each FlexFormz. Click on “Edit” for the FlexFormz you want to modify.

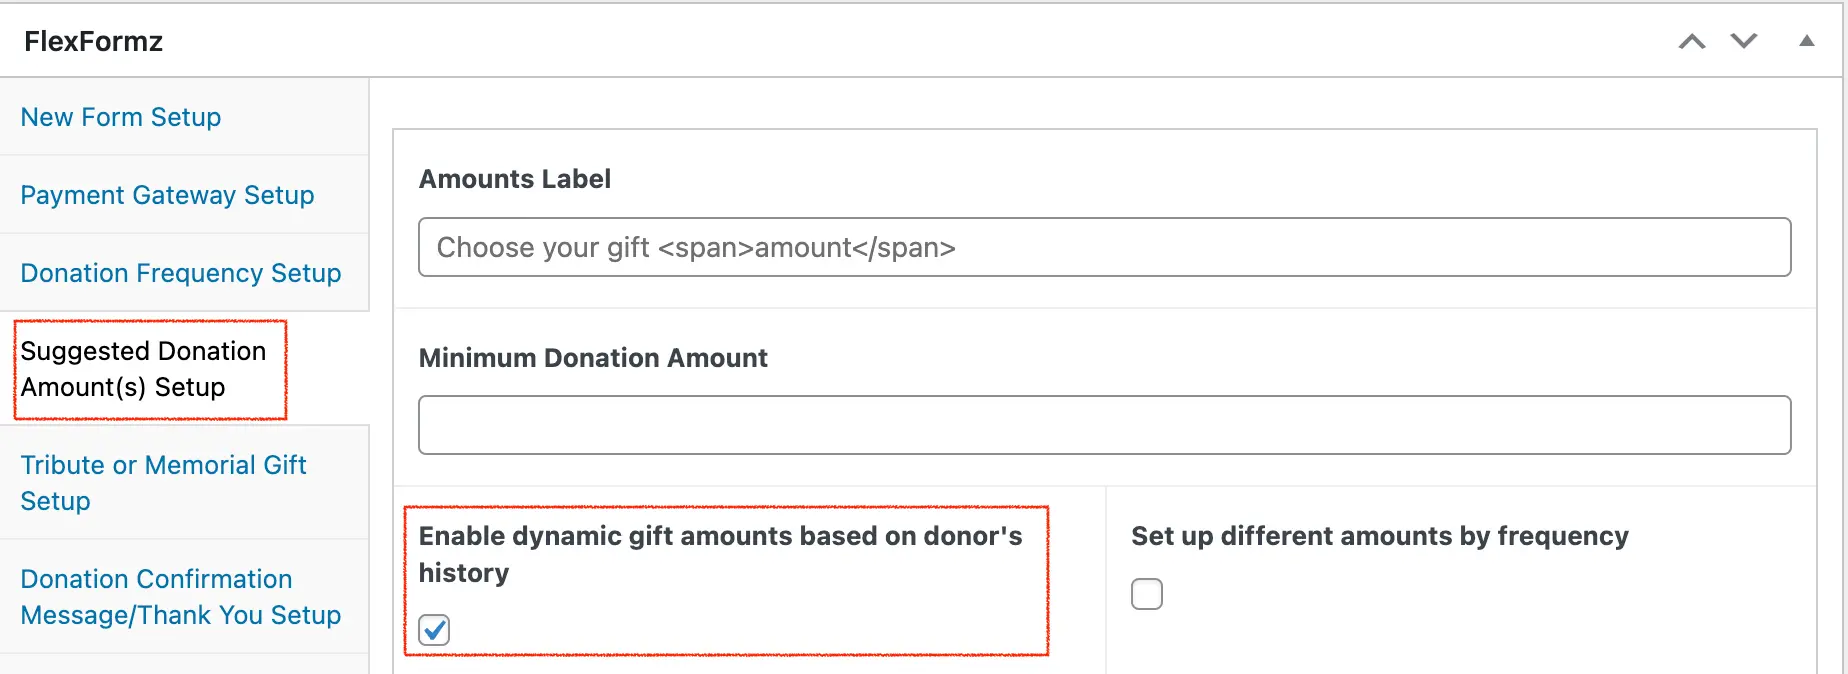
Find the section Suggested Donation Amount(s) Setup and you will see a new field called
Enable transaction fee to be covered by donor. Select this checkbox to activate the option for your donor to cover the transaction fee.
Lightbox Reminder
What is Lightbox Reminder?
A visual reminder for donors that intended to donate but did not finish their transaction. The donor can easily restart the donation process again by clicking on the Lightbox.
Is the Lightbox Reminder shown on full-page donation forms?
No, the lightbox reminder is hidden for one-step and two-step full-page forms.
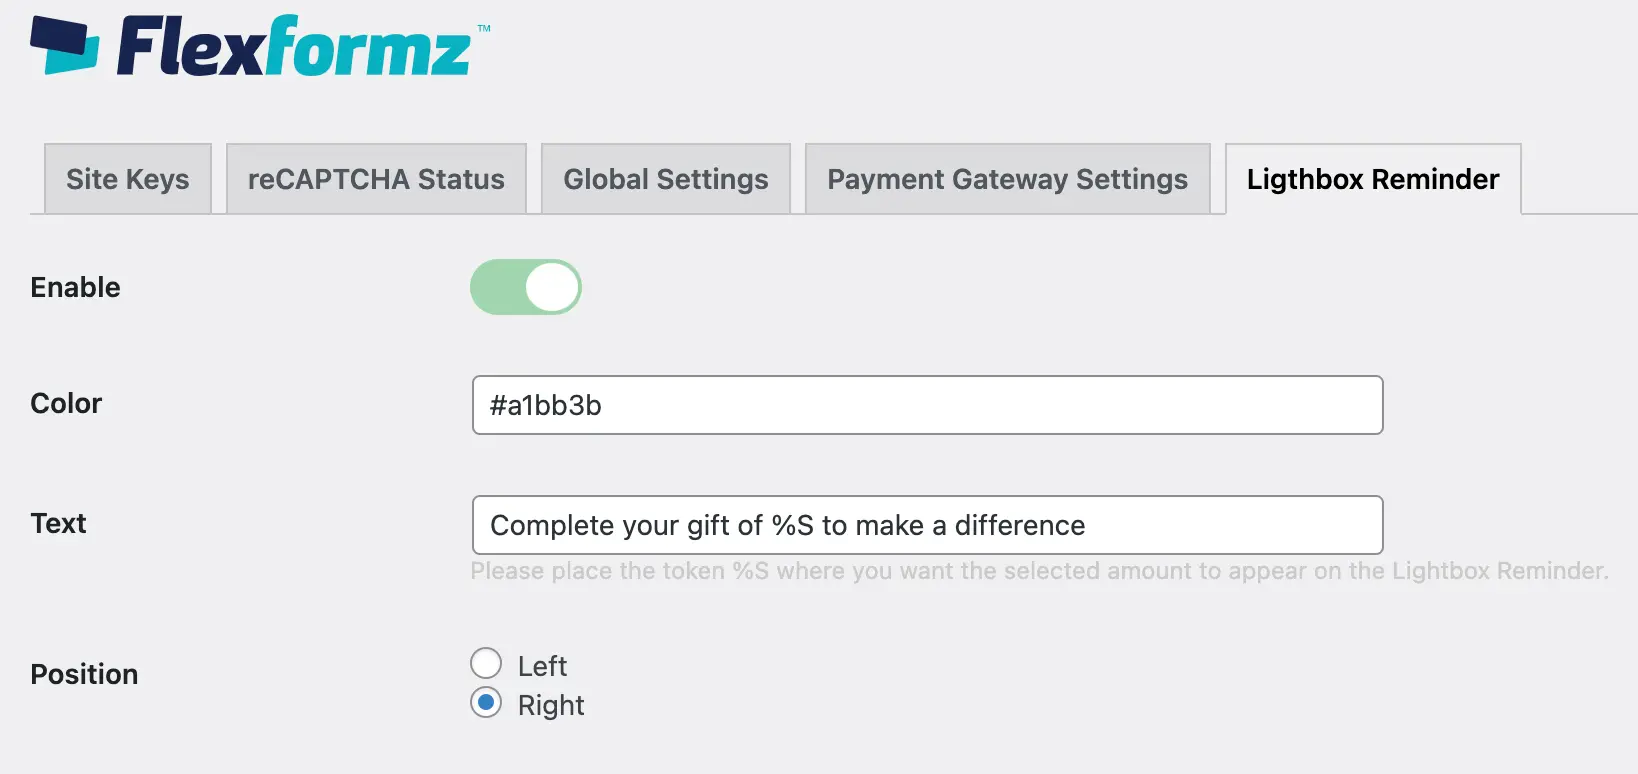
How do I activate the Lightbox Reminder?
Go to the FlexFormz Settings.
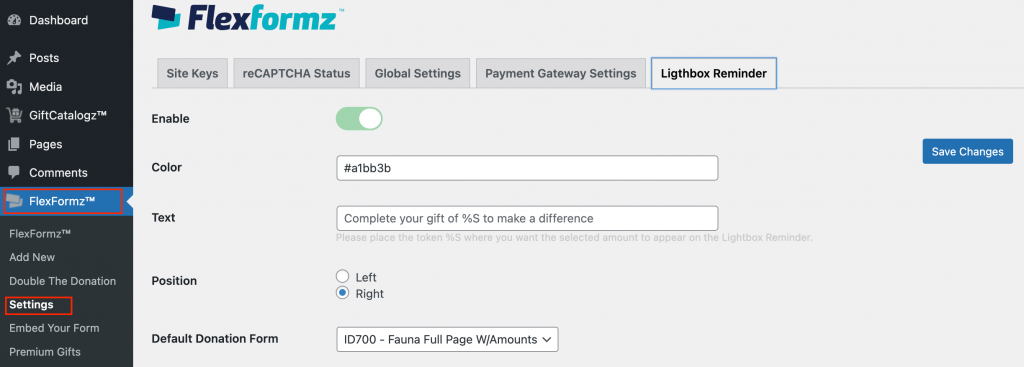
You will find a tab with the title “Lightbox Reminder”:
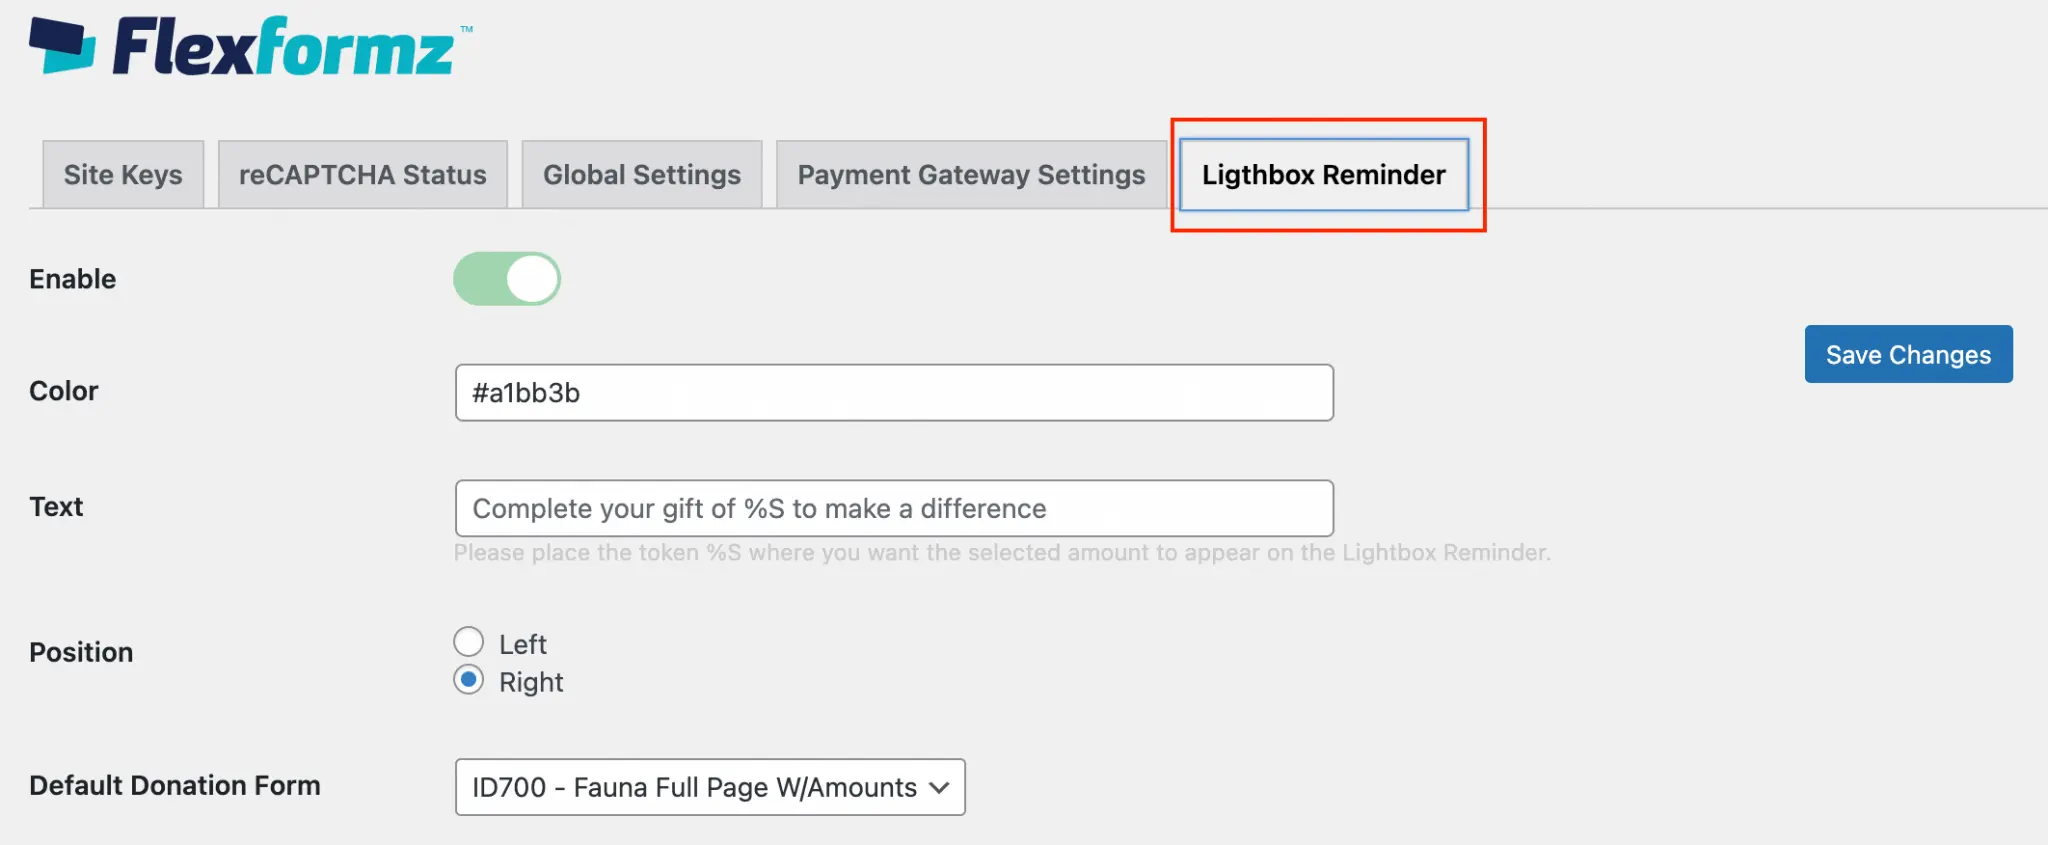
The Lightbox Reminder is disabled by default. Enable it to activate this feature on your website.

You can choose the background color of the lightbox reminder.

The default text is “Complete your gift of %S to make a difference”. If you change the text on this field, do not forget to use the token %S to display the amount that the user had originally selected.


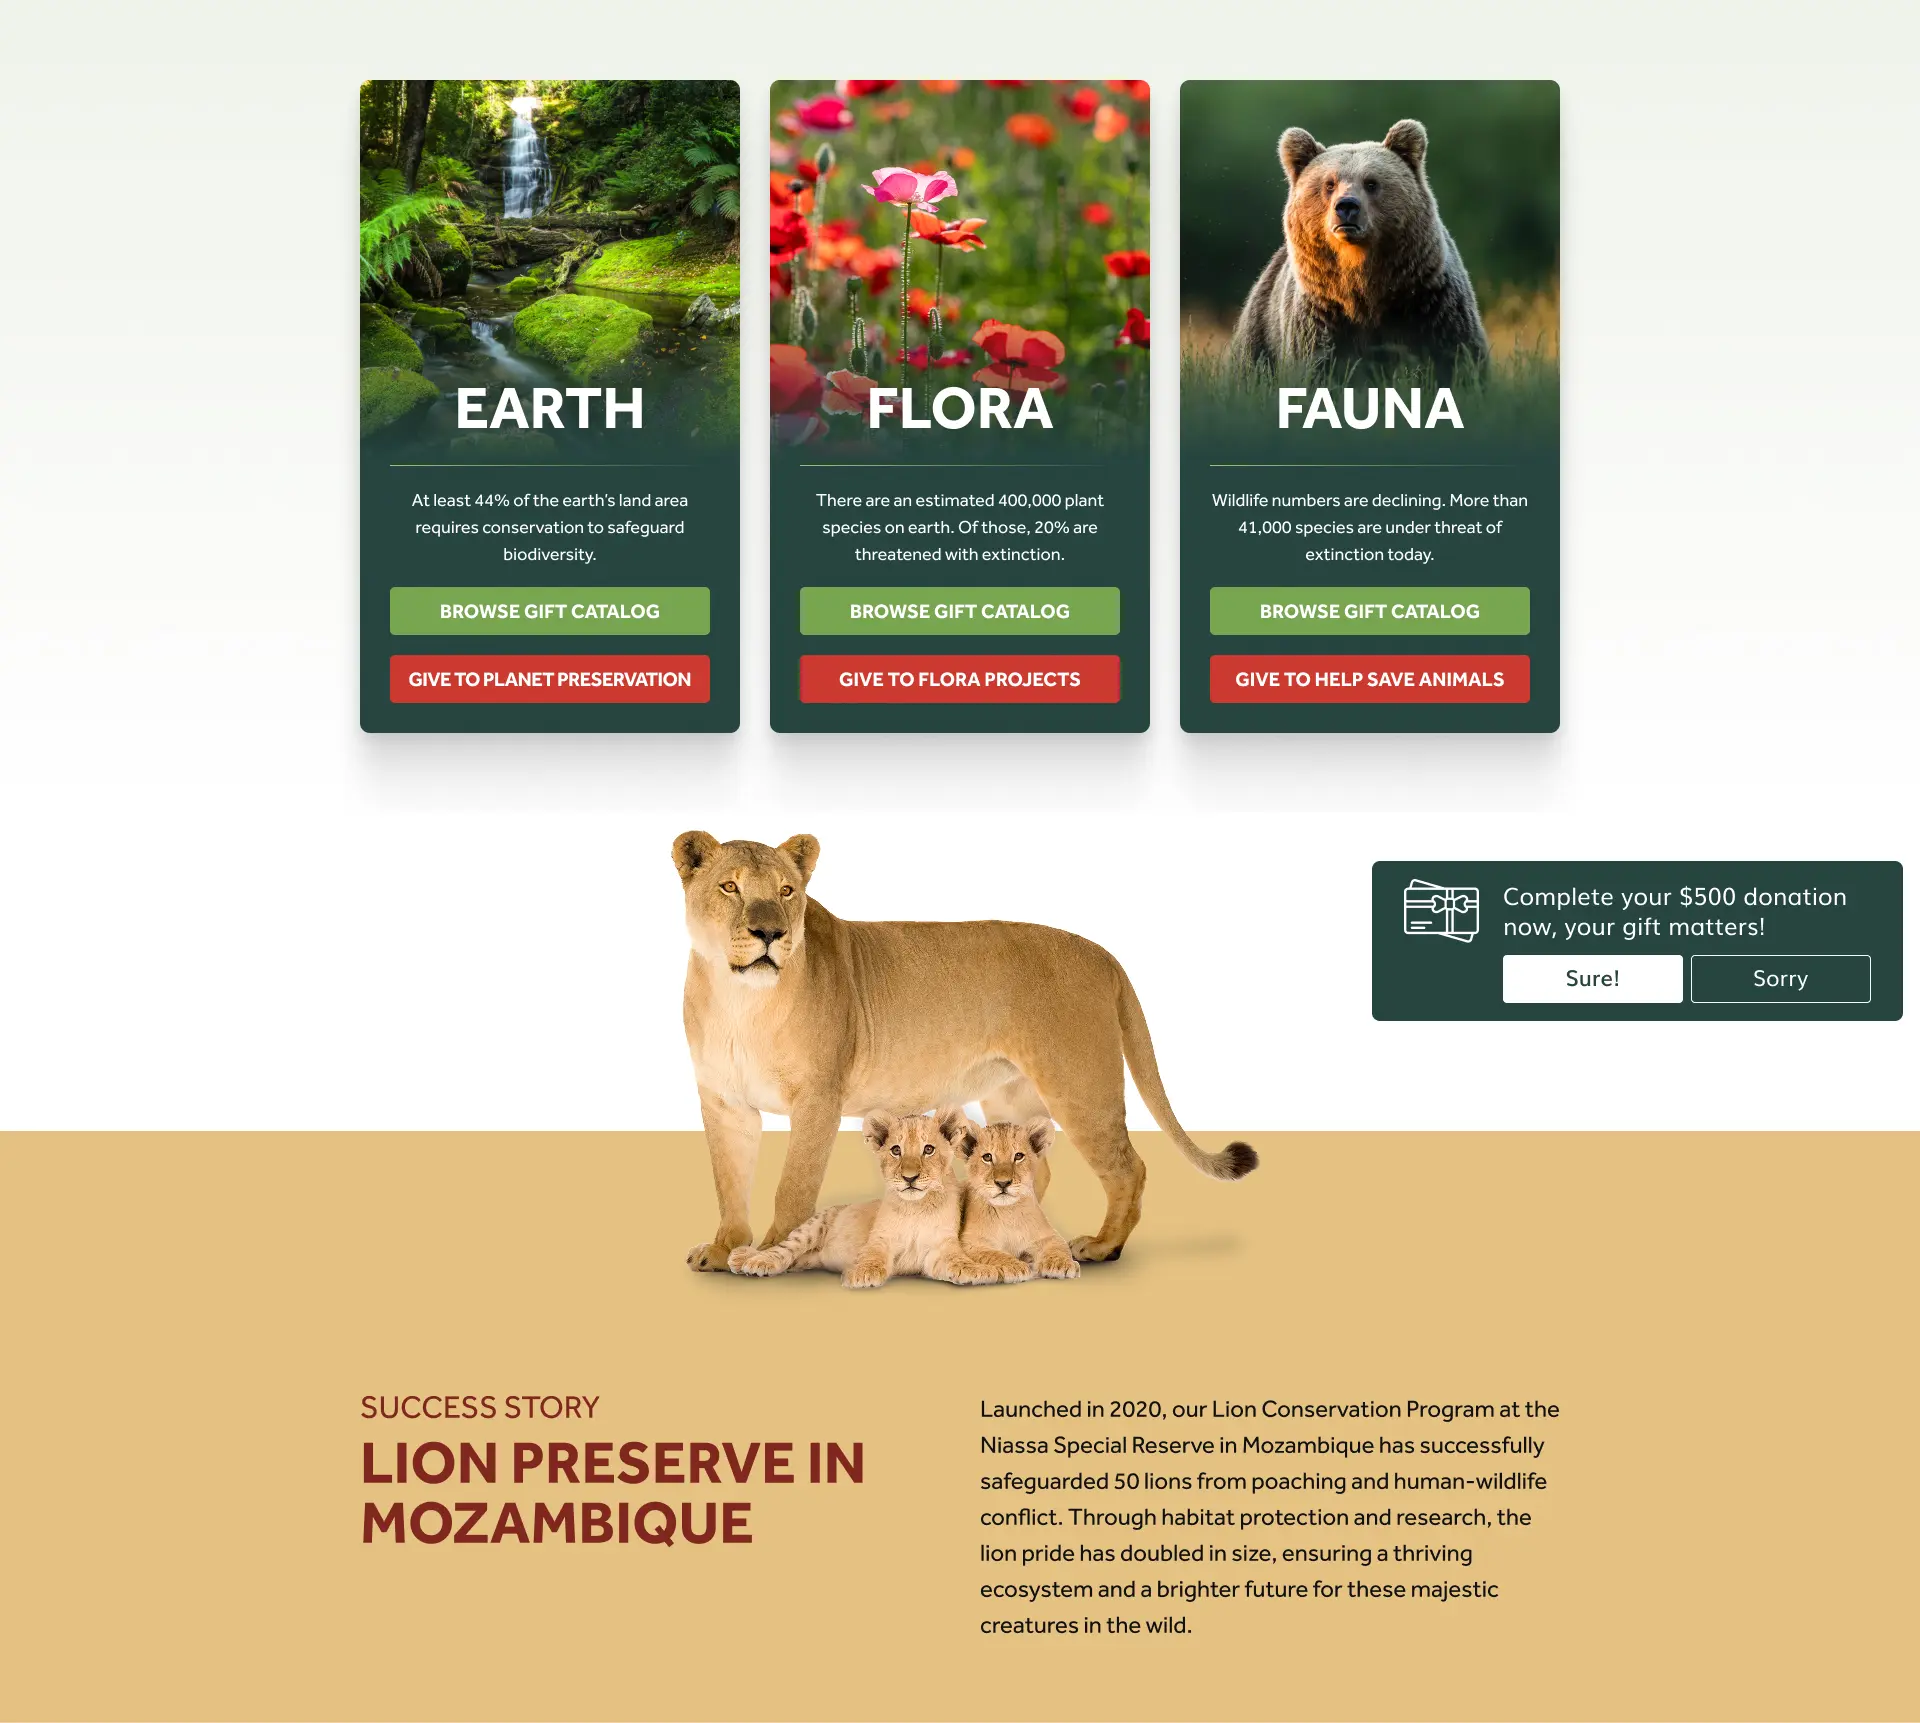
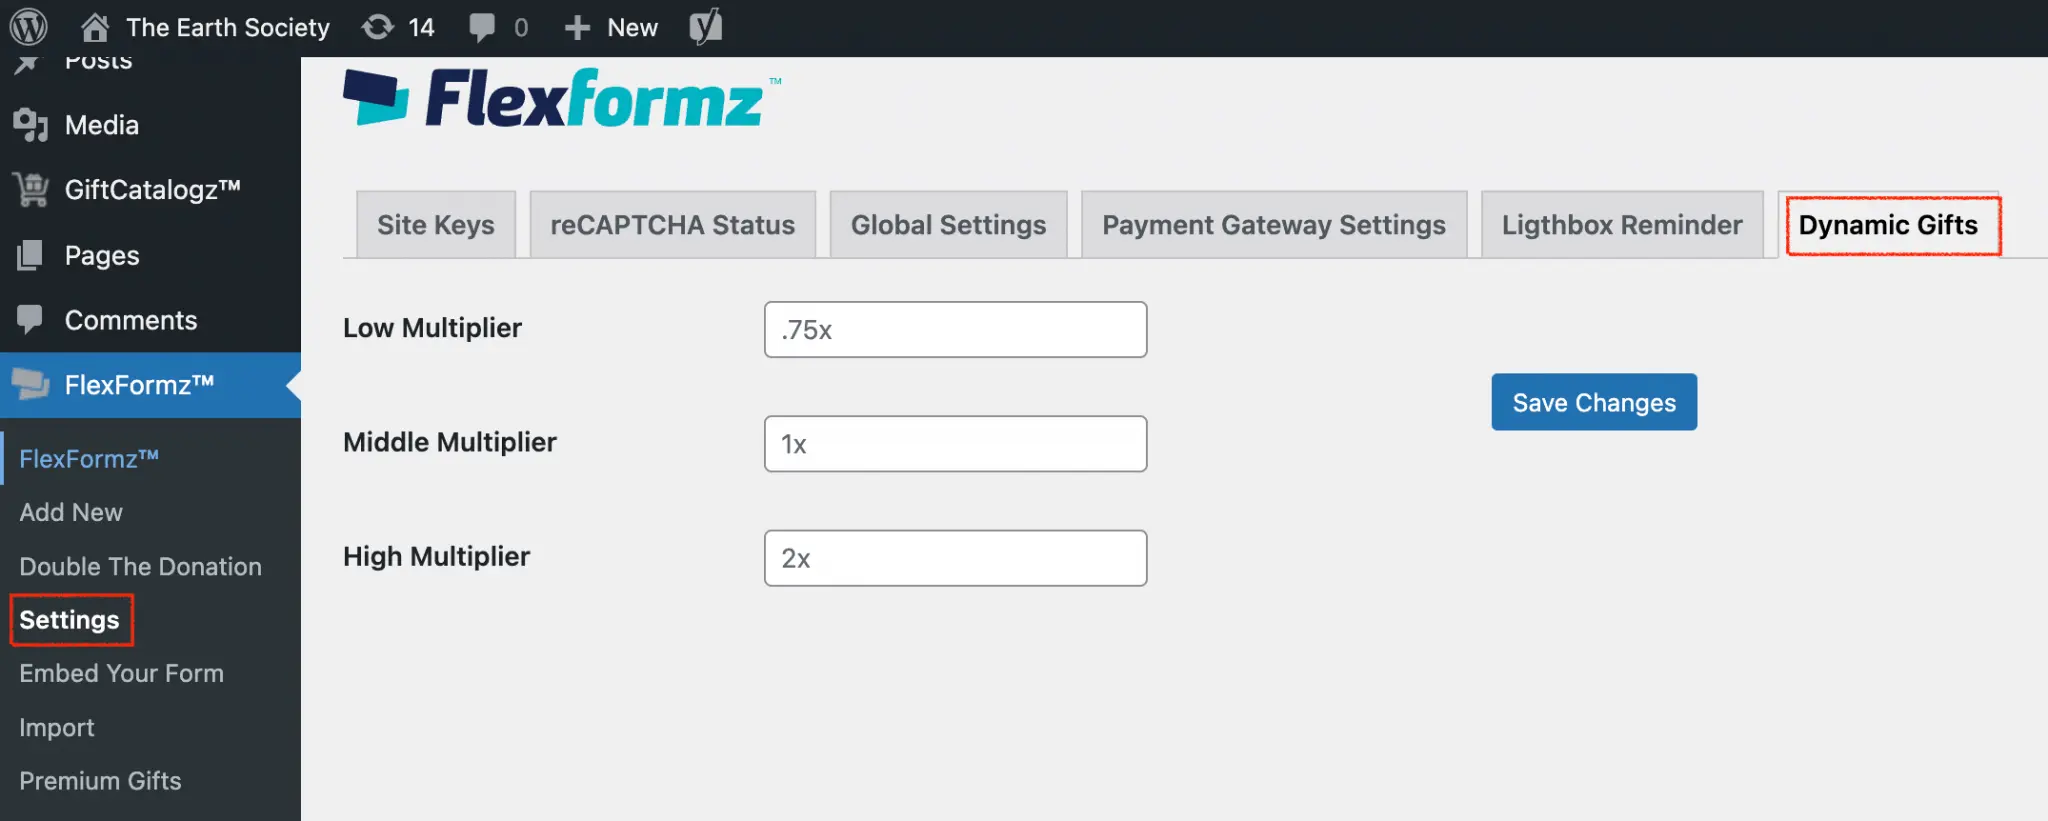
Dynamic Gift Arrays
Gift arrays are almost entirely unique to the nonprofit world—and they’re a great opportunity to offer your donor suggested gift amounts.
Importantly, custom amounts can be displayed based on a donor’s donation history, but note that it is only available in the full form (2-step, Two columns and Single column). It will calculate the average of the donor’s history, which will be taken as a base to use with the multipliers configurable in the general settings of FlexFormz.
There are three multipliers that already have a predefined value and can be edited according to your needs.
- Lower amount: 75% of the current average amount
- Pre-selected amount: the average amount
- Higher amount: 200% of the current average amount
Conditions of using Dynamic Gift Arrays
If the value of the average is greater than $25 or less than $1000, you will see the dynamic amounts in the donation form.
In case the average is over $1000 the open field will be shown in the donation form.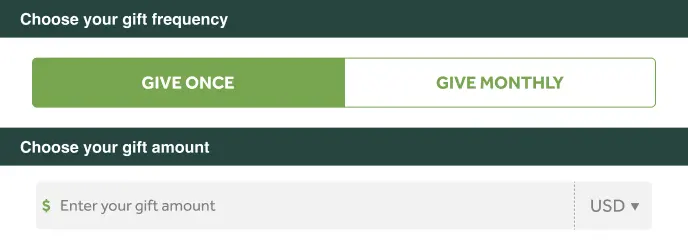
If the average is less than $25 you will see the amounts set in the donation form.

Visit the Suggested Donation Amount(s) Setup section to enable or disable the Dynamic Gift Arrays per form.
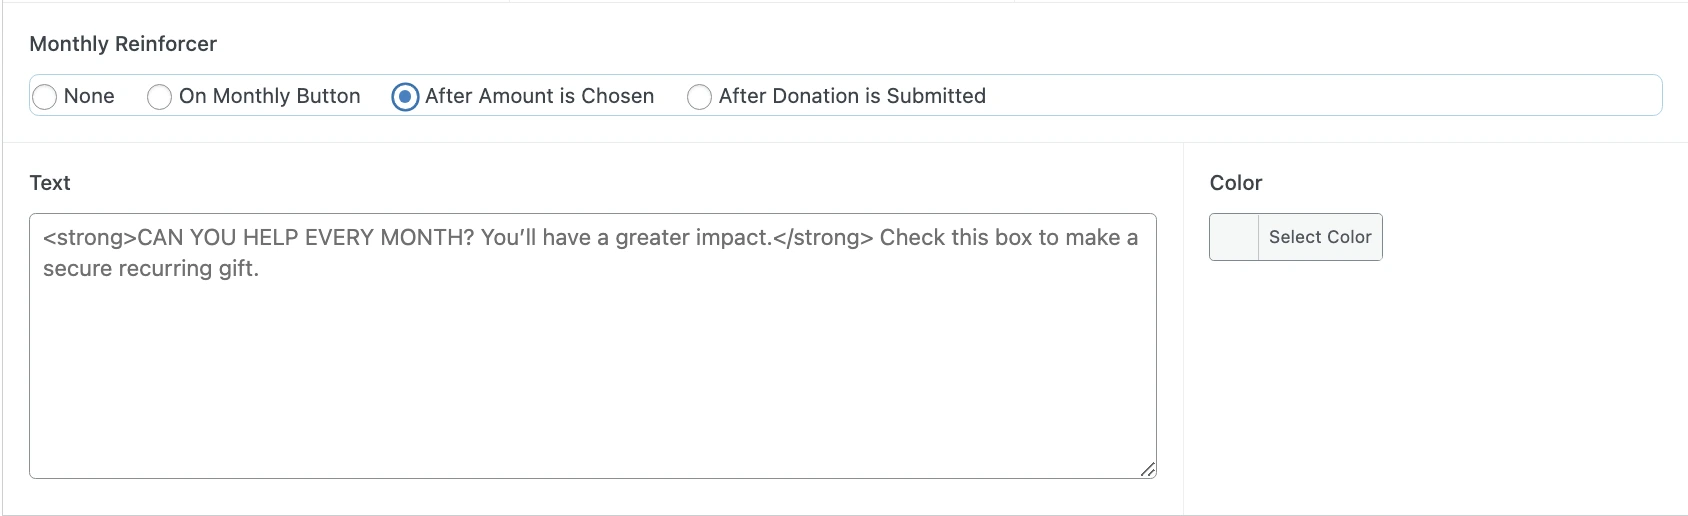
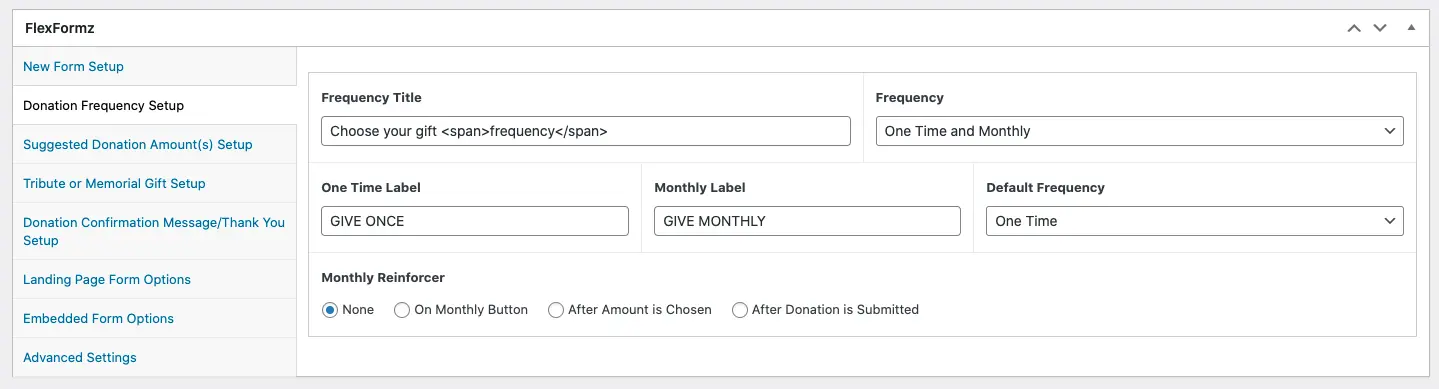
Monthly Reinforcer
Monthly Reinforcer The Monthly Reinforcer is a feature designed to encourage donors who have selected a one-time donation to consider switching to a monthly donation. Configuration This option is available in the Donation Frequency Setup under Monthly Reinforcer.  The available placements you can choose from are:
- On Monthly Button
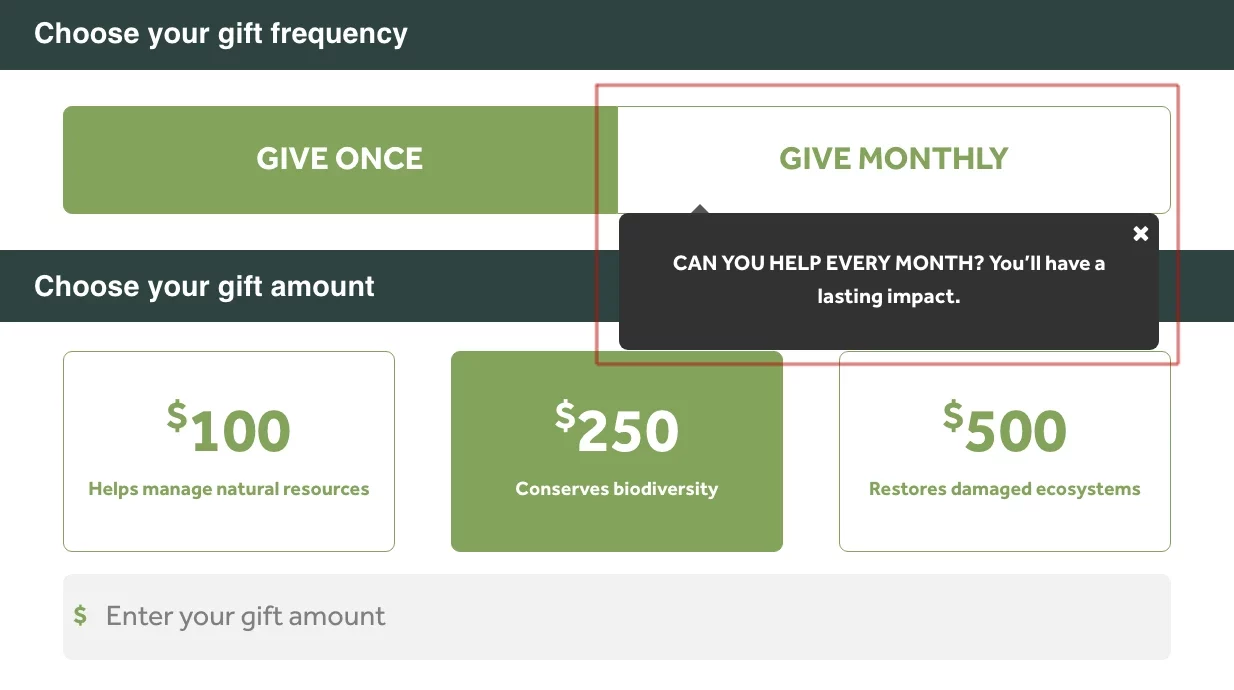
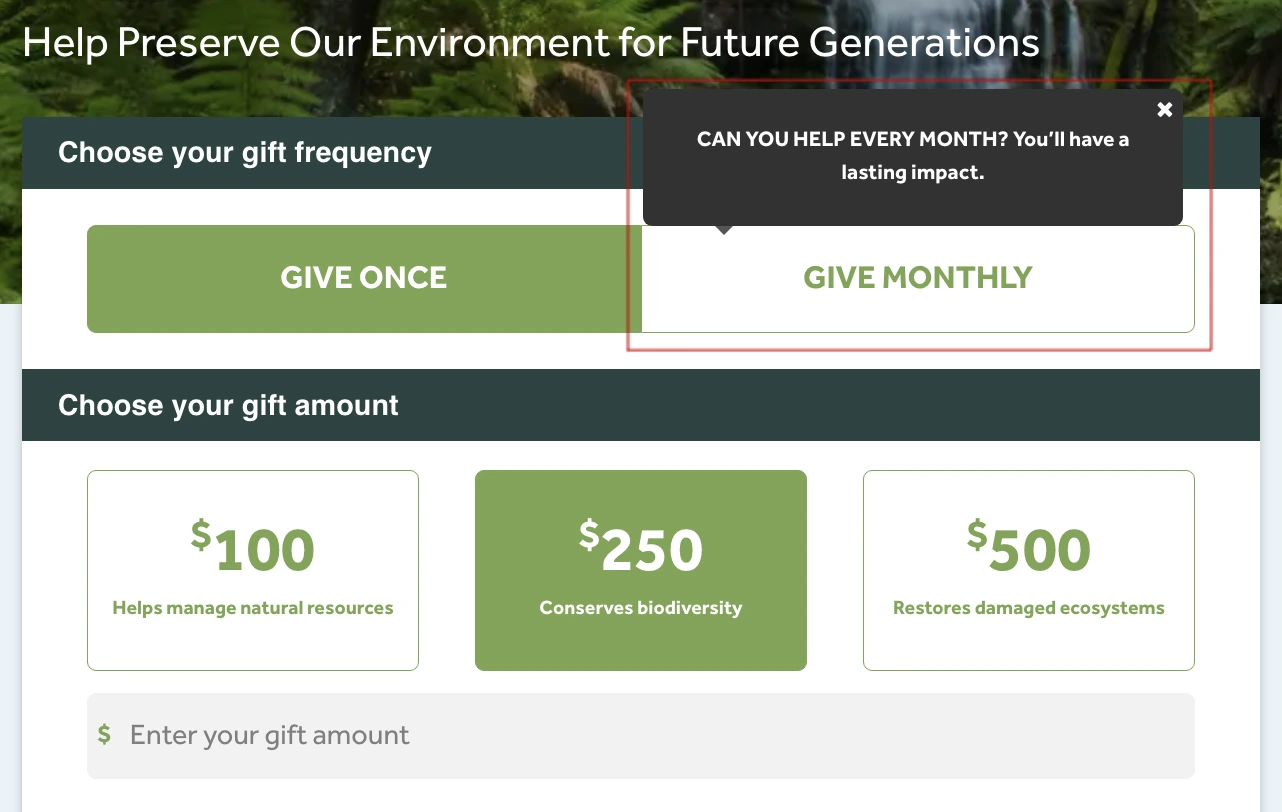
- Default title: “CAN YOU HELP EVERY MONTH? You’ll have a lasting impact.”
- The title is customizable.
- Can be displayed at the top or bottom of the monthly button.

-
- After Amount is Chosen
- After Amount is Chosen
- Default title: “CAN YOU HELP EVERY MONTH? You’ll have a lasting impact.”
- The title is customizable.
- Both the supporting text and the color of the containing box are customizable.
-
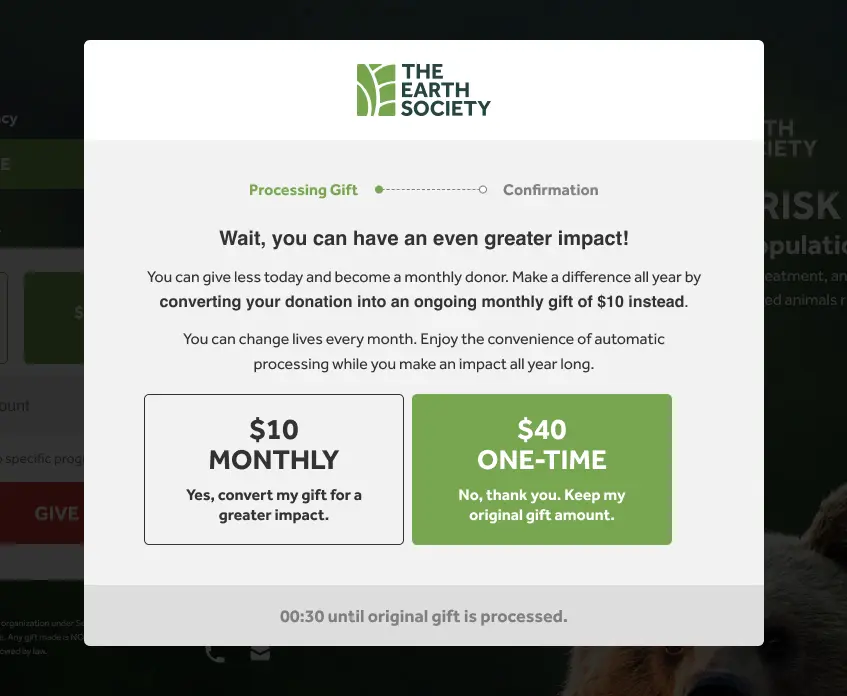
After Donation is Submitted
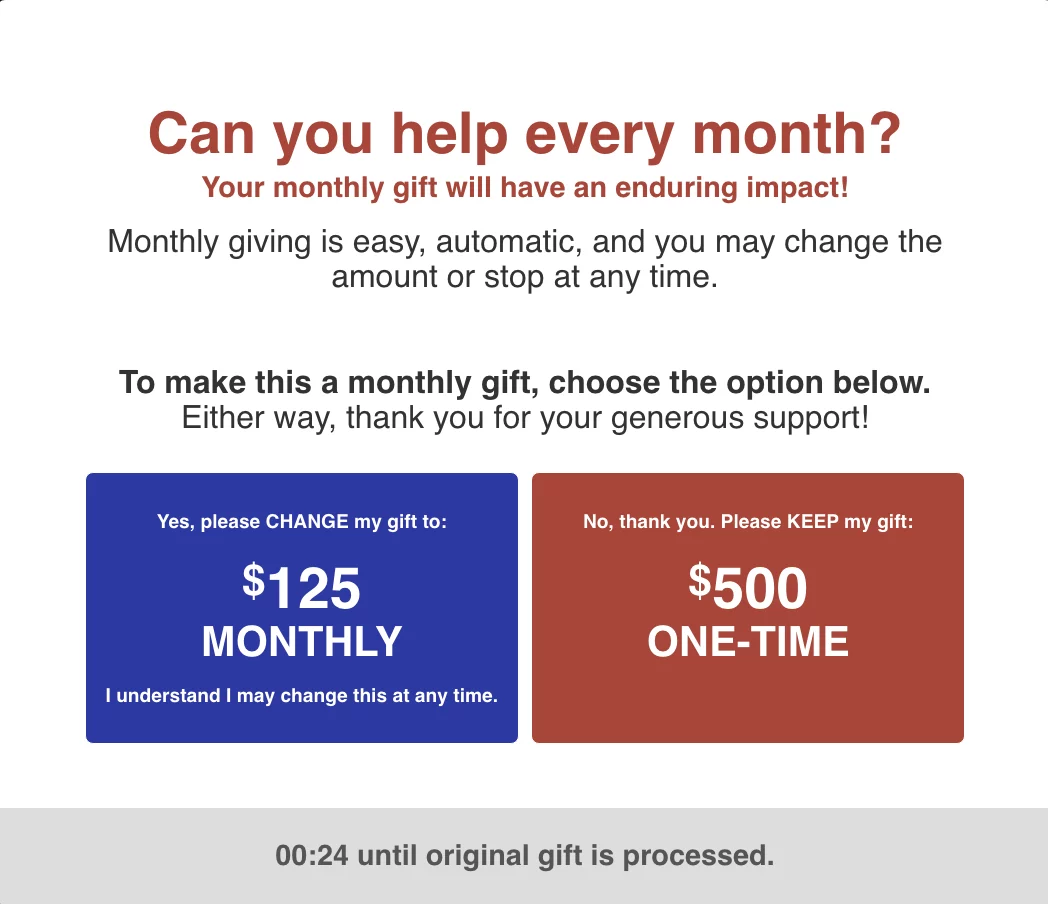
- The lightbox text is also customizable.
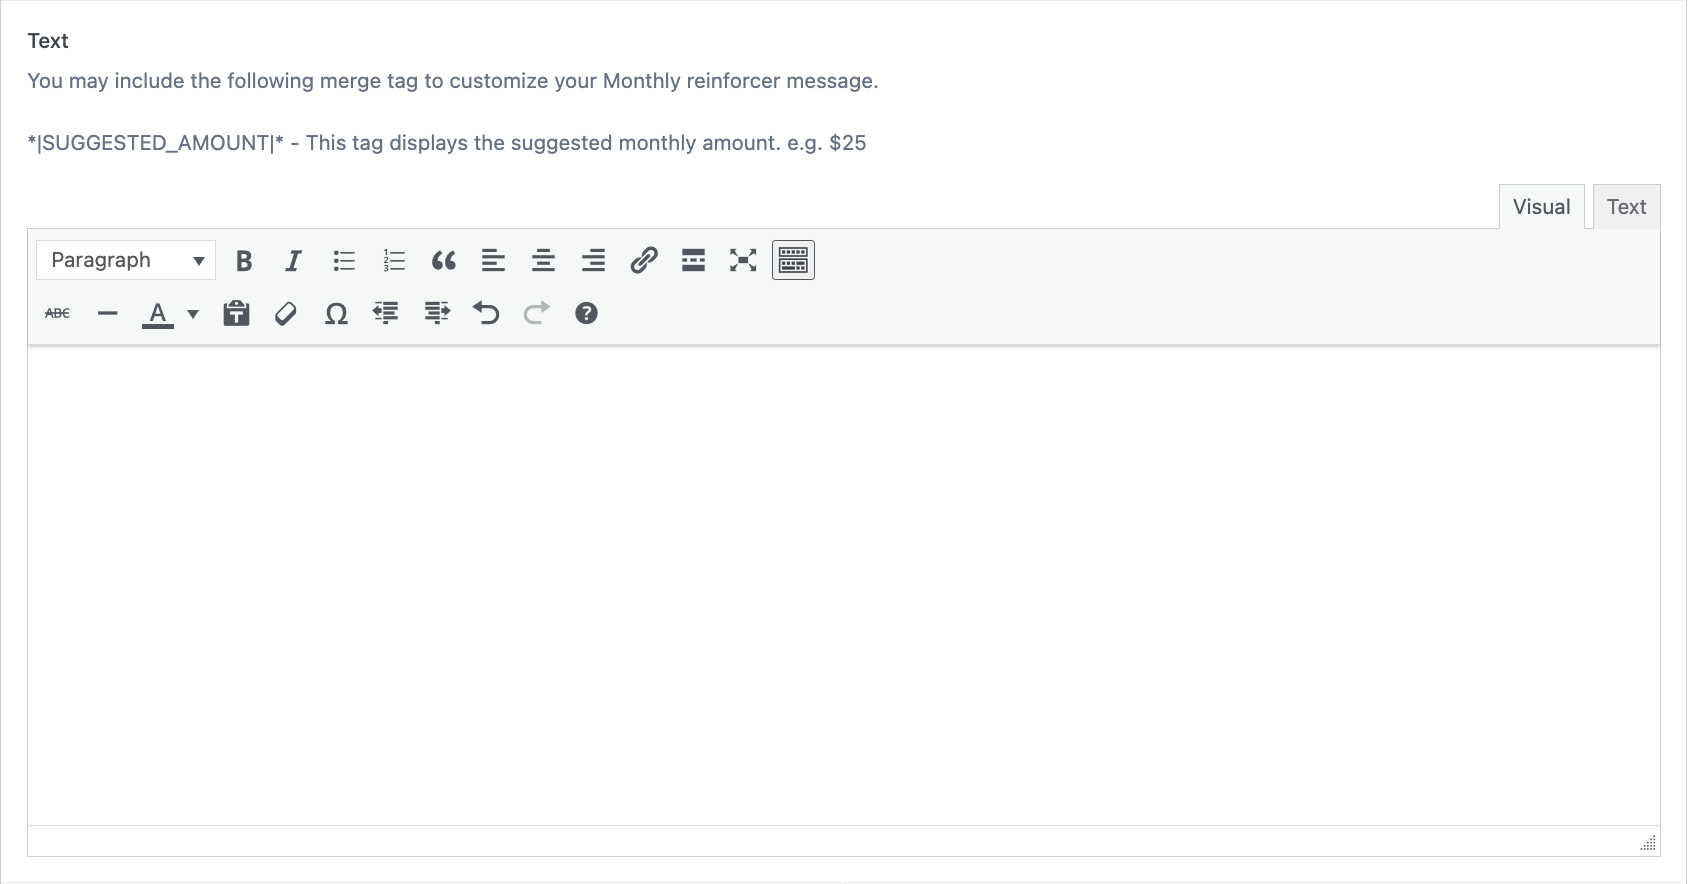
- When customizing the text, you can include the merge tag *|SUGGESTED_AMOUNT|*. This tag displays the suggested monthly amount.
- Before the donation is finalized, the donor is offered the option to change their one-time donation into a monthly donation.
- Two buttons are displayed on a lightbox:
- Keep one-time donation
- Switch to monthly donation (with suggested amount)
- Both the button text and button colors are customizable.
- The lightbox text is also customizable.
- When customizing the text, you can include the merge tag *|SUGGESTED_AMOUNT|*. This tag displays the suggested monthly amount.
Suggested Amount
- By default, the suggested monthly donation is 25% of the one-time donation amount, with a maximum cap of $1,000.
- Both the percentage and the maximum cap are customizable.

- This Monthly Reinforcer lightbox appears only for donations equal to or above $25 USD.
- It will not be shown if the donation includes a premium gift.
- If you are not using the FlexFormz Premium Gift add-on, this restriction does not apply.
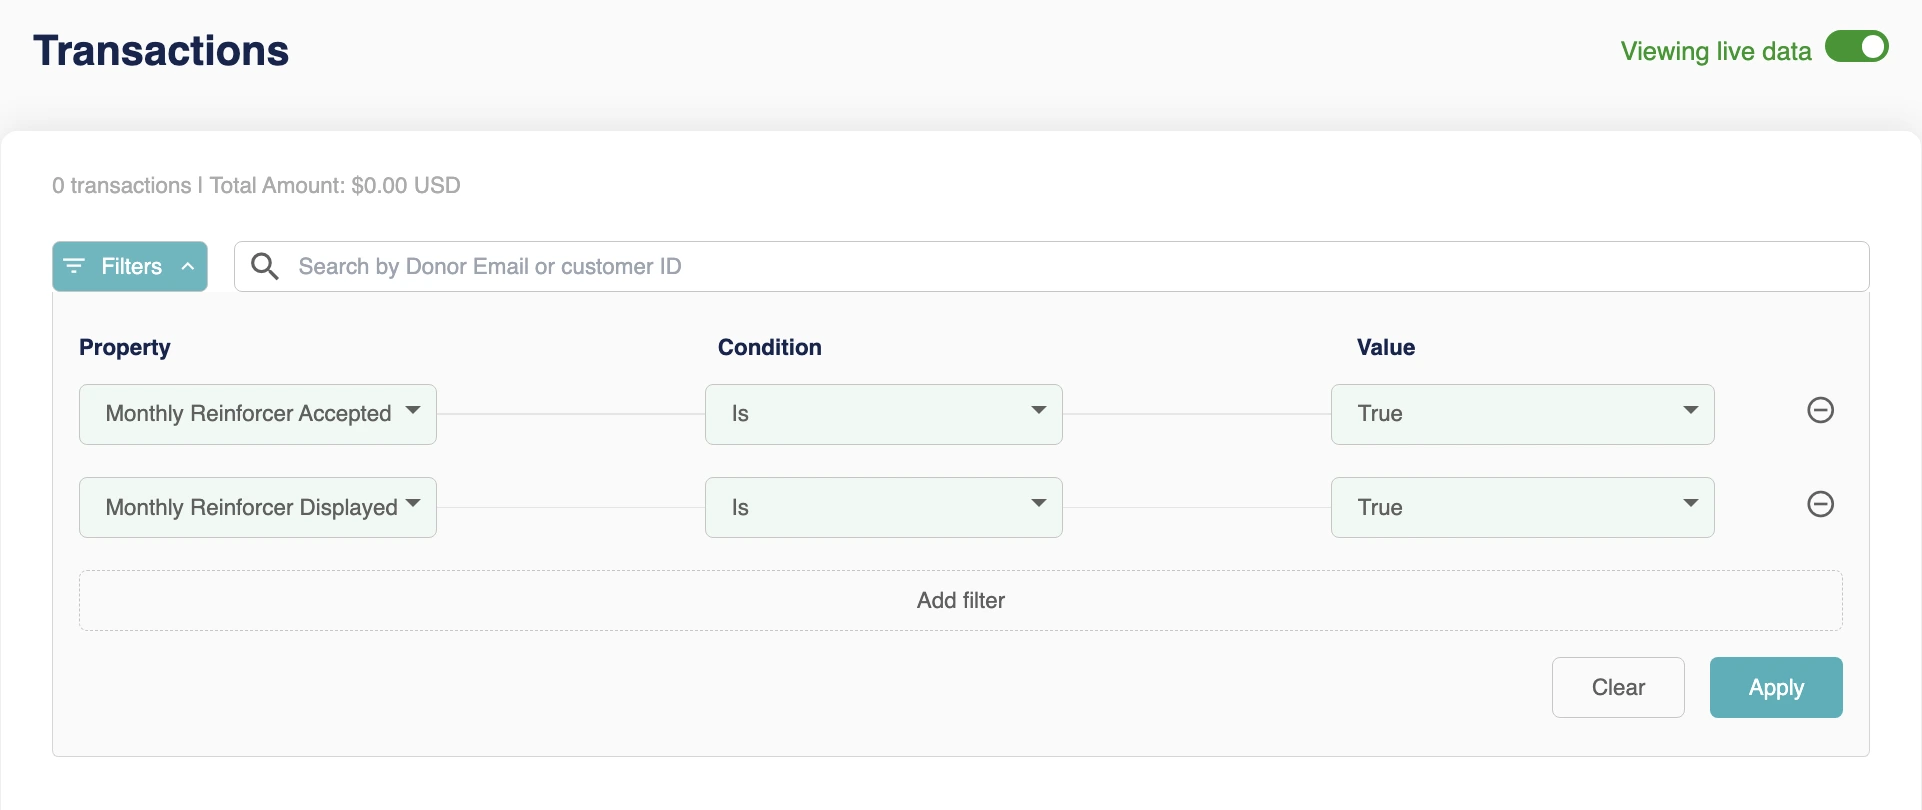
Tracking & Reporting When this option of Monthly Reinforcer is activated, its performance can be tracked in Dashboard > Transactions using the filters:
- Monthly Reinforcer Accepted
- Monthly Reinforcer Displayed
Creating FlexFormz
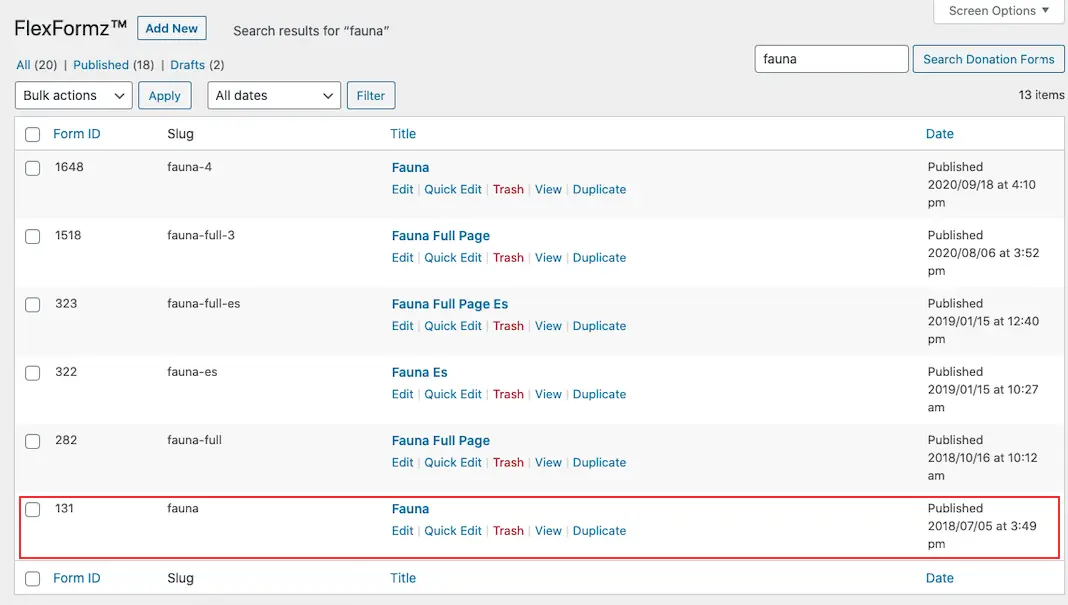
To create a new FlexFormz, access the FlexFormz » Add New menu on the left side of the WordPress dashboard. This will open a new blank form where all the form fields are located. Below we will describe each field in order to help you set your new form properly.
Title [Required]
To start with the creation of the form you need to assign a Title to the form. This will help you to identify the form for future reference. It may be the same as the campaign name (below).
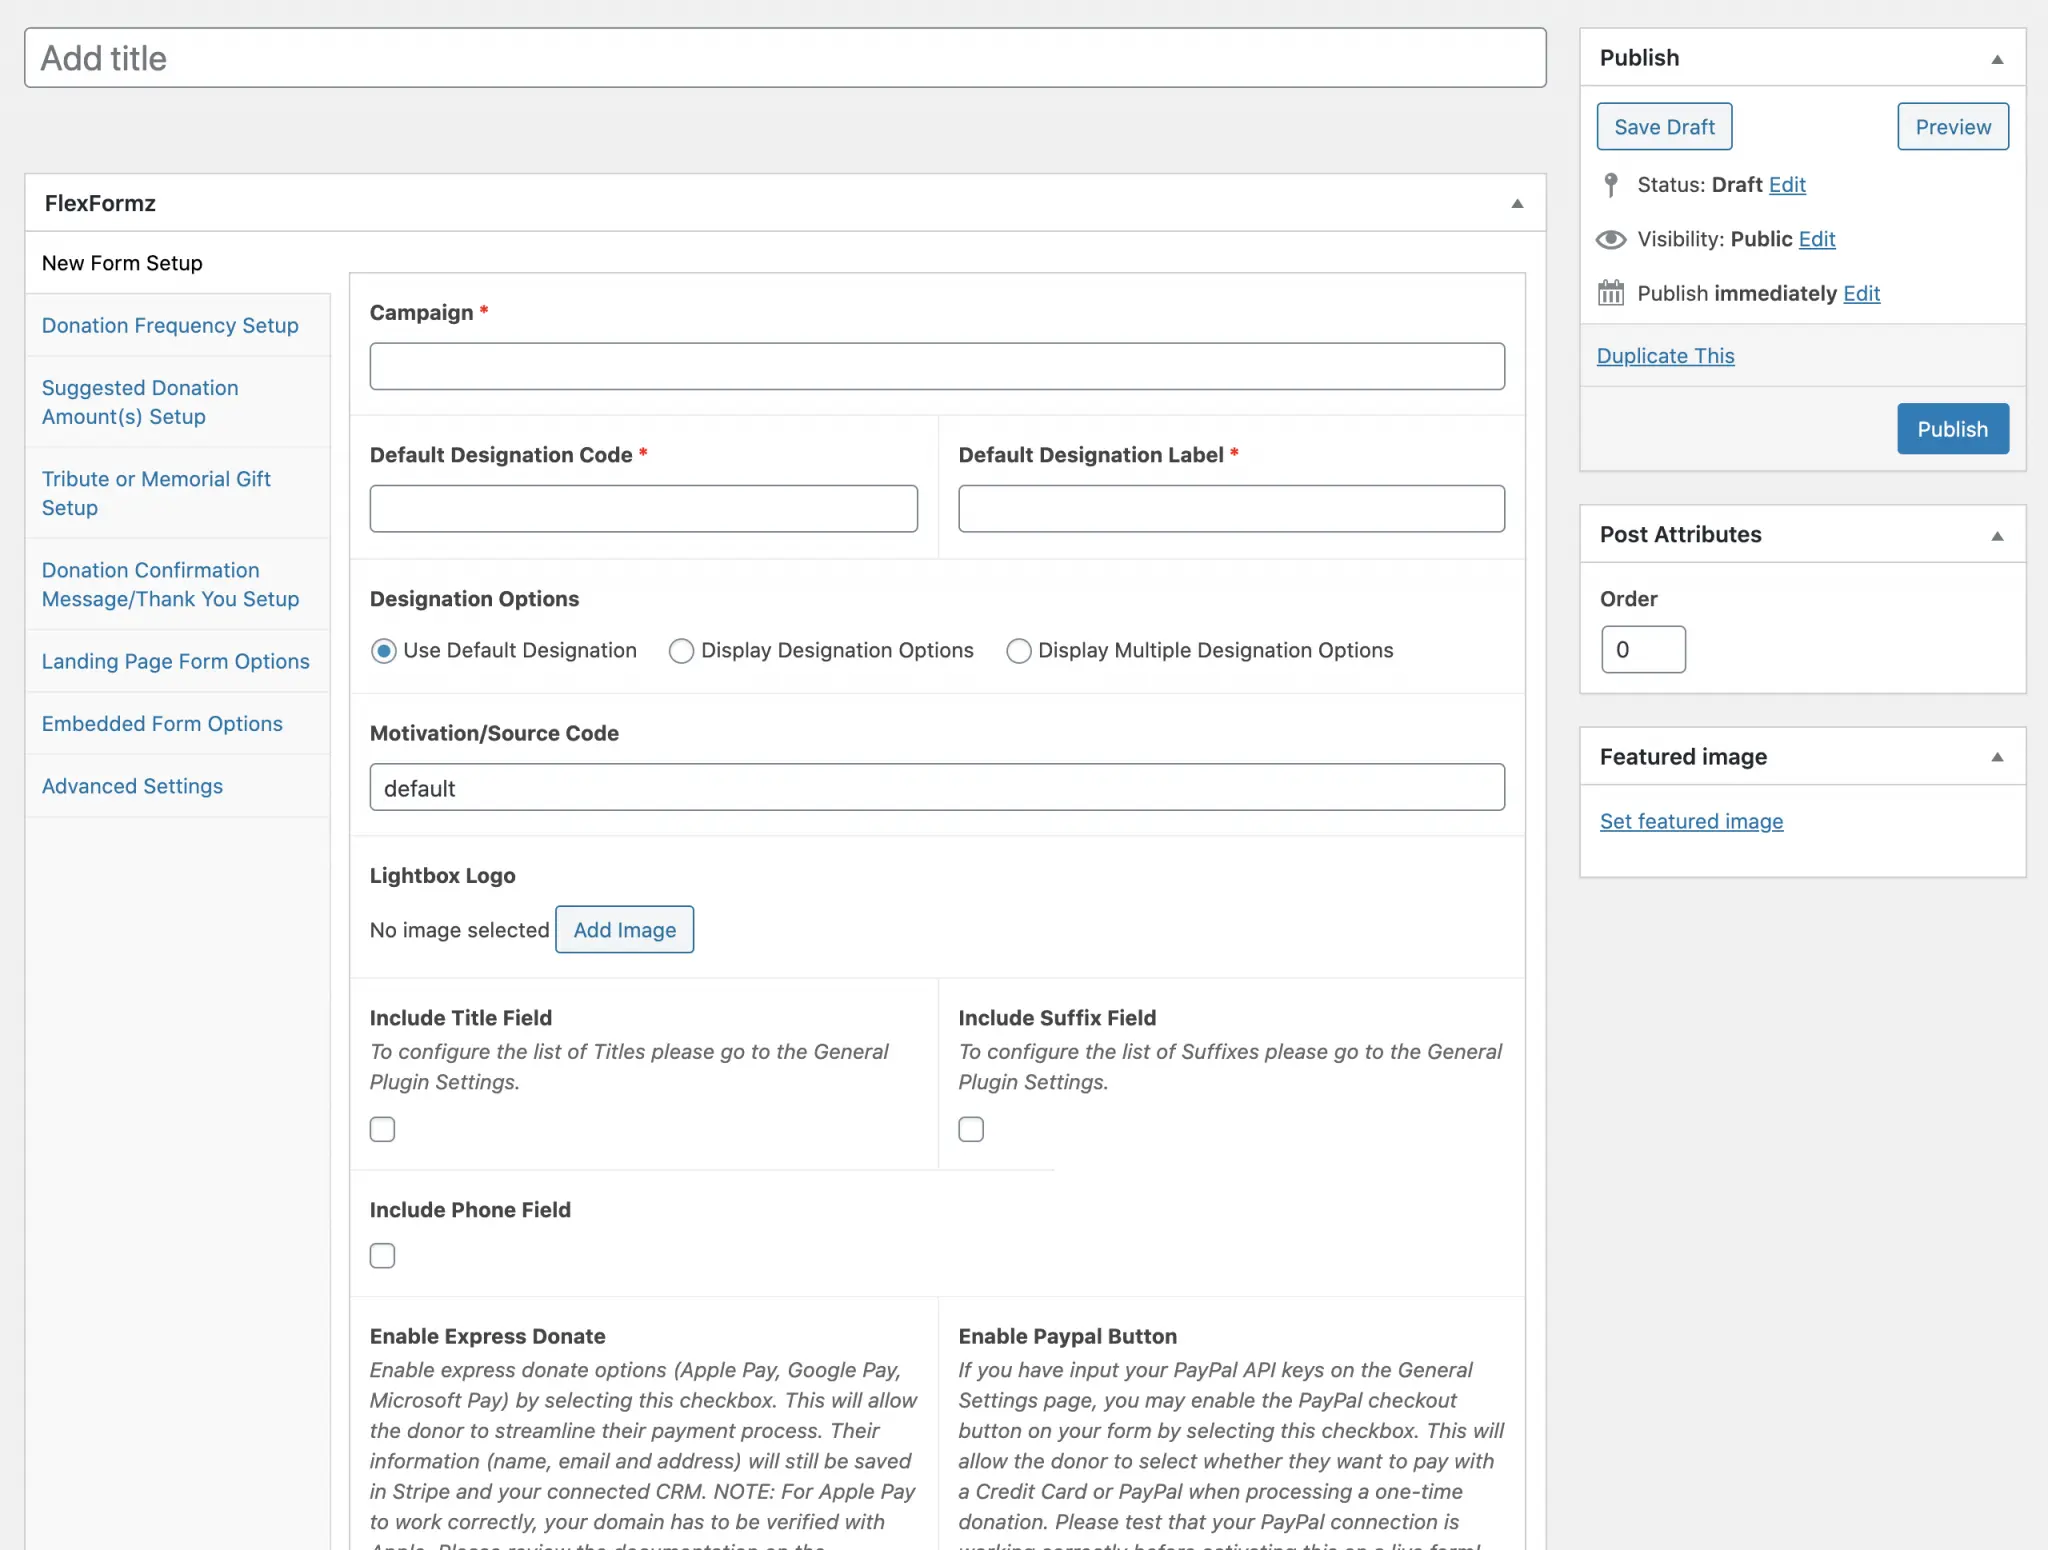
A. Basic Setup
Campaign [Required]
This field, along with the Title, will help to identify the form in WordPress/website and on the FlexFormz dashboard.
Default Designation Code and Default Designation Label [Required]
These fields will pass through to your FlexFormz Dashboard and CRM (if linked) to identify the default fund where the gifts will be designated on this form.

Designation Options
Use default designation
Select this option to let FlexFormz process the donations with the Default Designation Code and Label.

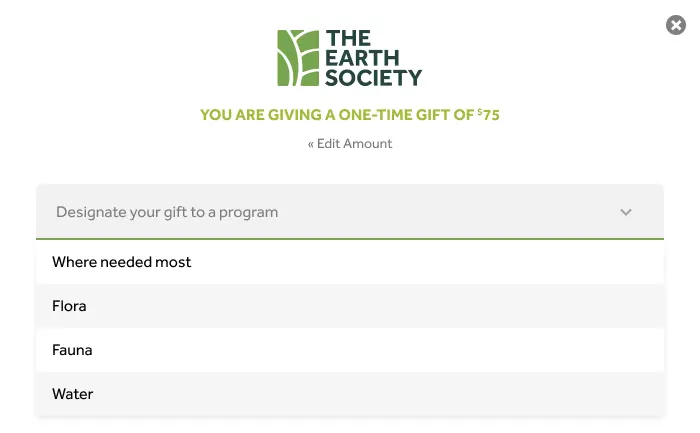
Display Designation Options
Select this option if you want to let the donor choose where they would like their donation to be designated.
Gift Designation Options Label
Insert the title that will appear before your designation dropdown list. Suggested language: “You may designate your gift by choosing from the dropdown list:”
Designation Options
Enter the list of the gift designation options (brief verbal description) that may be selected by the donor in the dropdown. For additional control, you may specify both a code and label in a single row separated by a colon. Each designation needs to be on a separate line.
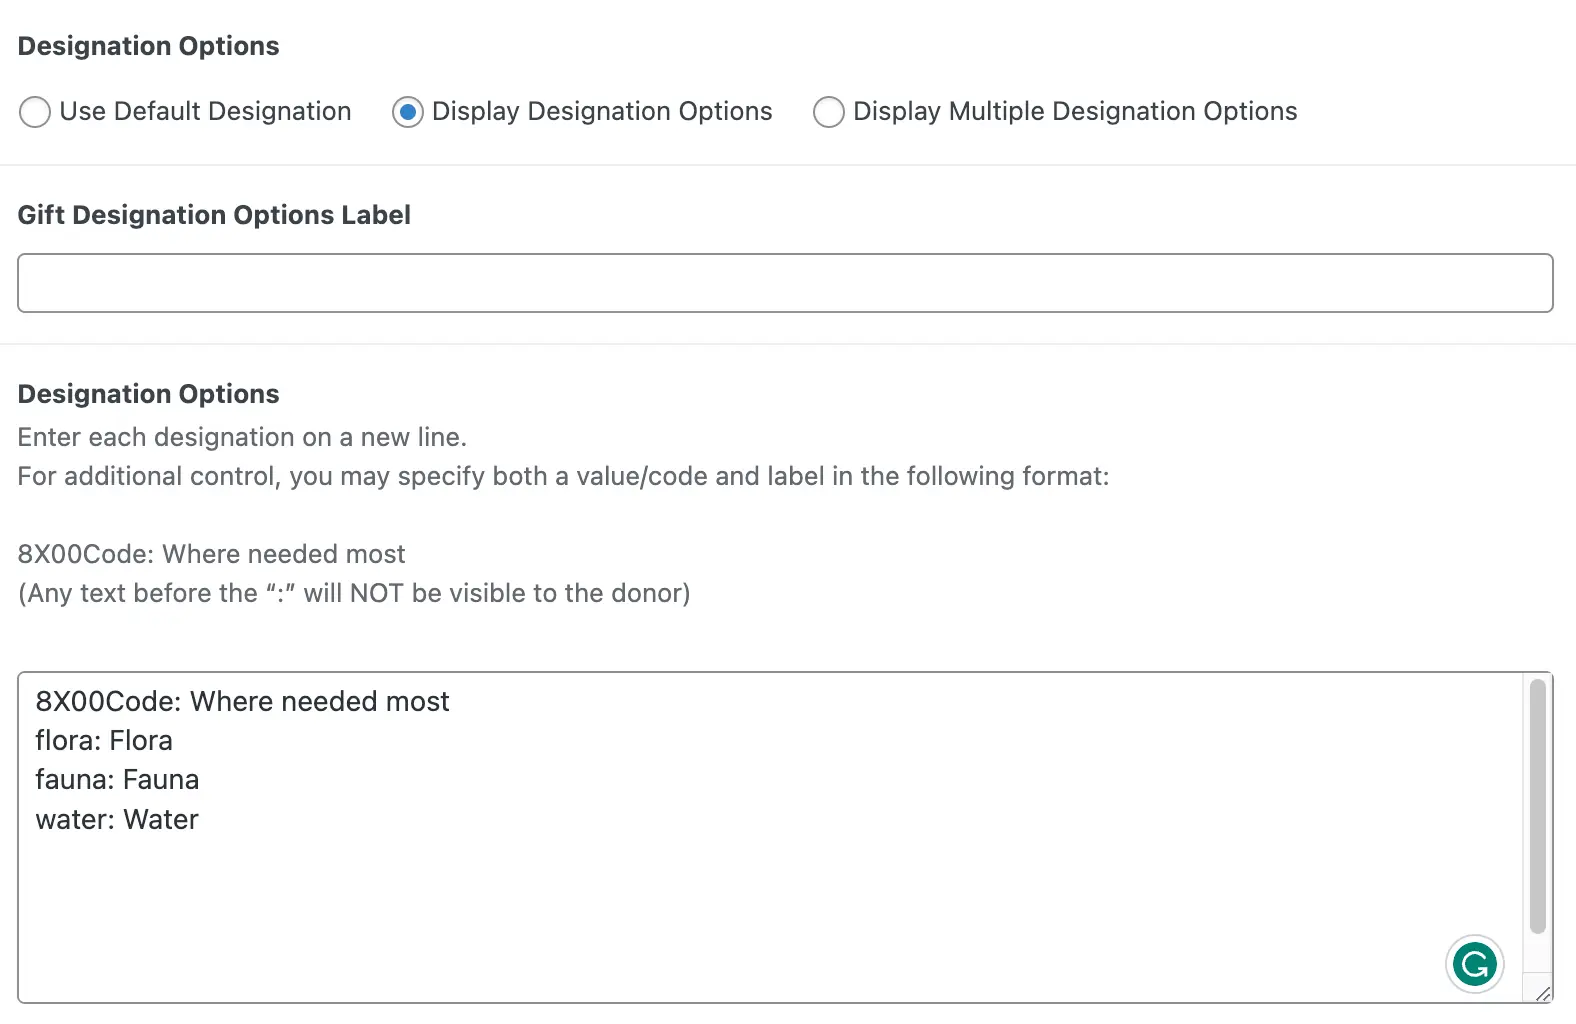
When using this configuration, the donor will have the option to select a specific designation, from a dropdown, during the donation process. The information about how the donors designated their donations will be available at FlexFormz Dashboard.
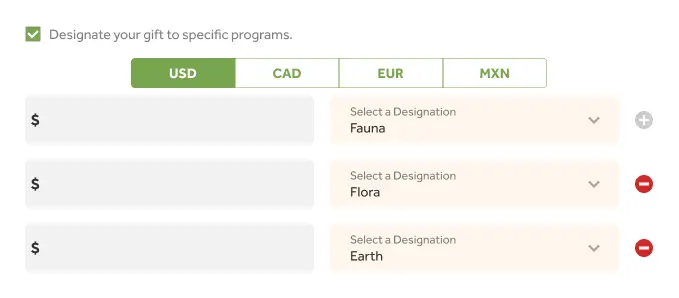
Display Multiple Designation Options
The donor will be presented with the option to designate their donations to specific programs, they may contribute a maximum of three amounts and select the designations for each. The resulting donation will be the sum of the provided amounts. Green and red buttons allow donors to add or remove designation programs for their donation.
Motivation/Source Code [Optional]
To track the source of donations to your FlexFormz (Email, Landing Page, Home Page Button, etcetera), you may use this field along with standard Google Analytics UTM (Urchin Tracking Module) codes on the URL (web address string) of your giving source(s).

Lightbox Logo [Optional]
If you would like a different logo to appear on the credit card step of your form, please upload your logo here. If no logo is chosen, the default logo located in the Settings of the Plugin will appear.

Allow Only Donations from the US
FlexFormz can receive transactions from across the globe. If you would like to limit these transactions to the US only, make sure to select this option.
Enable Test Account
“Viewing test data” function.If this field is enabled the form will be in TEST MODE. In this mode you can test that everything is correctly set up. YOU CANNOT RECEIVE ACTUAL DONATIONS IN TEST MODE!
To test the form you need to use a test card:
Card: 4242 4242 4242 4242
Expiration: 10/27 – CVV: 222
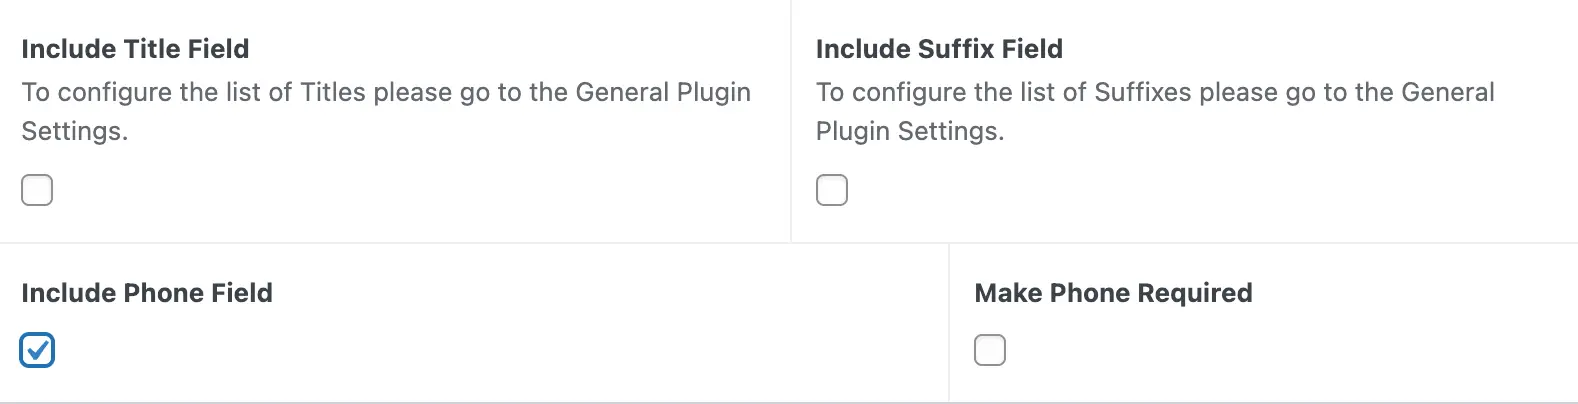
Optional fields to include on your form:
The title, suffix and phone fields are optional on every form depending on what information you want to request from your donors. To configure the list of Titles and Suffixes, please go to the General Plugin Settings.
To configure the Payment Options, please referred to the Payment Options section.
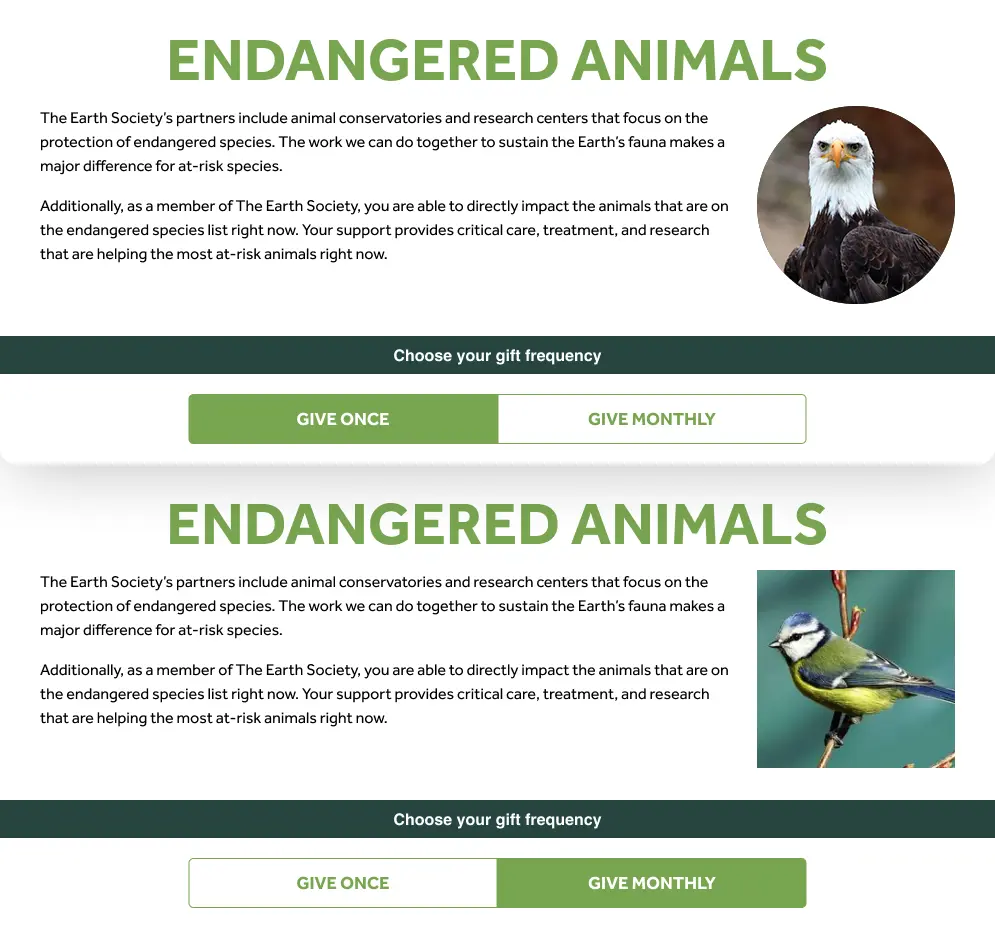
B. Donation Frequency Setup
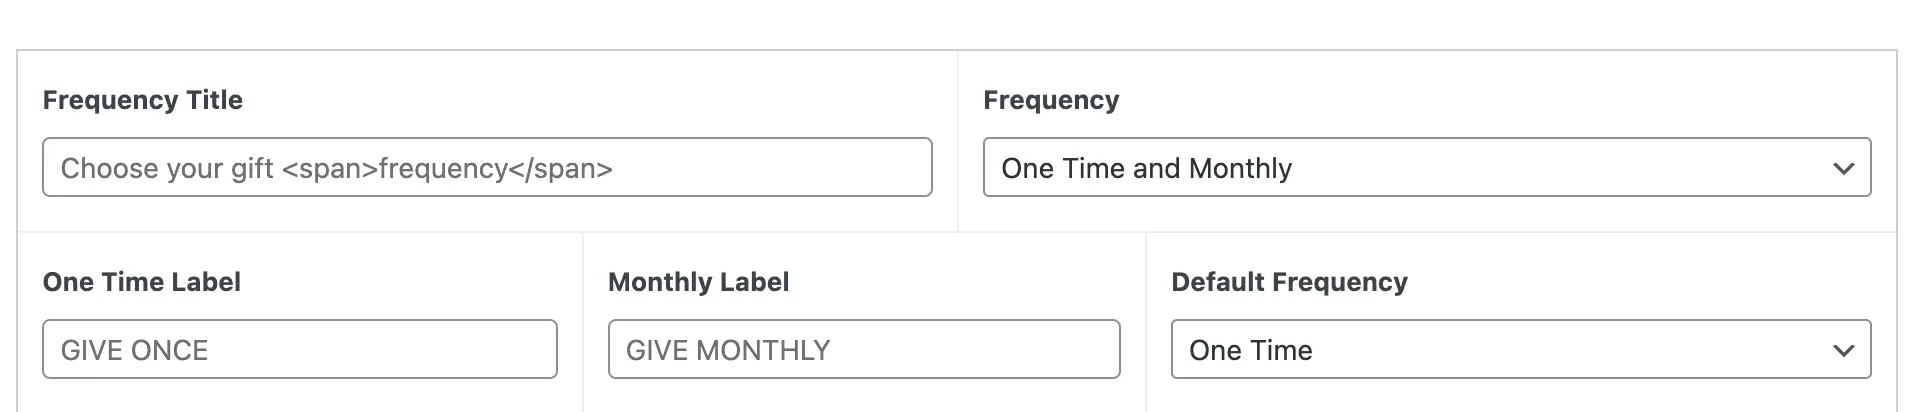
Frequency Title
Insert the title you would like to appear before your gift frequency options. You can add a highlighted color on part of the text if you place the words between a tag. See the sample below:

Frequency
The frequency dropdown has three values:
- Only One Time – Only a One-Time giving option will be active on your form. You can set the text that you want to appear on the One Time Label field for this option.
- Only Monthly – Only a Monthly giving option will be active on your form. You can set the text that you want to appear on the Monthly Time Label field for this option.
- One Time and Monthly – The donors will have the option to select whether they want to do a one time or monthly donation. You can set the text you want to appear for both options (One Time Label and Monthly Time Label). For this option you can also specify the default option that you want to appear on the Default Frequency dropdown.
What is a Monthly Reinforcer?
A visual reinforcement for donors to switch to a monthly donation.
Where to set up Monthly Reinforcer?
- Find your FlexFormz.
- Click on Edit.
- Inside “Donation Frequency Setup”.
- Search for the Monthly Reinforcer section.

Types of Monthly Reinforcer:
- None
- On Monthly Button
- After Amount is Chosen
- After Donation is Submitted
Type of Monthly Reinforcer – None
Monthly Reinforcer is disabled:
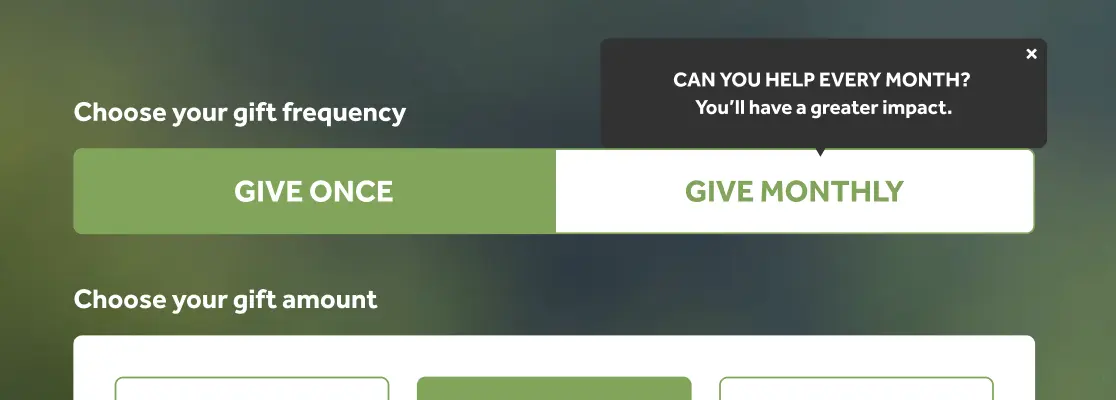
Type of Monthly Reinforcer – On Monthly Button
Display a tooltip with a custom message:
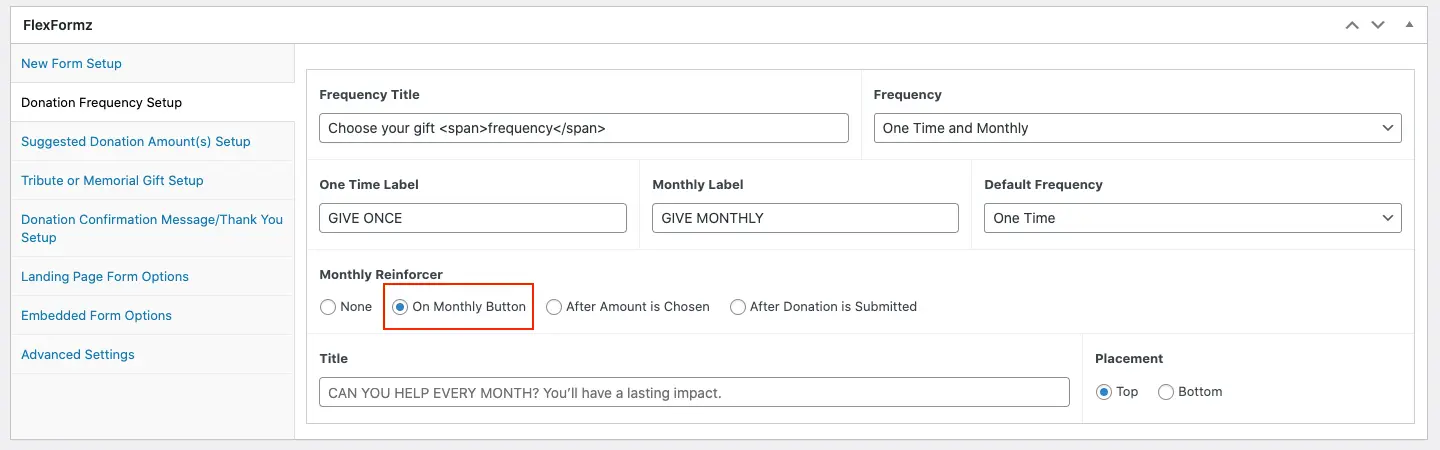
You can set up a custom message and the placement of the tooltip.
- Default Message: CAN YOU HELP EVERY MONTH? You’ll have a lasting impact.
- Max Length Message: 65 characters
- This reminder is not visible for contextual forms.
RESULT
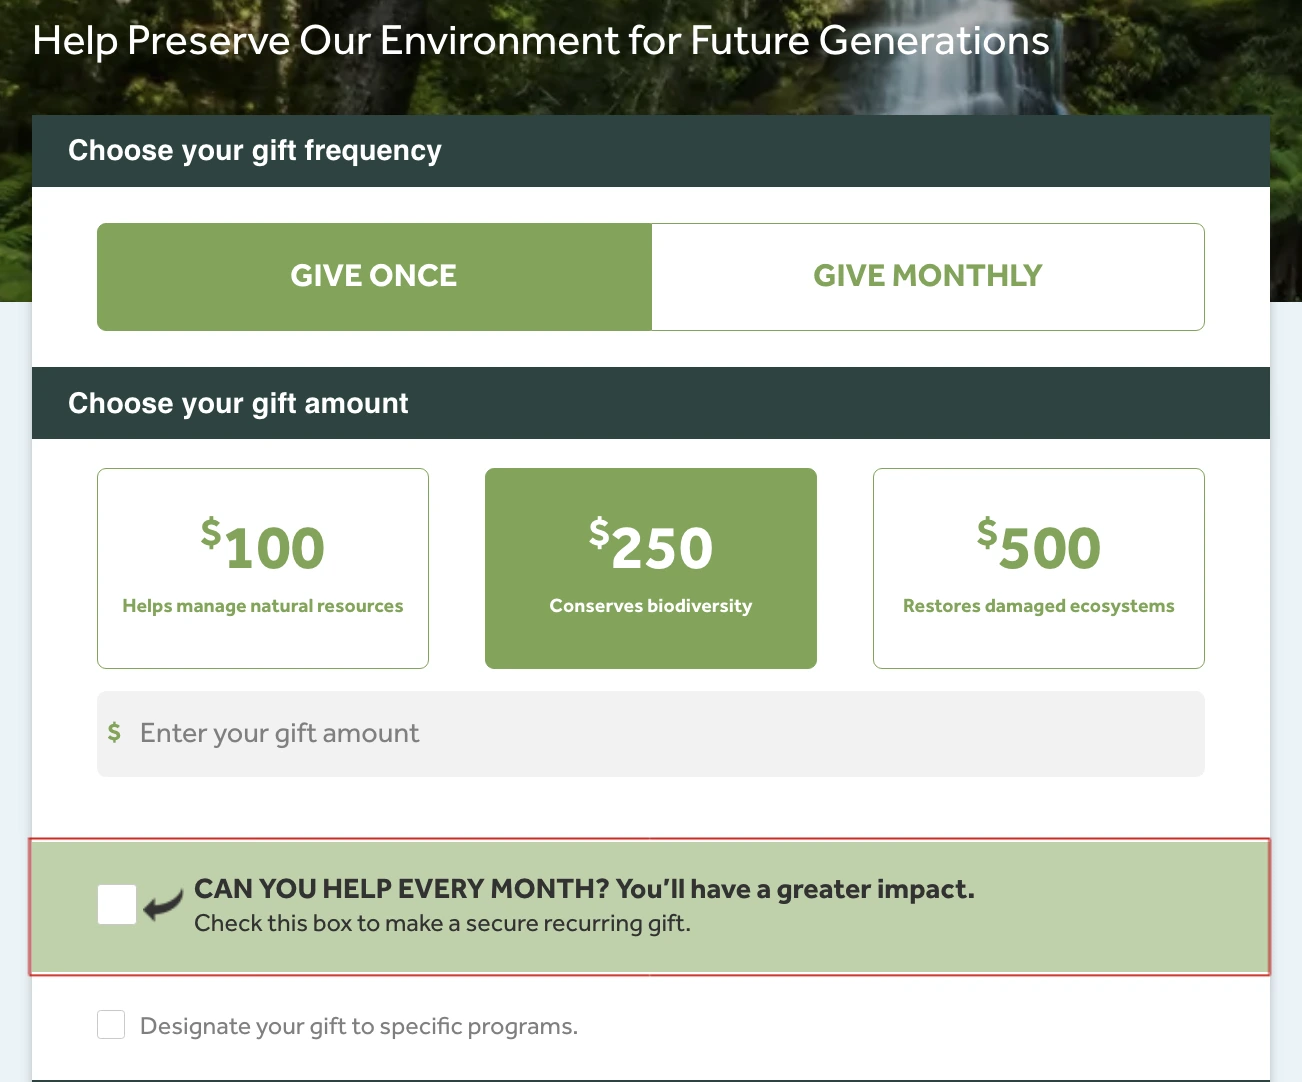
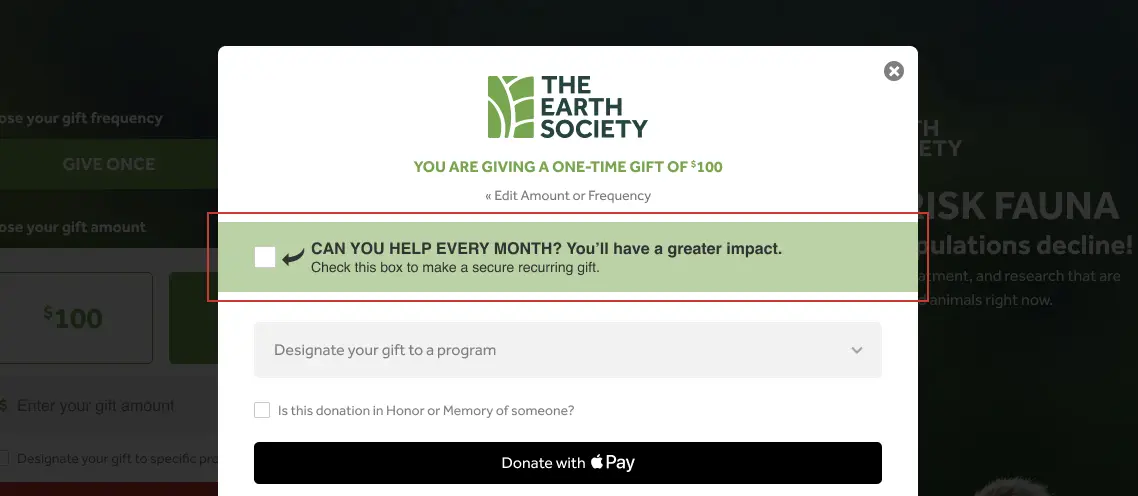
Type of Monthly Reinforcer – After Amount is Chosen
Display a section after the amount is selected:
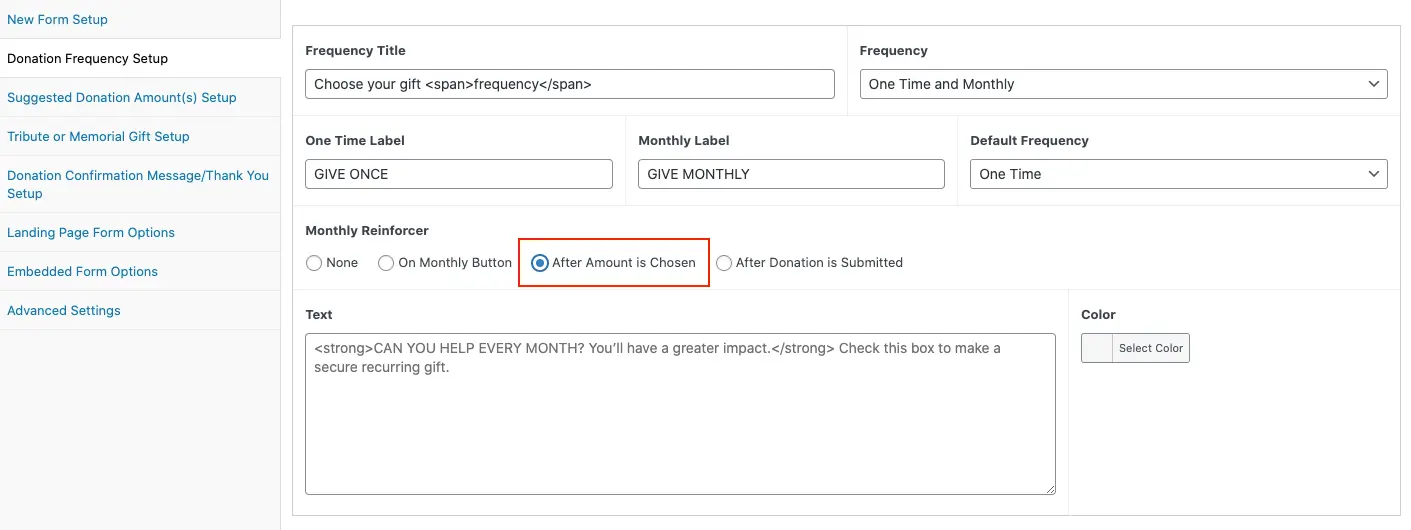
You can set up a custom message and the placement of the tooltip.
- Default Message: CAN YOU HELP EVERY MONTH? You’ll have a greater impact. Check this box to make a secure recurring gift.
- Color Default: Same that the frequency buttons
- This reinforcer is not visible if the amount has a premium gift related.
RESULT
Type of Monthly Reinforcer – After Donation is Submitted
Display lightbox after donation is submitted:
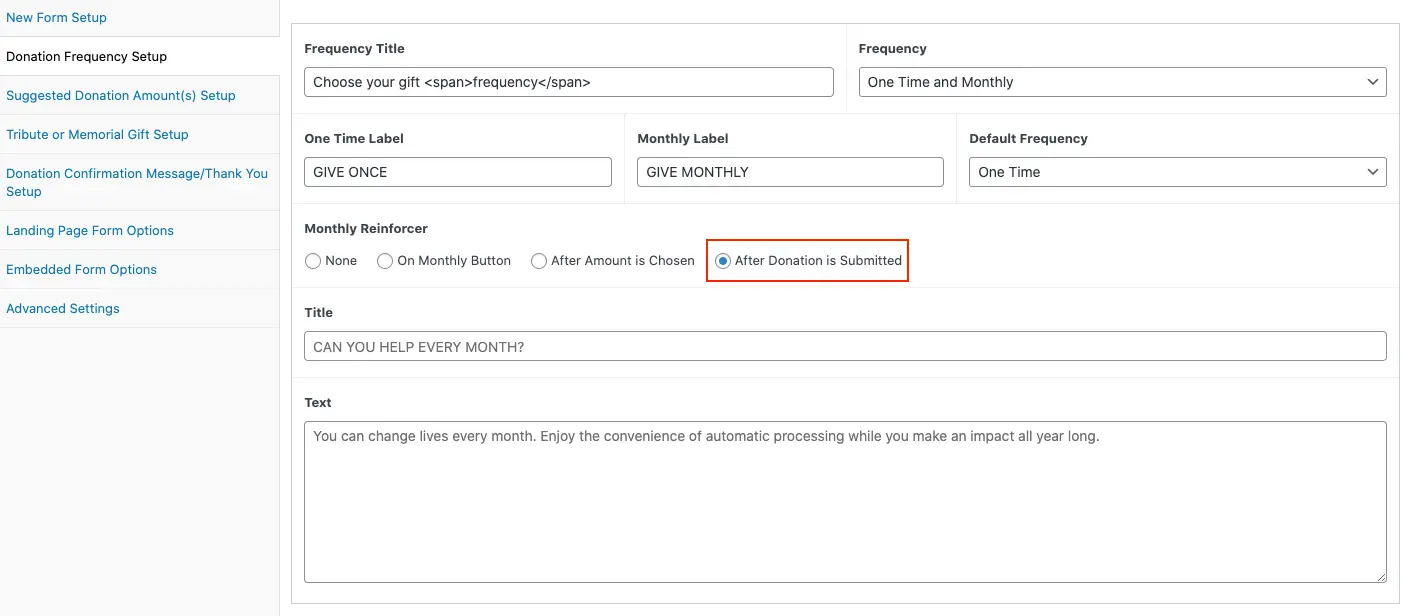
- Default Title: CAN YOU HELP EVERY MONTH?
- Default Message: You can change lives every month. Enjoy the convenience of automatic processing while you make an impact all year long.
- This reinforcer is not visible if the amount has a premium gift related.
- The monthly amount is 25% of the amount selected.
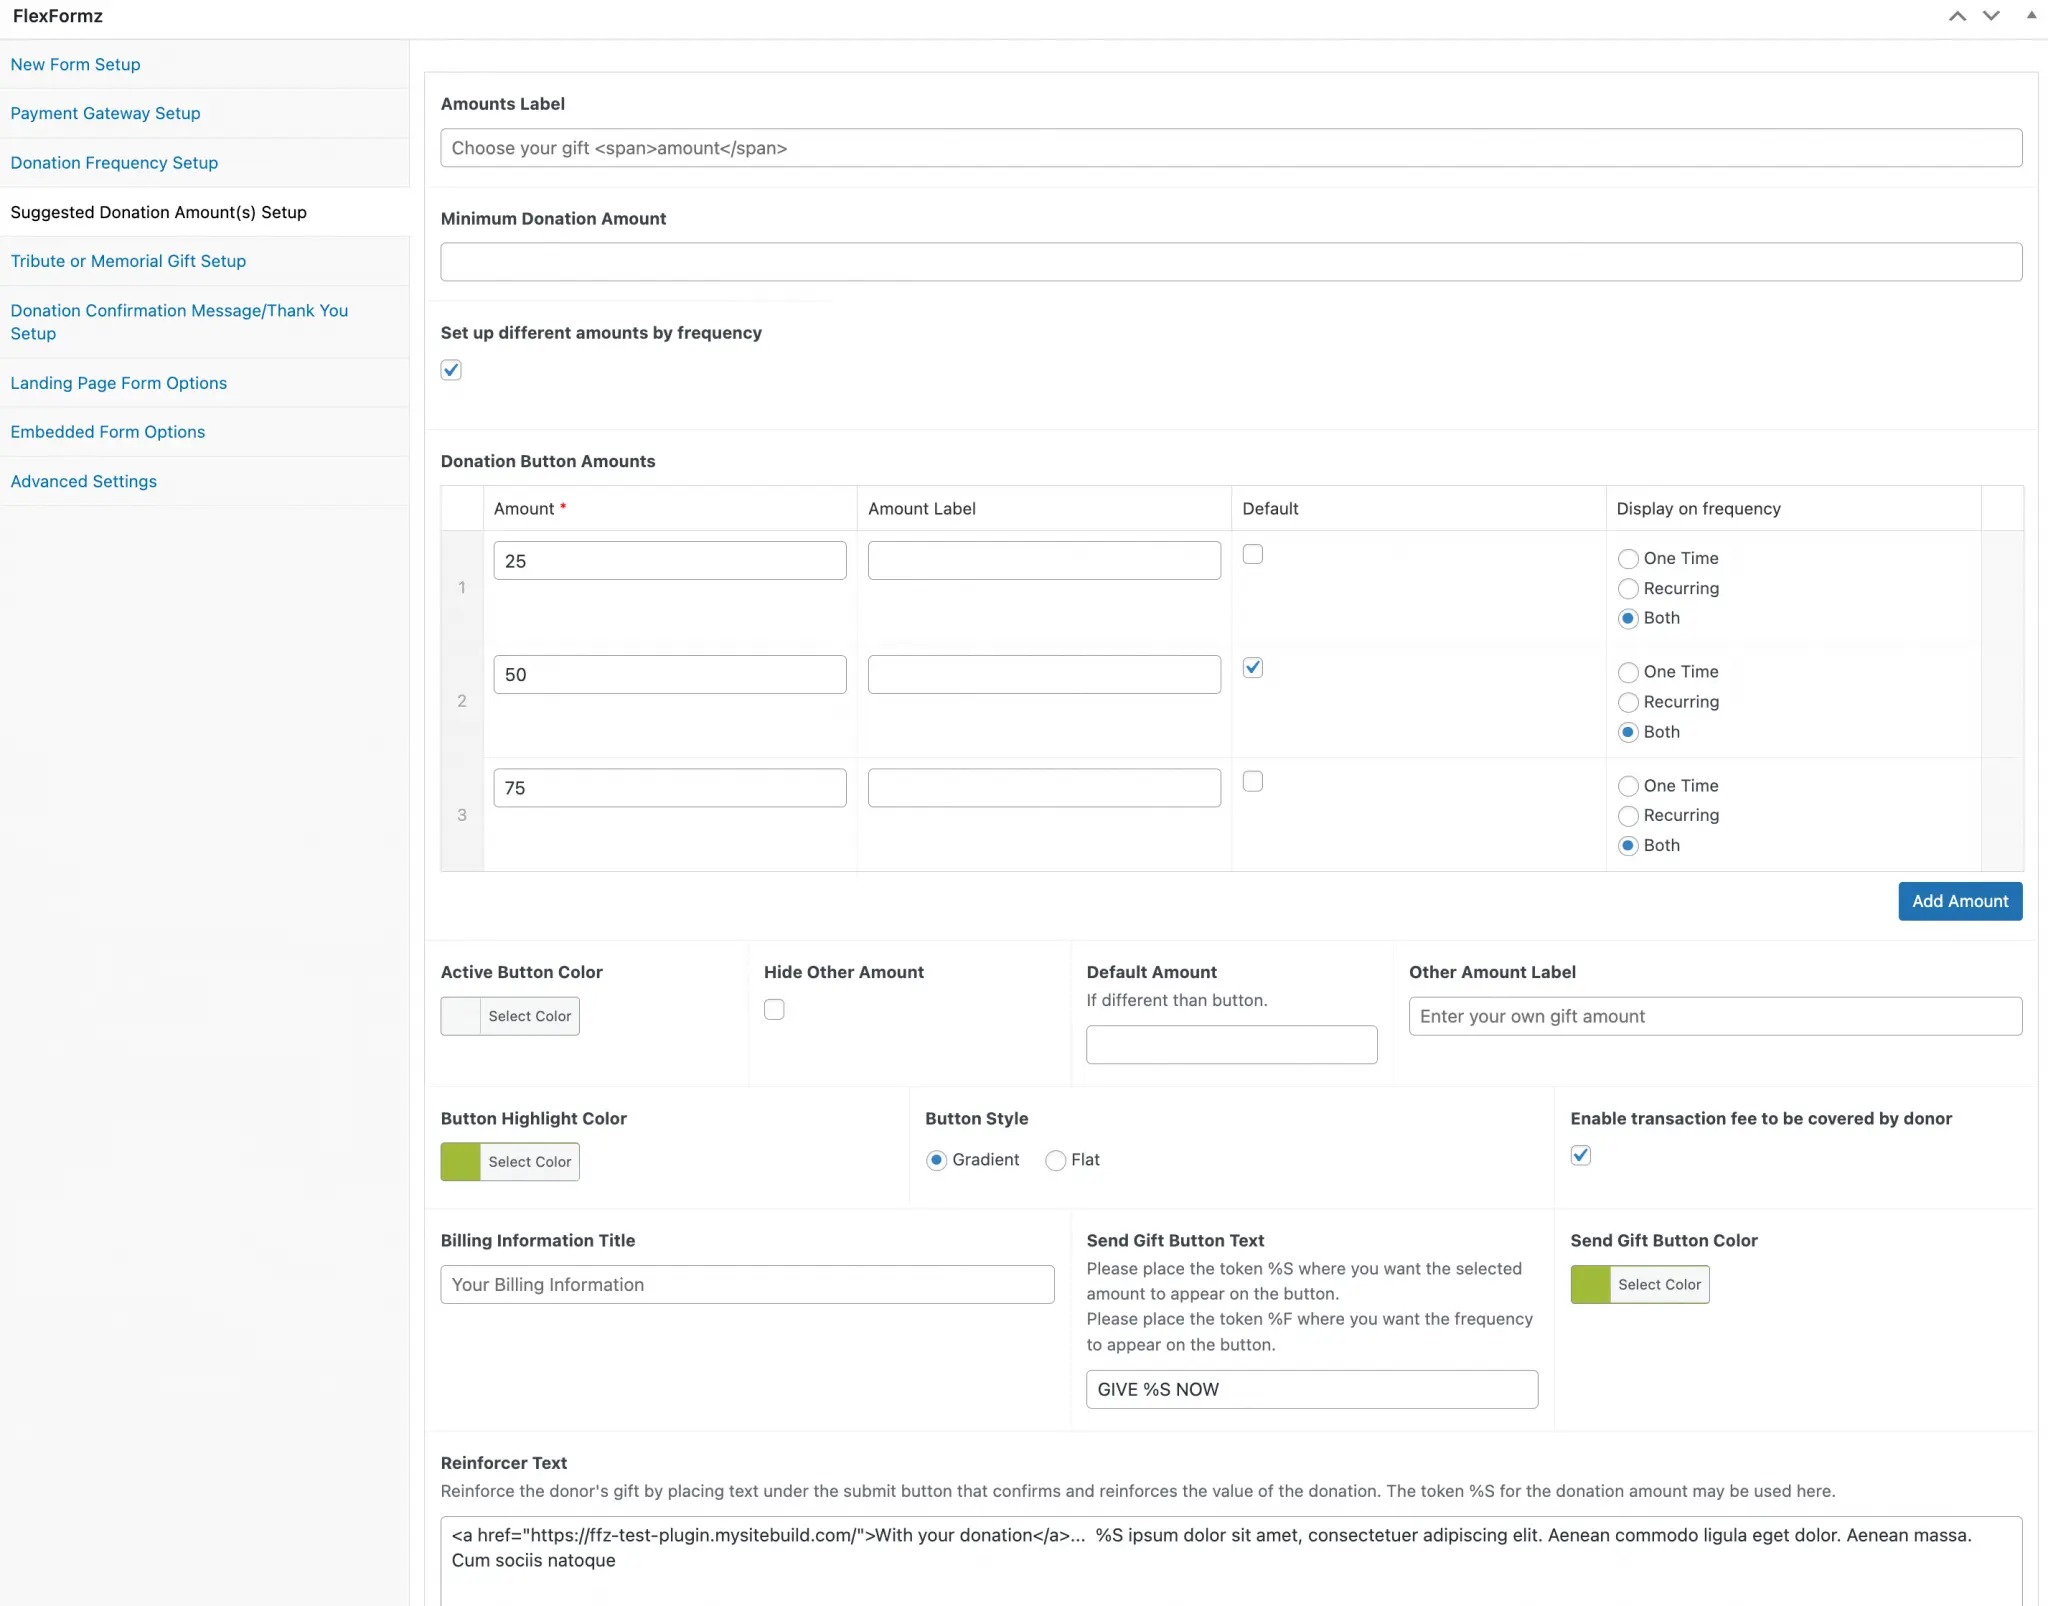
C. Suggested Donation Amount(s) Setup
Amounts Title
Insert the title you would like to appear before the amount choices. You may add a highlight color to part of your text if you place the words between a tag.
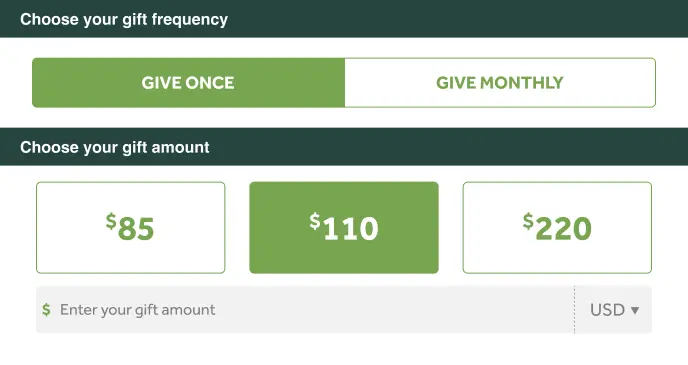
Donation Button Amounts
You may add and/or remove button amounts that you would like to display on your form. Based on extensive testing,
Add a New Amount
- First click/tap on the
Add Amountbutton. - The
Amount Fieldis the donation amount displayed on the form buttons. - You may add a short text on the
Amount Labelfield; this text will be displayed under the amount inside the button (this field can also be left empty).
Default Button Amount
On this field you may specify the button amount that you want to show as the default/highlighted amount.
Amount buttons (recommended), the button will be selected when you load the page. If the Default Amount is different from one of the Button Amounts it will be shown pre-populated on the Other Amount field.Button Highlight Color
Here you may select a highlight color that will appear when a button (frequency and amount) is selected.
Other Amount
The Other Amount field activates a blank input field that enables the donor to enter an amount of their choosing.
You can hide the Other Amount field by selecting Hide Other Amount. If the other amount is visible you can add a title that will appear before the blank field on the Other Amount Label field.
Send Gift Button Text and Send Gift Button Color
This field controls the text for the Send Gift button, a token “%S” can be added to this field to show the donation amount or the token “%F” to show the frequency chosen on the Send Gift button.
If you want to highlight the Submit button with a different color, you may choose the color here.
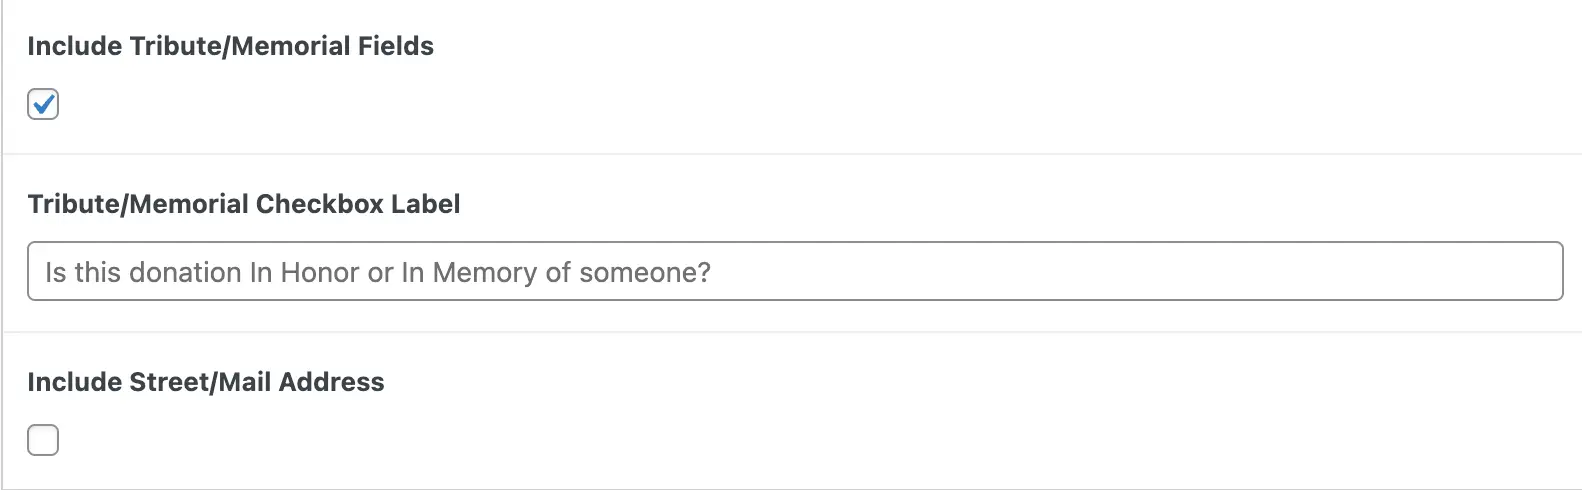
D. Tribute or Memorial Gift Setup [Optional]
Tribute/Memorial Fields and Checkbox
You may activate the Tribute/Memorial Gift section on FlexFormz to allow the donor to give a donation In Honor Of or In Memory Of a person, group, or entity. Select the Include Tribute/Memorial Fields option to activate this section. You can edit the title that will be displayed on the form (Tribute Checkbox Label).
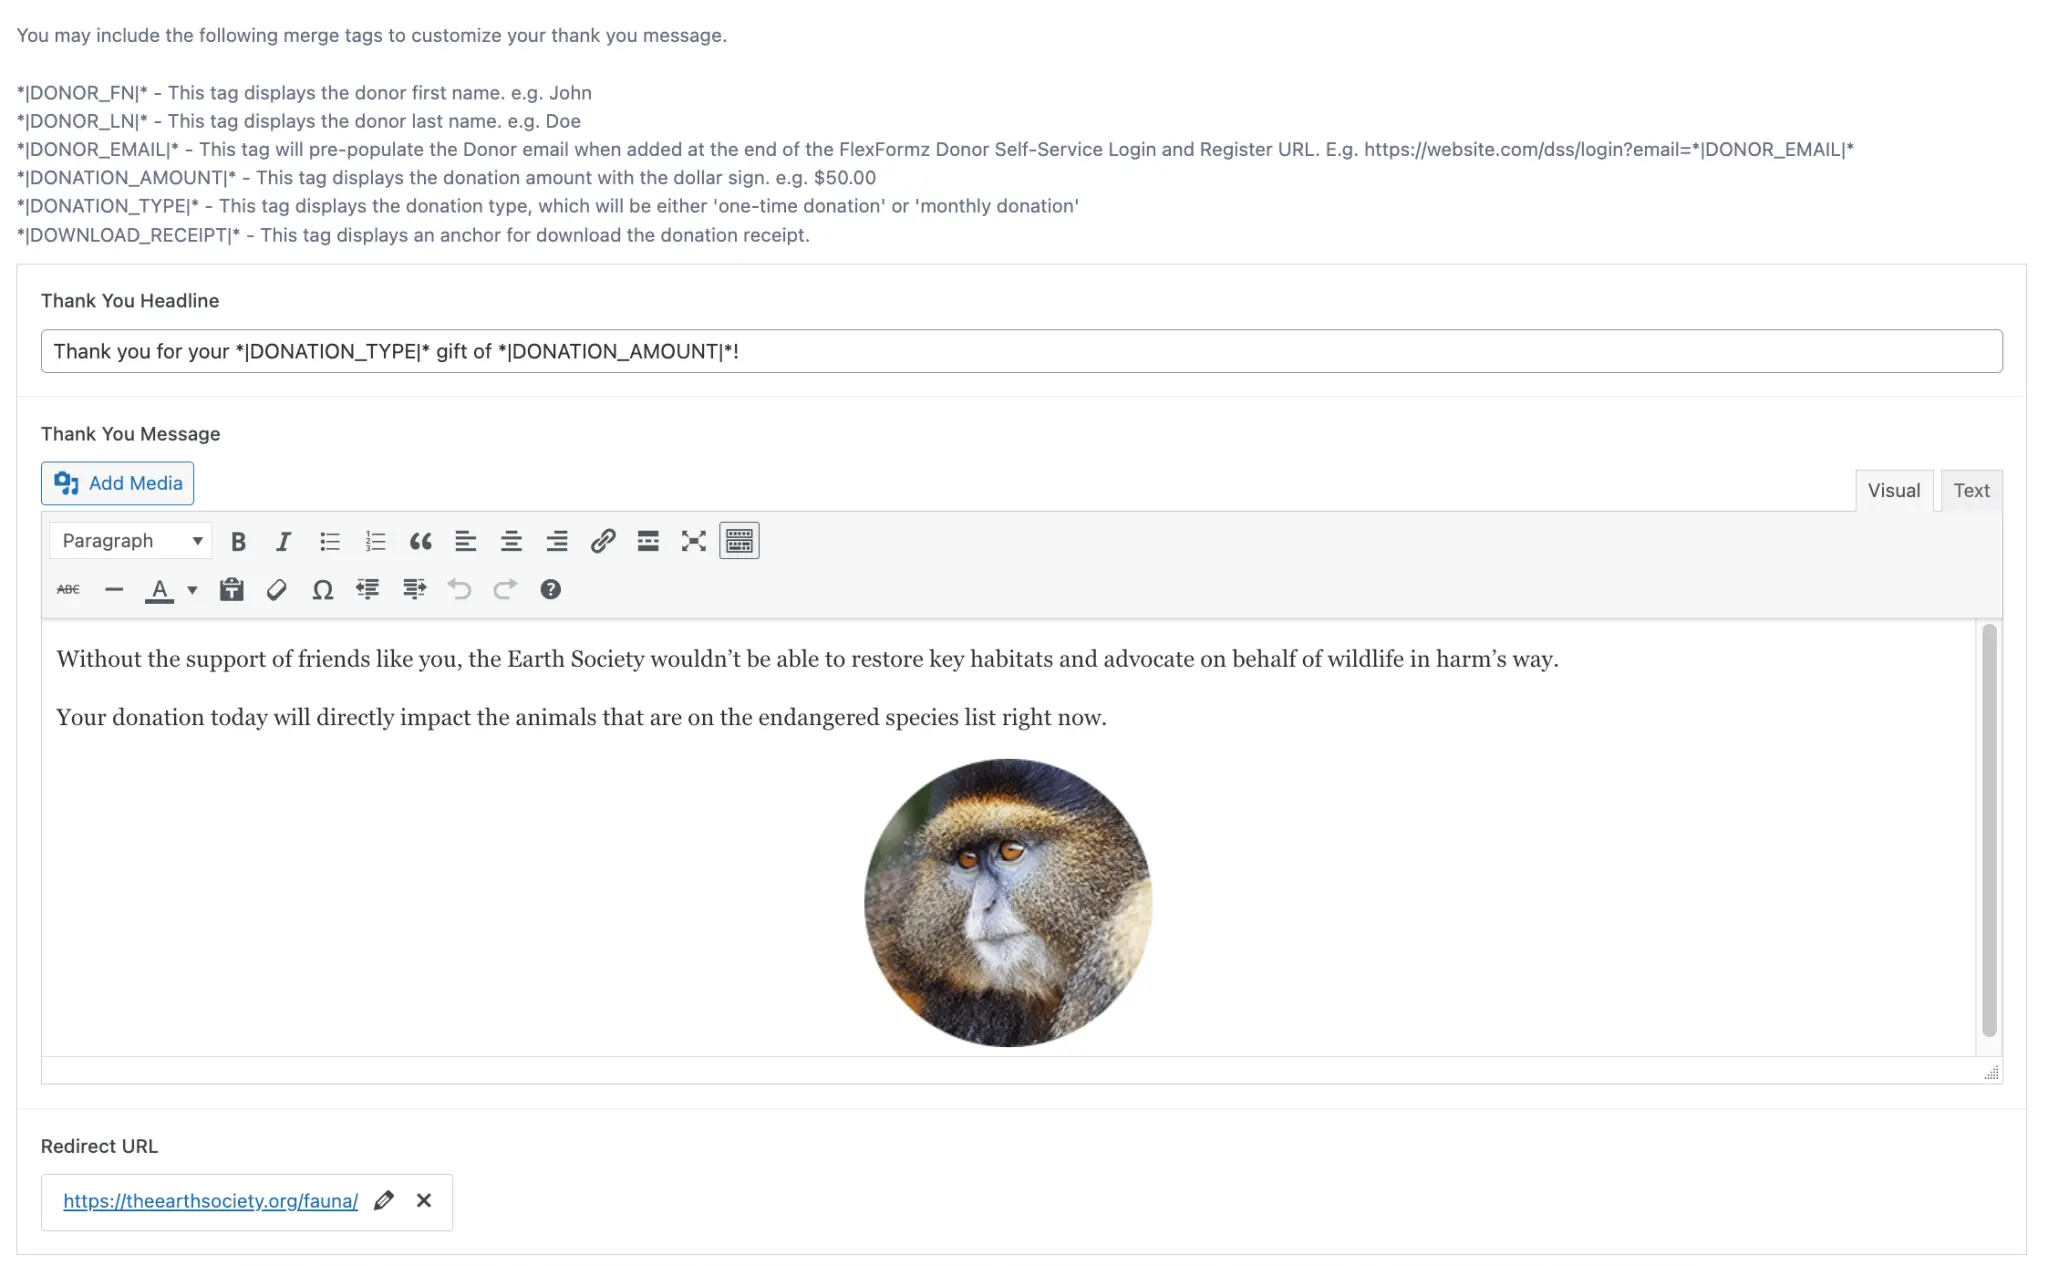
E. Donation Confirmation Message/Thank You Setup
Donation Confirmation/Thank You Message
On this field you may enter the text of your gift acknowledgment/thank you message. You may include an image and format the text as desired.
Redirect URL
You may set the page (with a specific URL) to which the donor is redirected to when they close the donation confirmation/thank you message. If you do not set a custom URL/page, the donor will be redirected to the home page of your website. The URL redirect only works for the unique URL landing page formz.
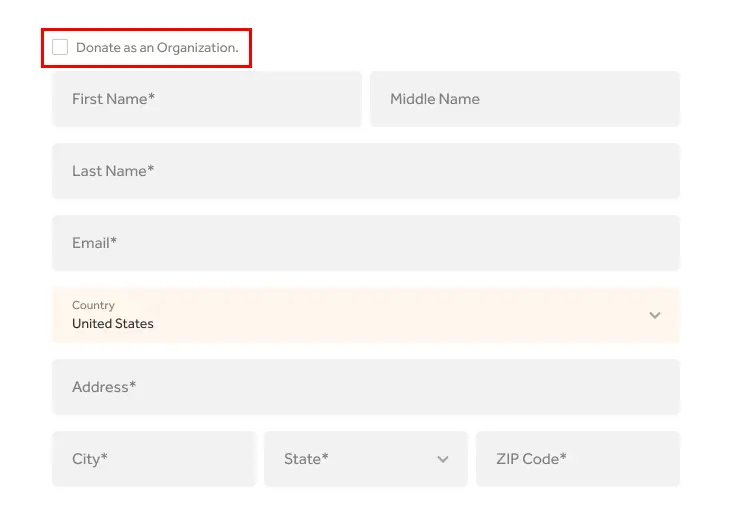
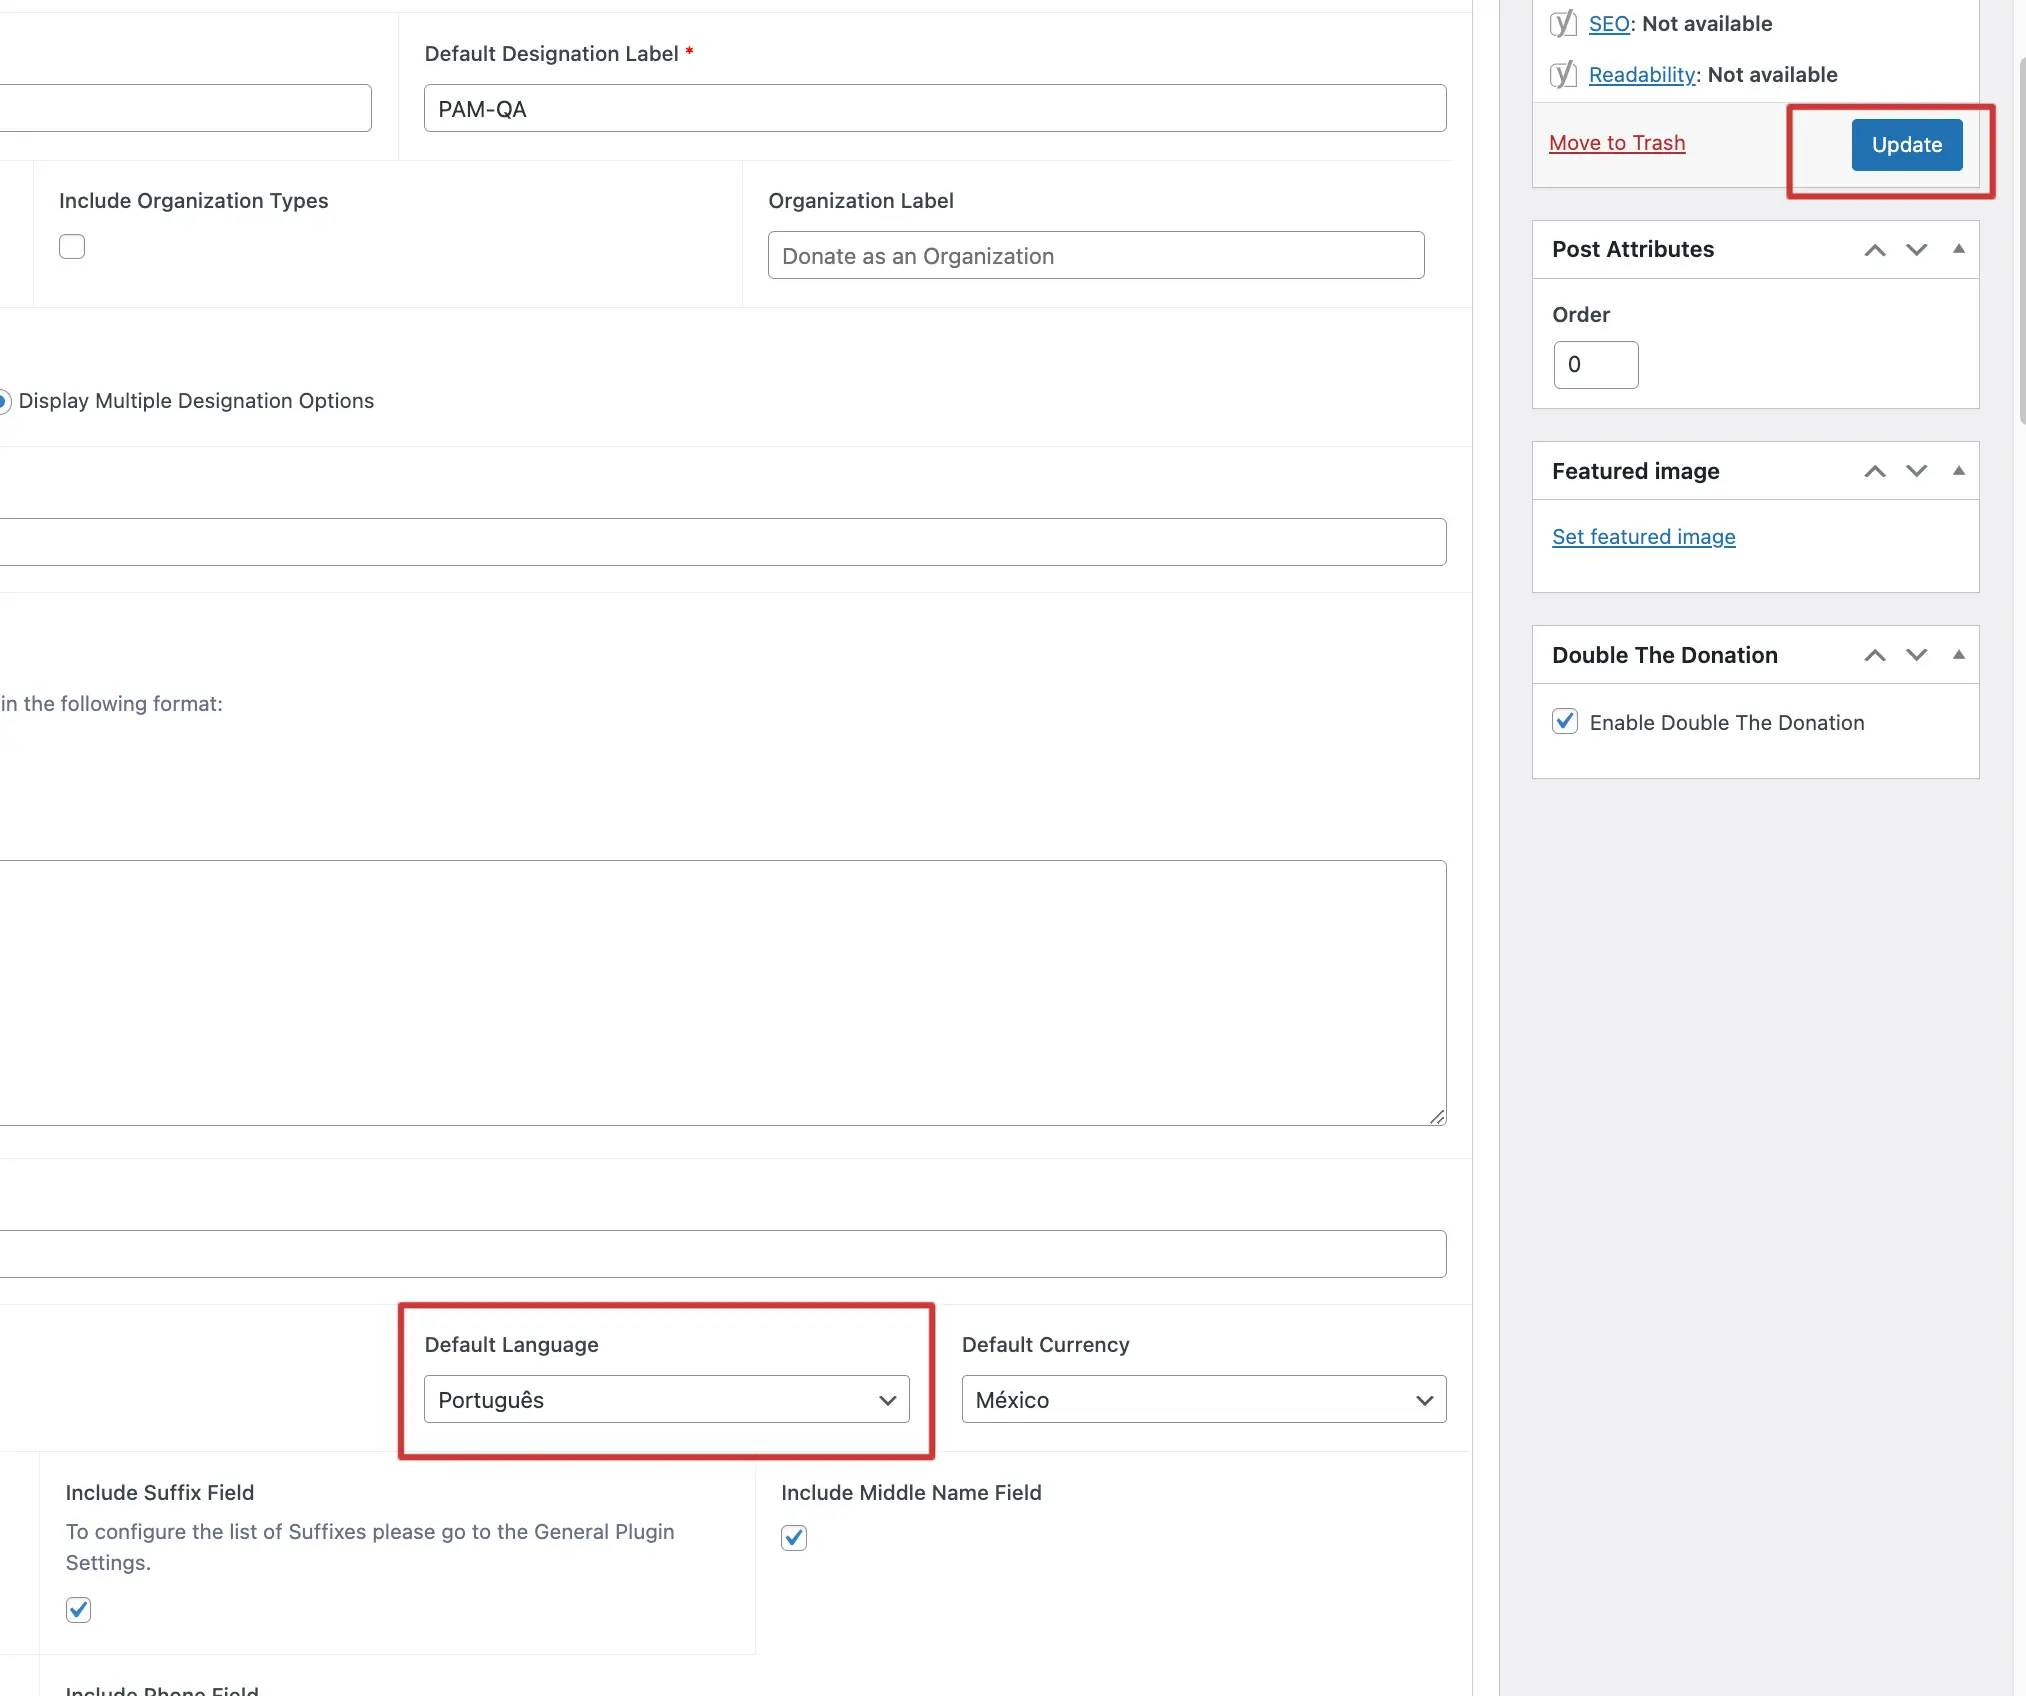
F. Organization Fields
Select the form you want to show organization field options for and click “Edit.”
In the form’s menu, navigate to the “New Form Setup” section on the left and locate the “Donor Type Allowed” subsection.
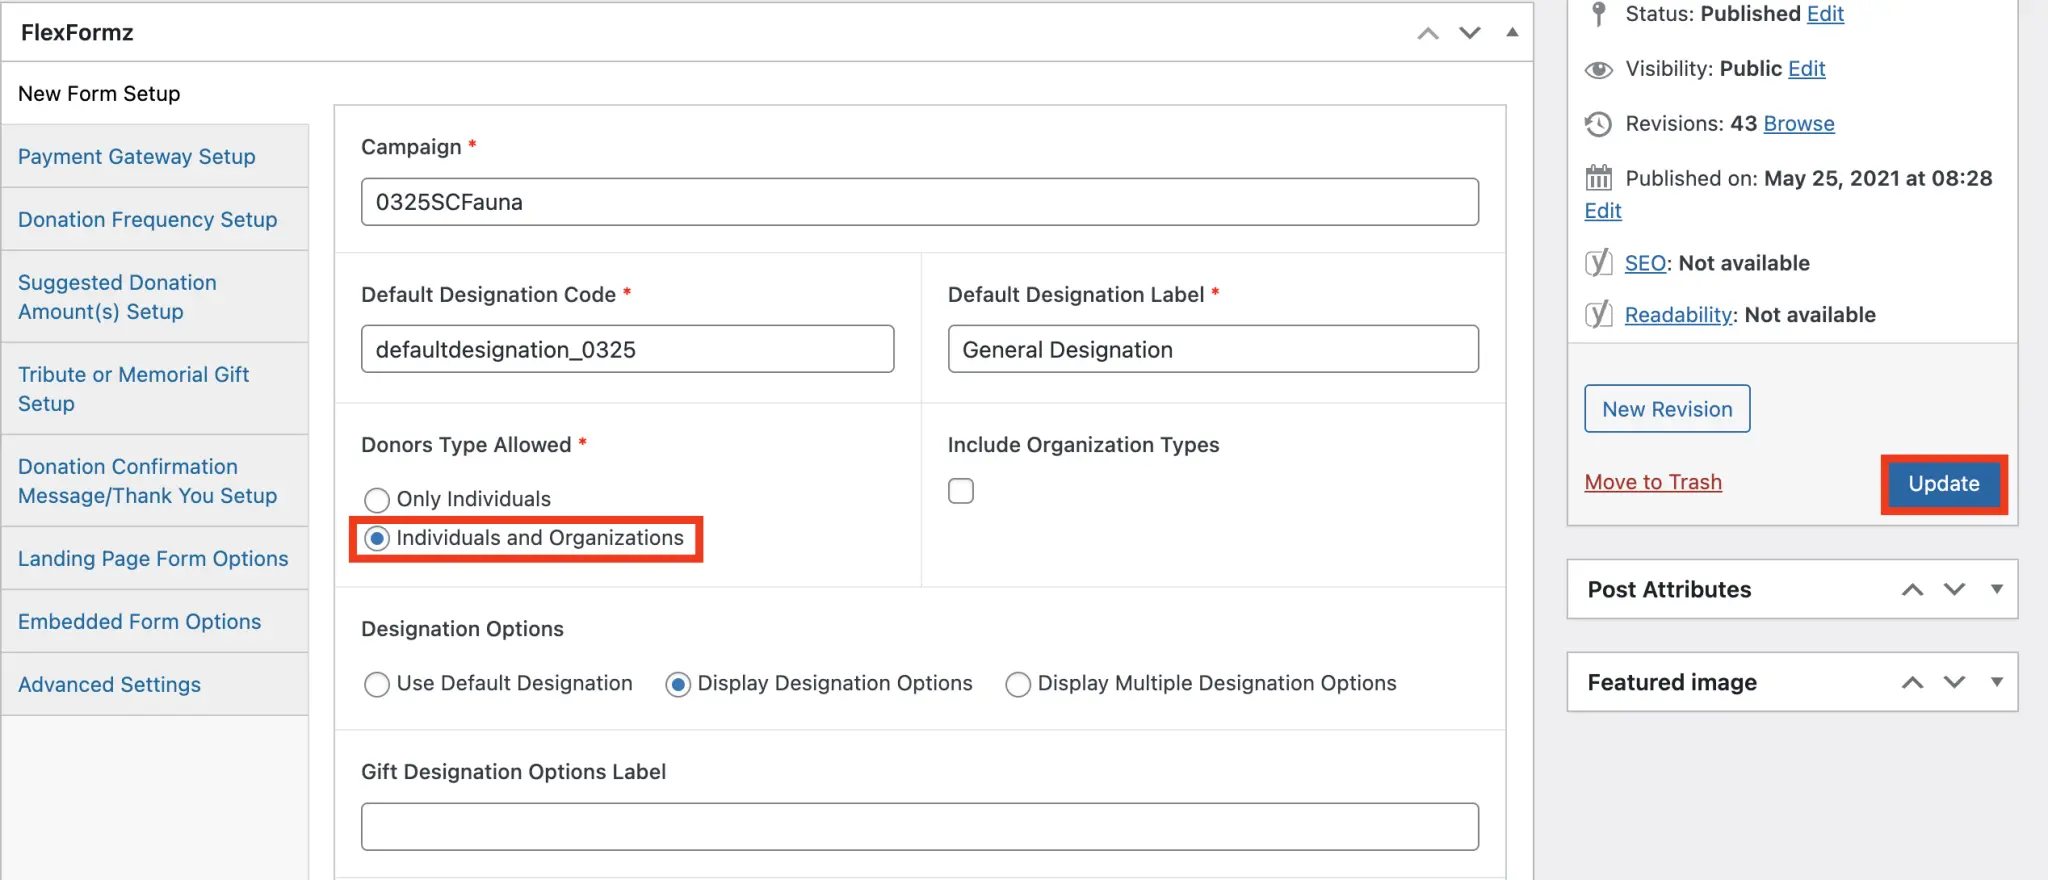
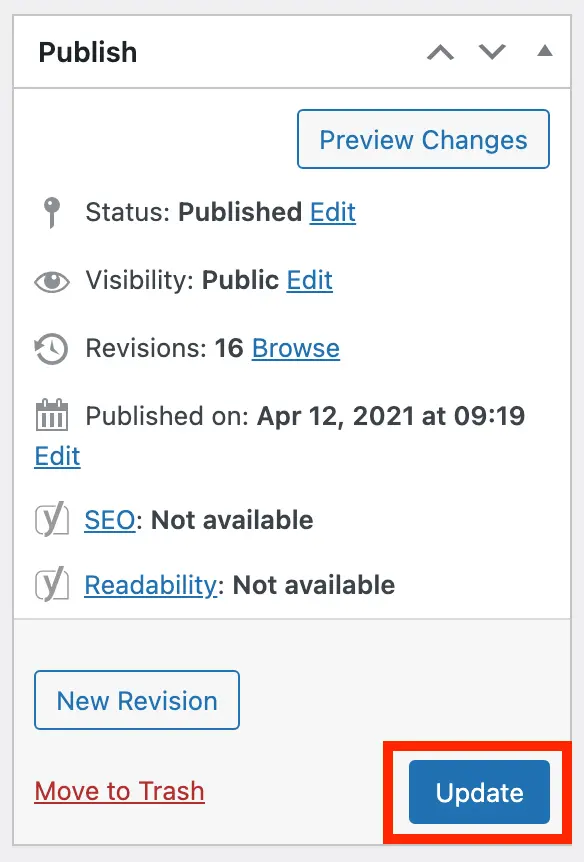
Check the option for “Individuals and Organizations” and update your form using the Publish menu (found on the right sidebar at the top of the page).
When viewing the edited form, ensure that the checkbox “Donate as an Organization” appears along with the relevant fields.
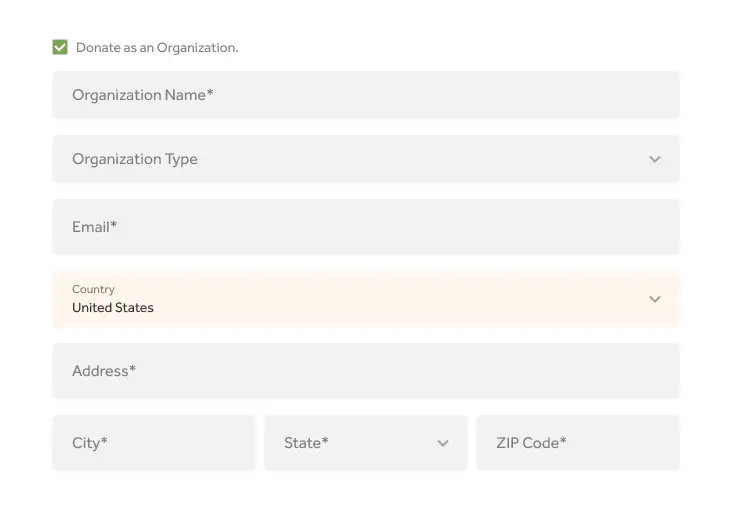
To add “Organization types”
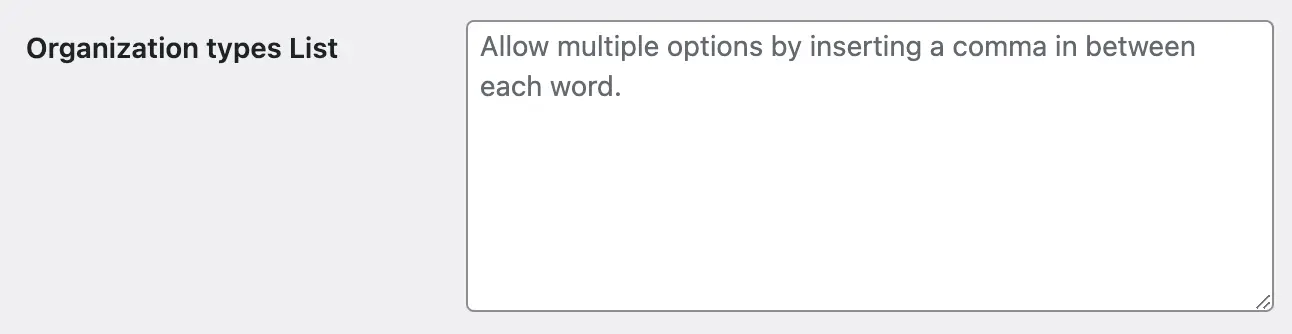
On the left sidebar in the FlexFormz menu, go to “Settings” and select the “Global settings” label at the top of the page


Scroll down to find the “Organization types List” option and list the types you want to allow, separating each with a comma (e.g., Foundation, Church, Corporation, Health). Click the “Save Changes” button when finished.
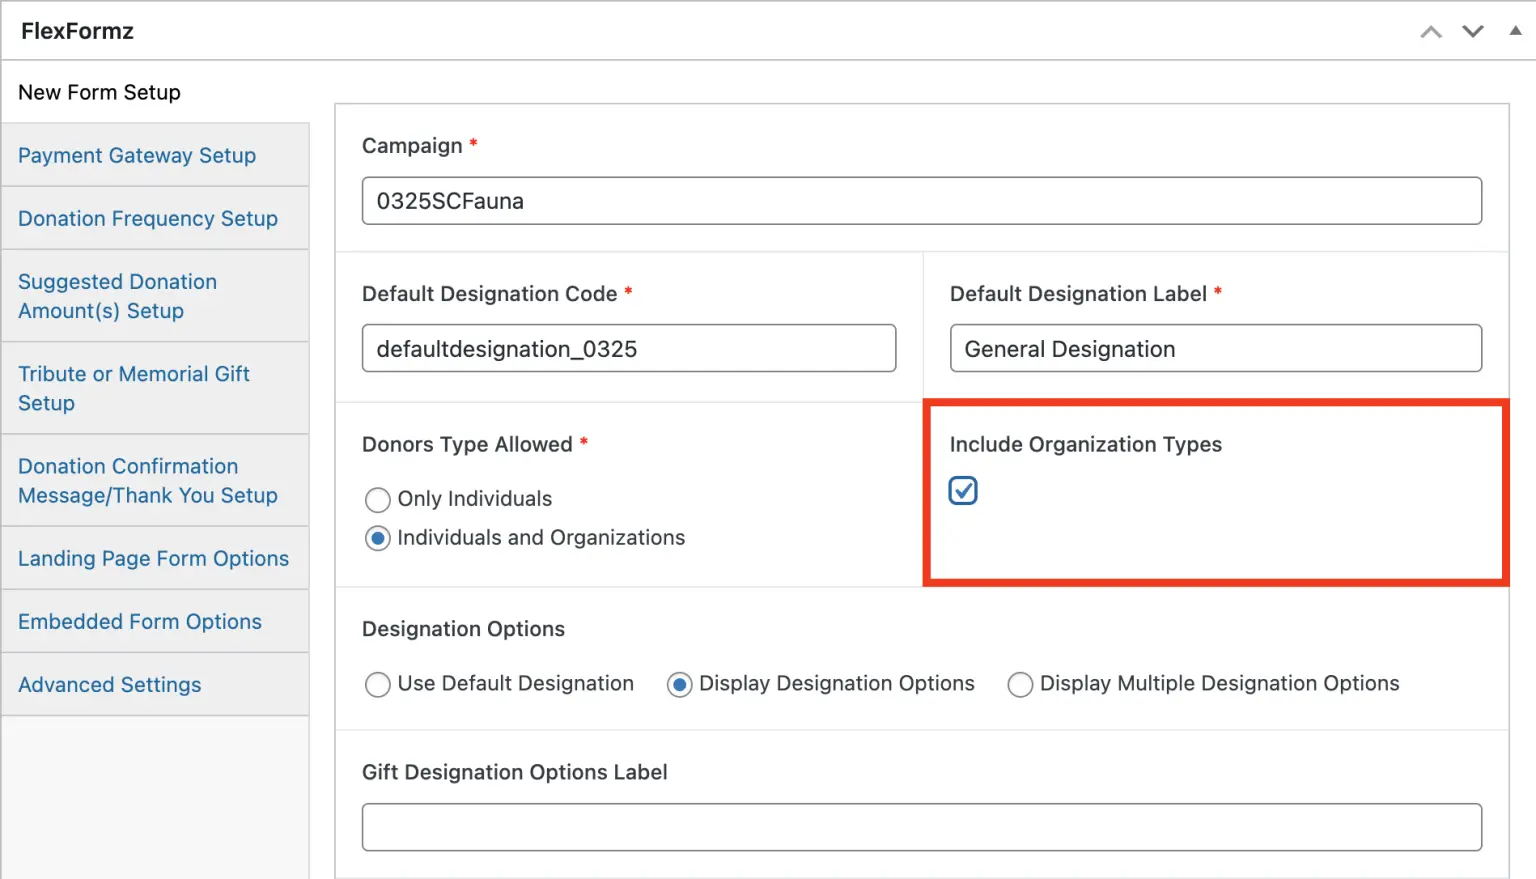
Return to edit the form, locate the “New Form Setup” section, and check the option for “Include Organization Types.”
Update the form and verify that the Organization Types are displayed correctly.

G. Change language by donation form
To change the language of a donation form for a specific campaign:
- Select the form you want to change and click on “Edit.”
- Scroll down to the “Default Language” section under the “New Form Setup” menu.
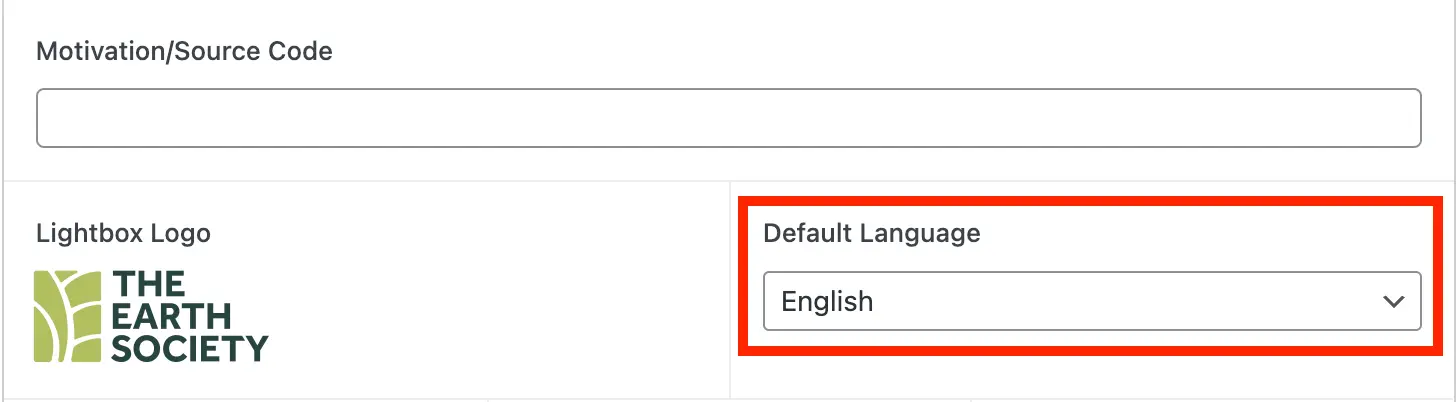
- Choose the desired language (English or Spanish) and update the form.

Note that any manually entered text in the form will remain in the original language and must be changed manually if needed.
Landing Page Form Options
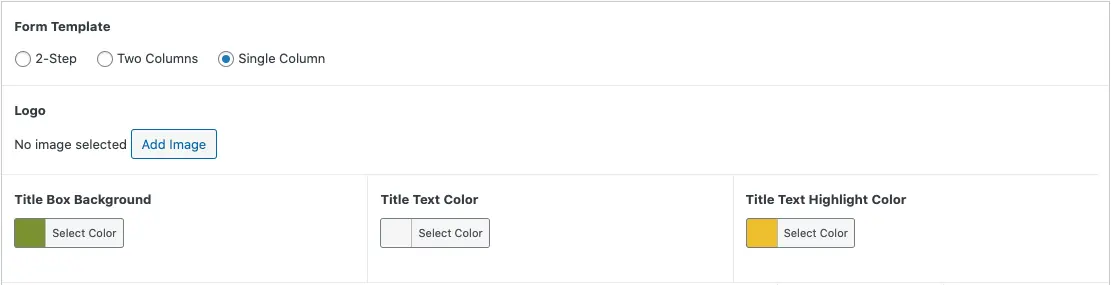
Form Template [Required]
FlexFormz has three different types of full-page/landing page views: 2-step which is the standard FlexFormz view, two columns, and one column. You can change between the options whenever you would like to find the correct template that works for your specific needs.
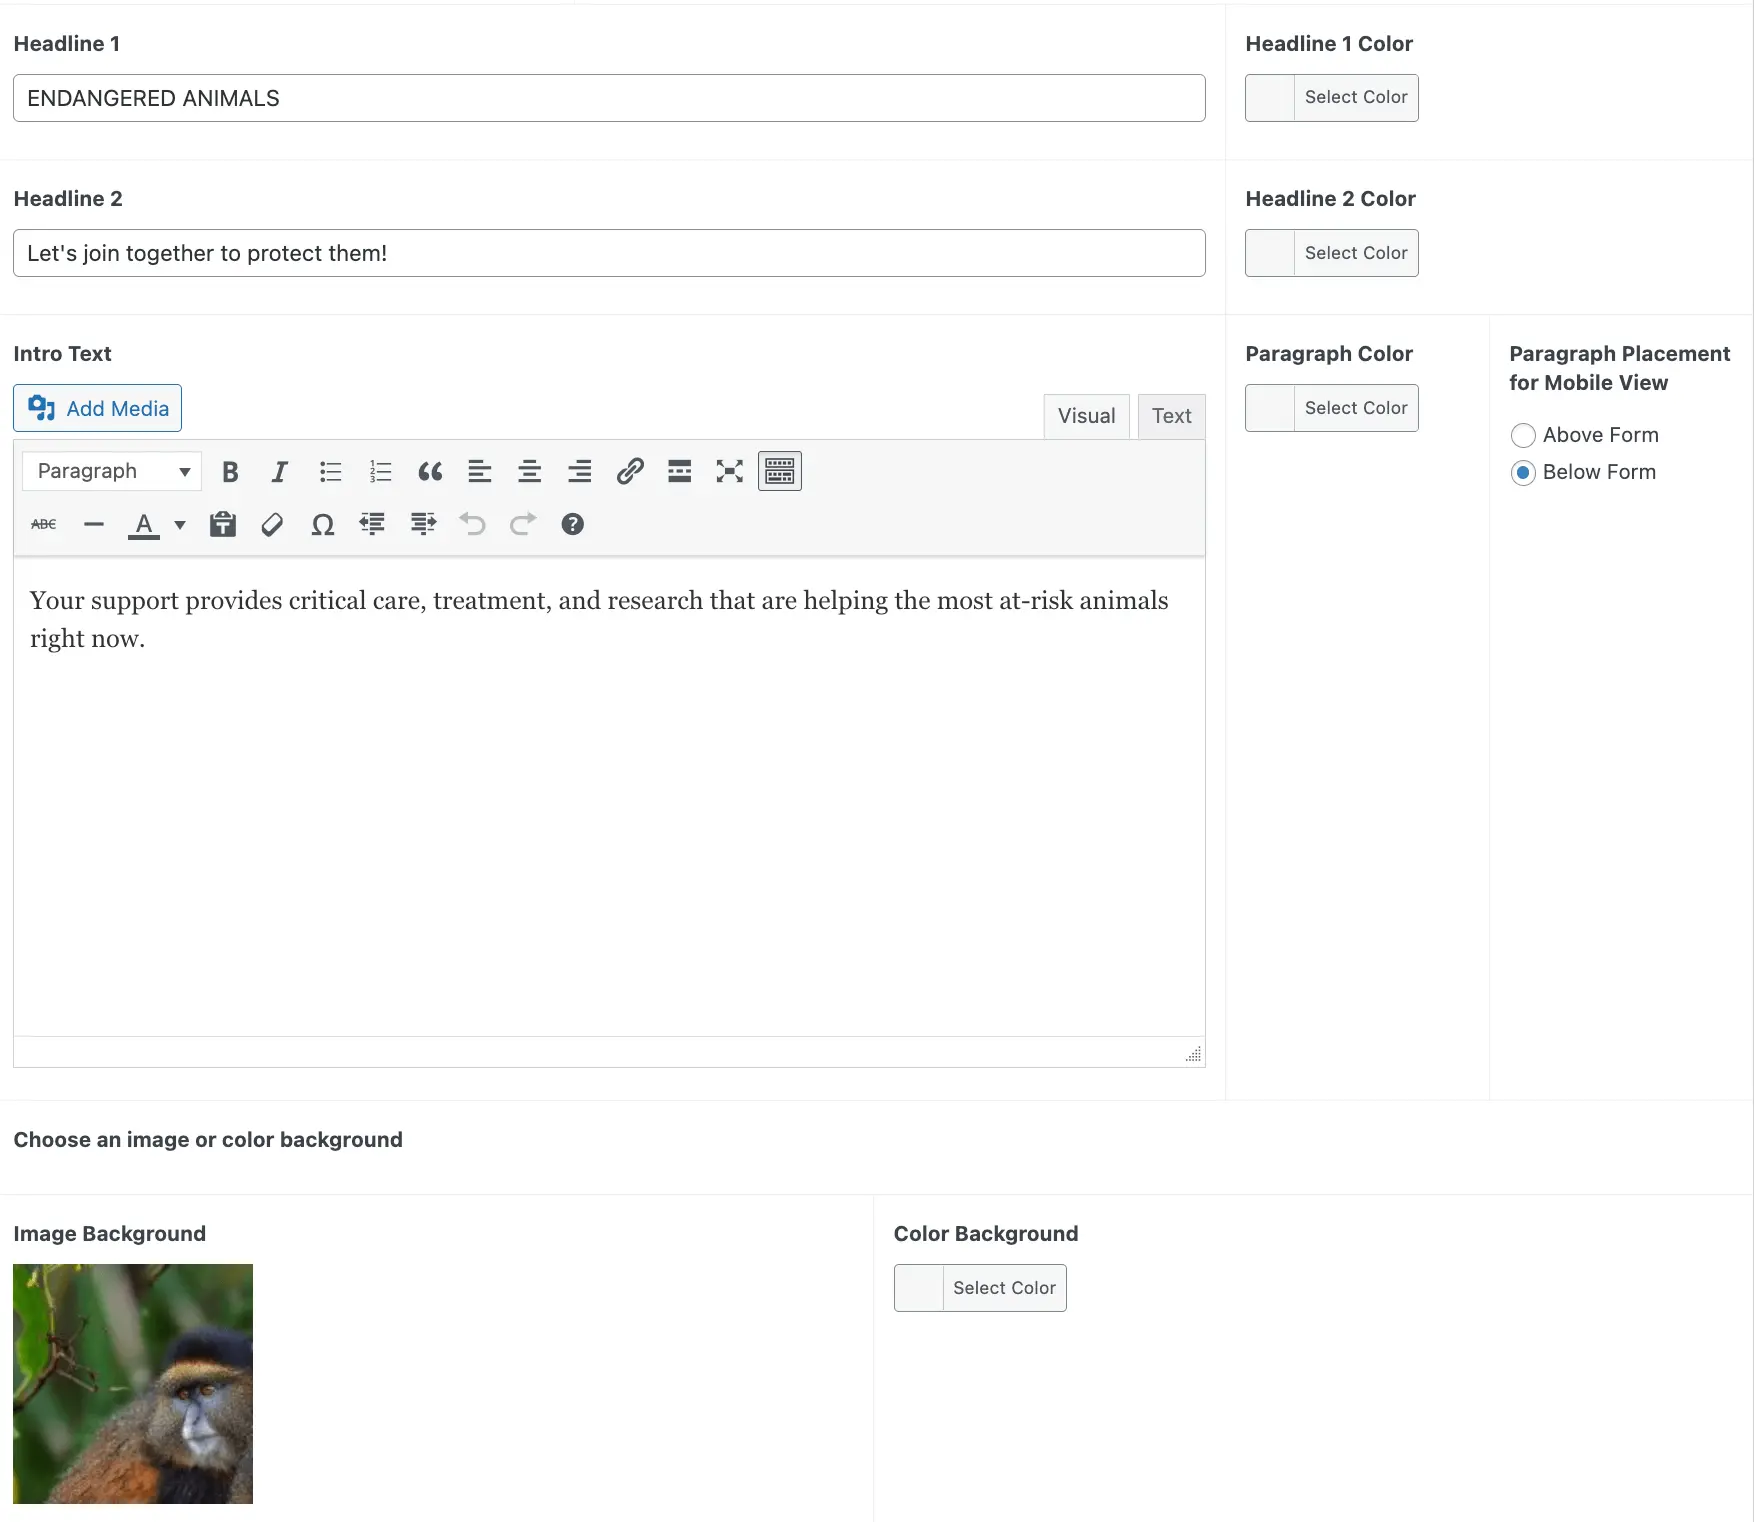
Logo
The default logo displayed on each form is the one you previously chose on the global settings, but you CAN overwrite by uploading a new one here. This logo will only appear on the landing page Forms.
Form Text Colors
This form text color controls the frequency title, amount title, other ways to give, and legal disclaimer text. The highlight color will only be active if you insert the text you want highlighted in a different color between the following code: YOUR TEXT
Title Box Background Color
This field will only display if you select the Full Page FlexFormz template. It dictates the Background Color for the Description Titles.
Headline Text and Color
These fields correspond to the title and subtitle (Headline 1 and 2) that will be displayed on the form only available for 2-Step and Two Columns template. If you leave these blank no text will be shown. The color selectors to the right of these fields will define the hue of these elements on the visual form.
Paragraph Text and Color
These fields correspond to the paragraph text that will be displayed below the title. If you leave this blank no text will be shown. The color selectors to the right of this field will define the hue of this element on the visual form.
Image or Color Background
On your FlexFormz, you can use either an image or a solid color as the page background (or both, if you want to use a transparent image.
The size of the Image Background depends on the type of form that you choose (2-Step or Full-Page., Below are the minimum size requirements for the image:
| Template | Width | Height |
|---|---|---|
| 2-Step | 1460px | 820px |
| Two Columns | 1200px | 350px |
| Two Columns (Featured Image) | 250px | Any |
| Single Column | 1460px | 512 |
Mobile Background Image Adjustment
When you select a background image, make sure is adjusted for both desktop and mobile version.
On the two-column form there is 2 sections for background image, “full-width image” and image for mobile.
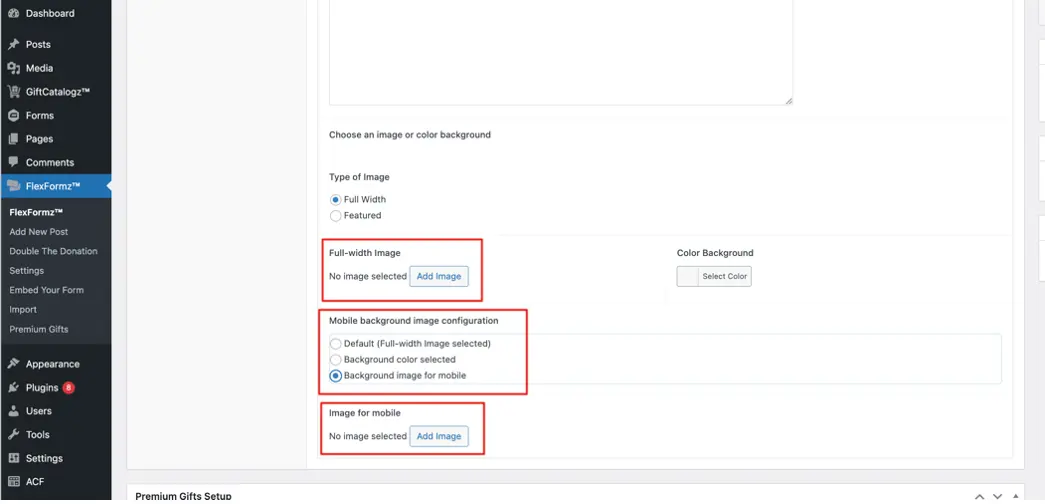
For the second one, the recommendation is to select “Background image for mobile” and upload an image with max-width = 576 and max-height = 400, with a gradient at top and the bottom, and preferably the predominant colors of the image should match the background color.
Bottom Text
These fields correspond to the paragraph text that will be displayed below the form. If you leave this blank no text will be shown.
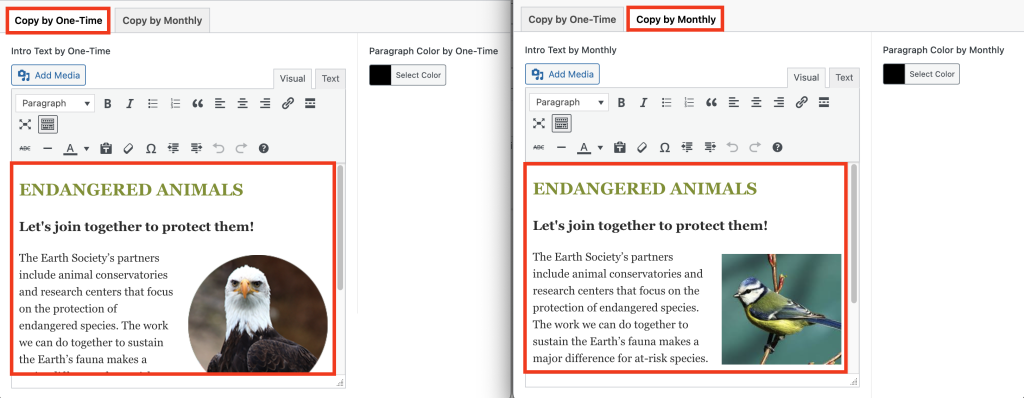
Dynamic text by frequency
Choose the form you want to modify and click on “Edit.”
Locate the “Landing Page Form Options” menu and find the “Headline and Copy by” section.
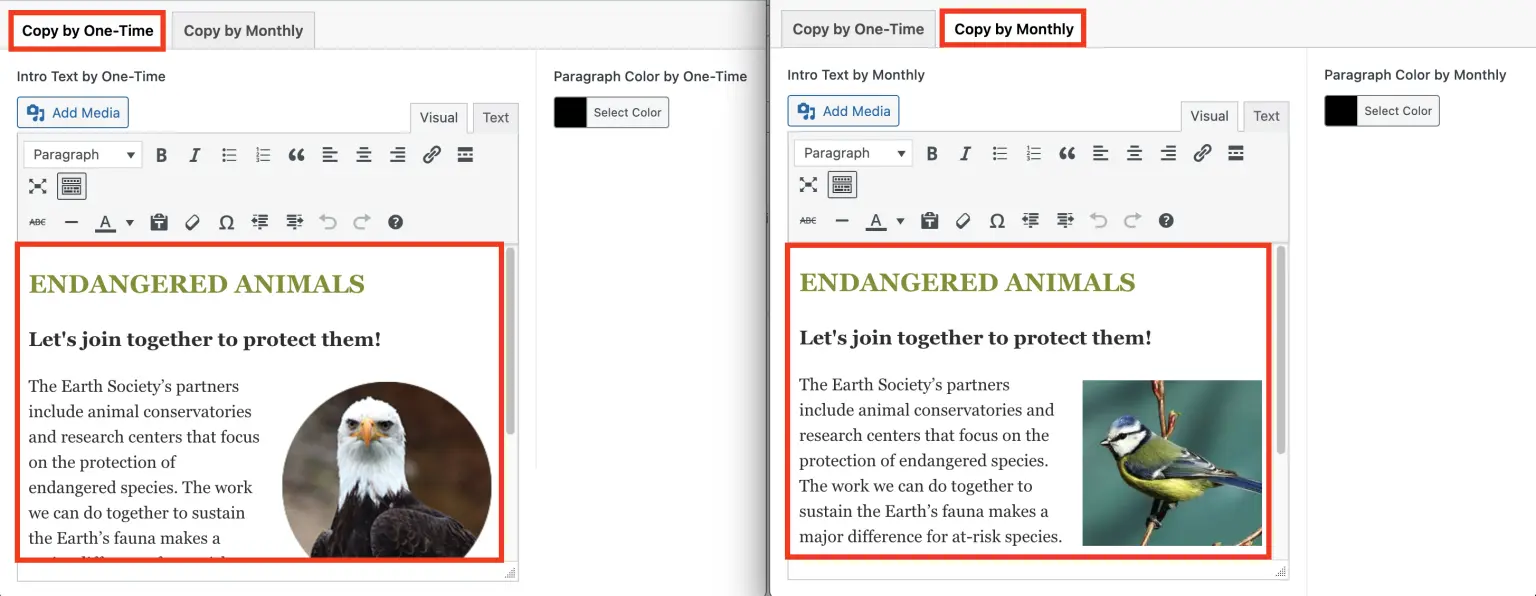
Select the “Frequency” option and format the text for each frequency in the text box below.
Update your form through the Publish menu (found on the right sidebar at the top of the page).
Preview your form to verify that the changes have been applied.
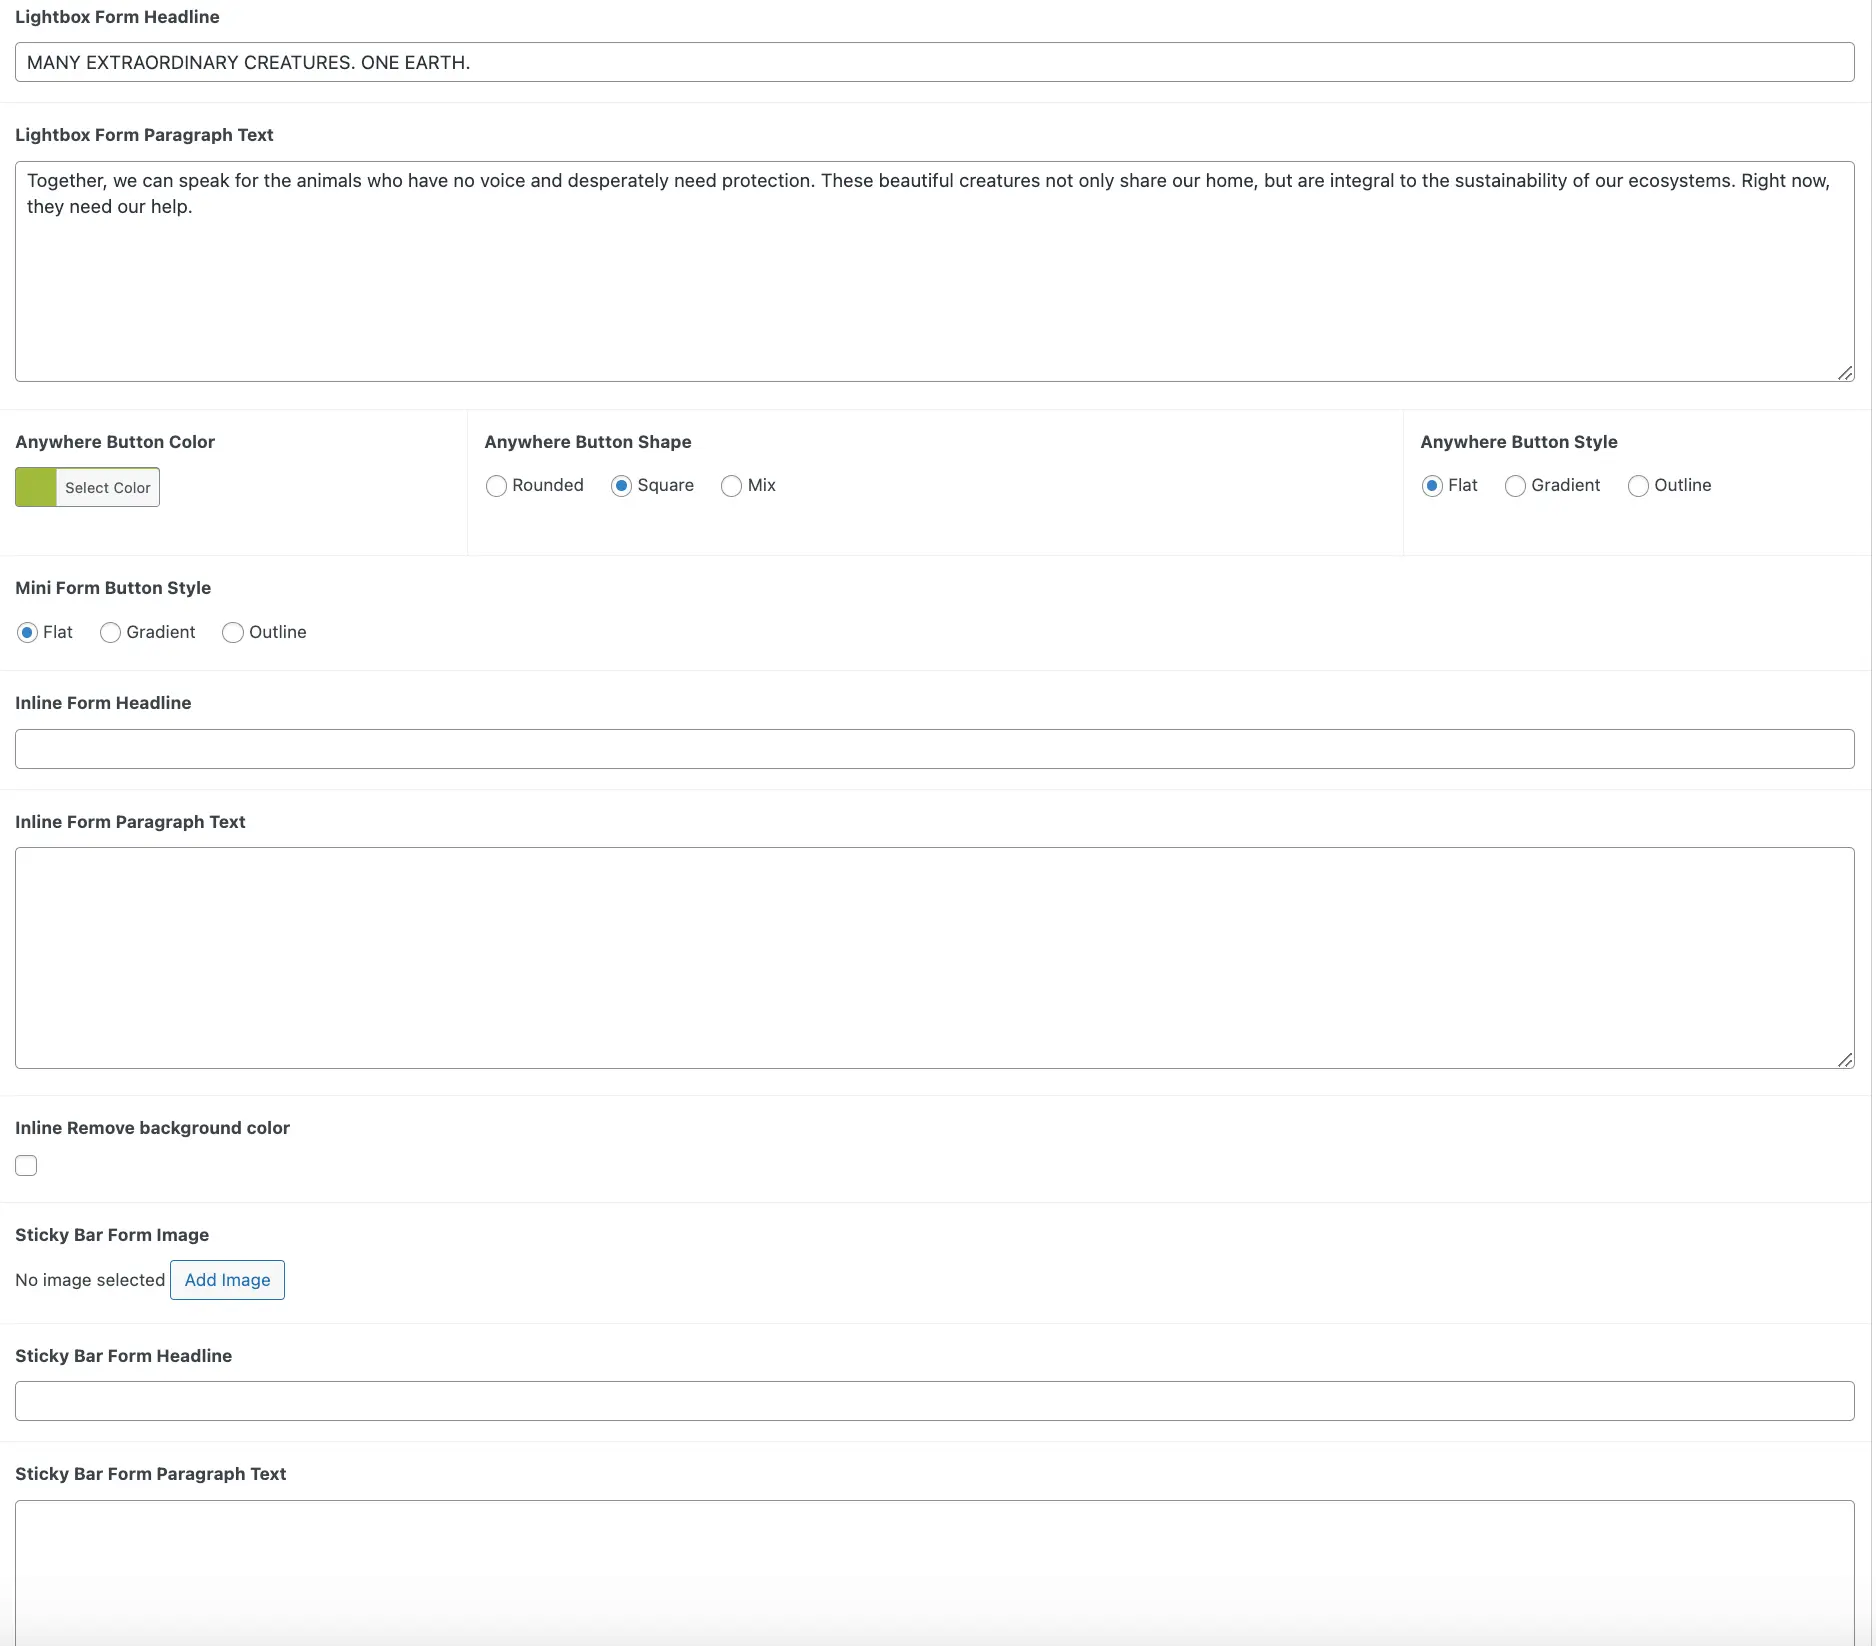
Embedded Form Options
Lightbox Form Image, Headline, and Paragraph Text
With these fields you can add an image, headline and paragraph text to the Lightbox view of FlexFormz.
Anywhere Button Form Color
This field controls the button color of the Anywhere Buttons added to your pages and posts.
Inline Form Image, Headline, and Paragraph Text
With these fields you can add an image, headline and paragraph text to the Inline view of FlexFormz.
Sticky Bar Form Image, Headline, and Paragraph Text
With these fields you can add an image, headline and paragraph text to the Sticky view of FlexFormz. The image will only be displayed on the left and right views of the Sticky Bar (NOT on the top or bottom views).
Internationalization
Language
English is the default language, but you can customize this to make your form more accessible for your donors.
The available languages are: English, Spanish, French, Portuguese, Italian, Deutsch and Hungarian/Magyar.
There are two ways to change the language on your form:
1.-From the form configuration.
2.-Using a plugin (we recommend WPML)
Change language on a form
Set a language for all forms, English is the default.
On the side bar, on “Settings” for Flexformz, go to “Global Settings”.
You can select the default language for all your forms, later you can change it for every form.
New forms are created with the default language selected.
Change language for a specific form.
On your WP Admin page
On the sidebar → Flexformz → Edit Donation Form (On the selected form) → New Form setup → Default Language
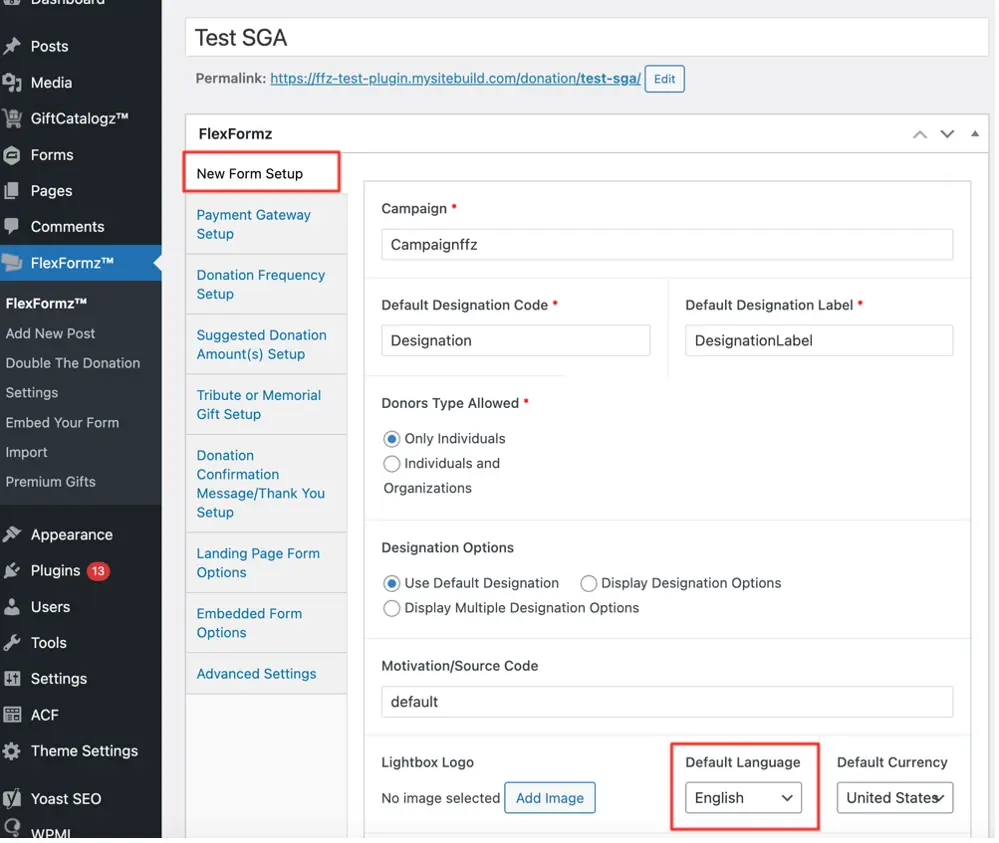
Select the language you want for your form, and don’t forget to click on update.
Plugins (WPML)
Download and install WPML Multilingual CMS and WPML String Translation
On your WP Admin page
On the sidebar → Plugins → Installed Plugins → Activate
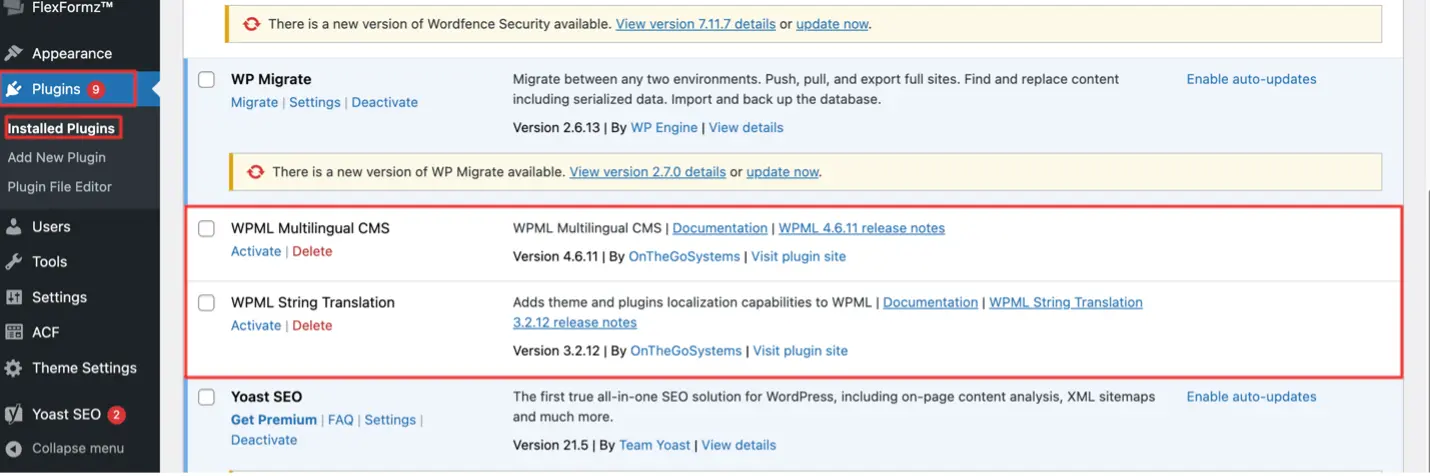
Once activated, a small icon with a flag will appear in the bottom right corner of your form page, click it to select from the different language options available.
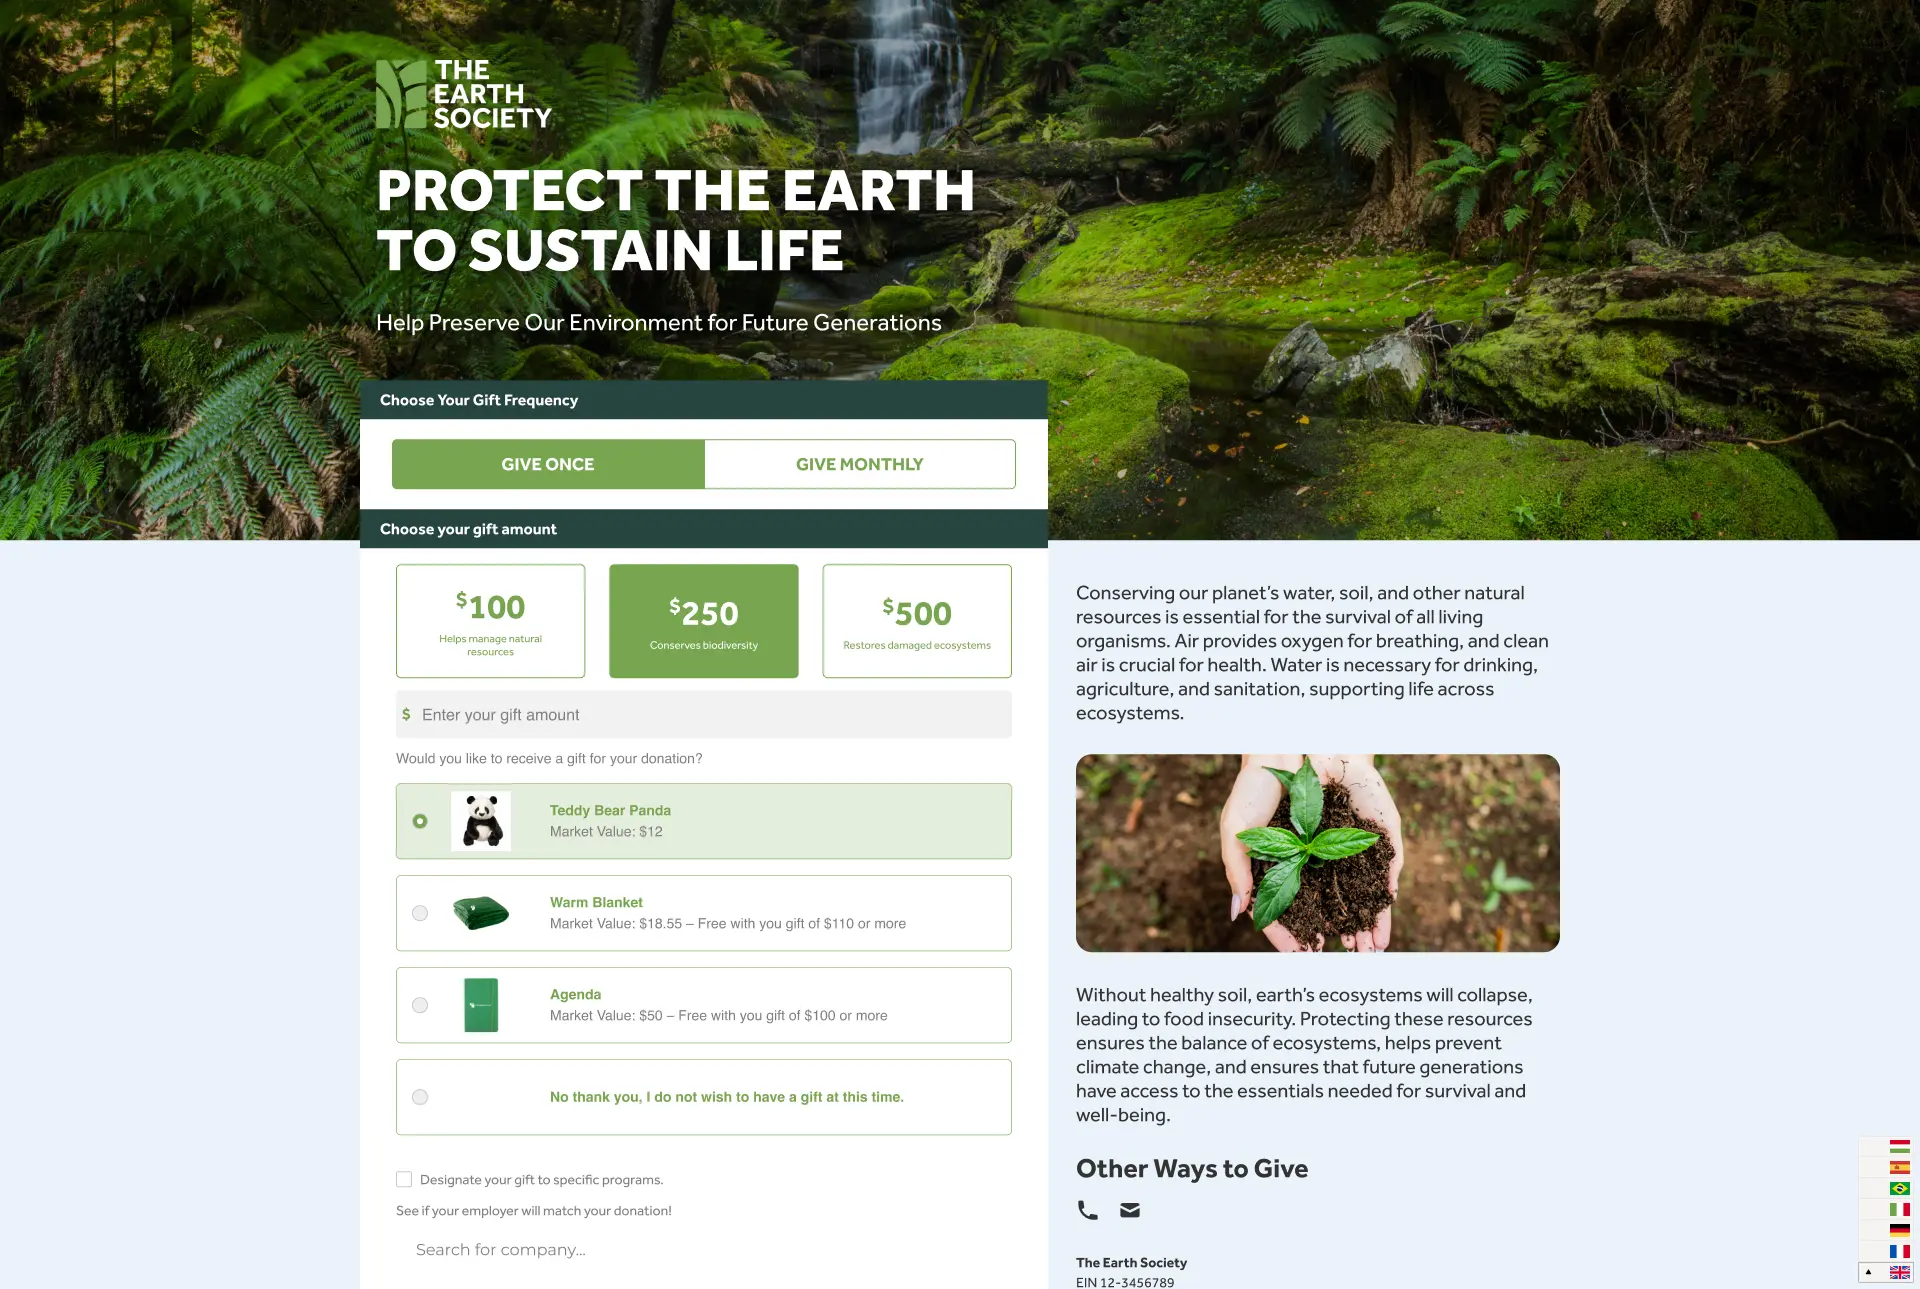
The selected language will be the same language for the autoresponder sent to the donor (if it is configured on dashboard).
“Instructions for how to do this are available in “Autoresponders”.
Back on your WP Admin page, on the right side of your “Edit Donation Form” page, you can add a new form for a specific language if you want to customize it.
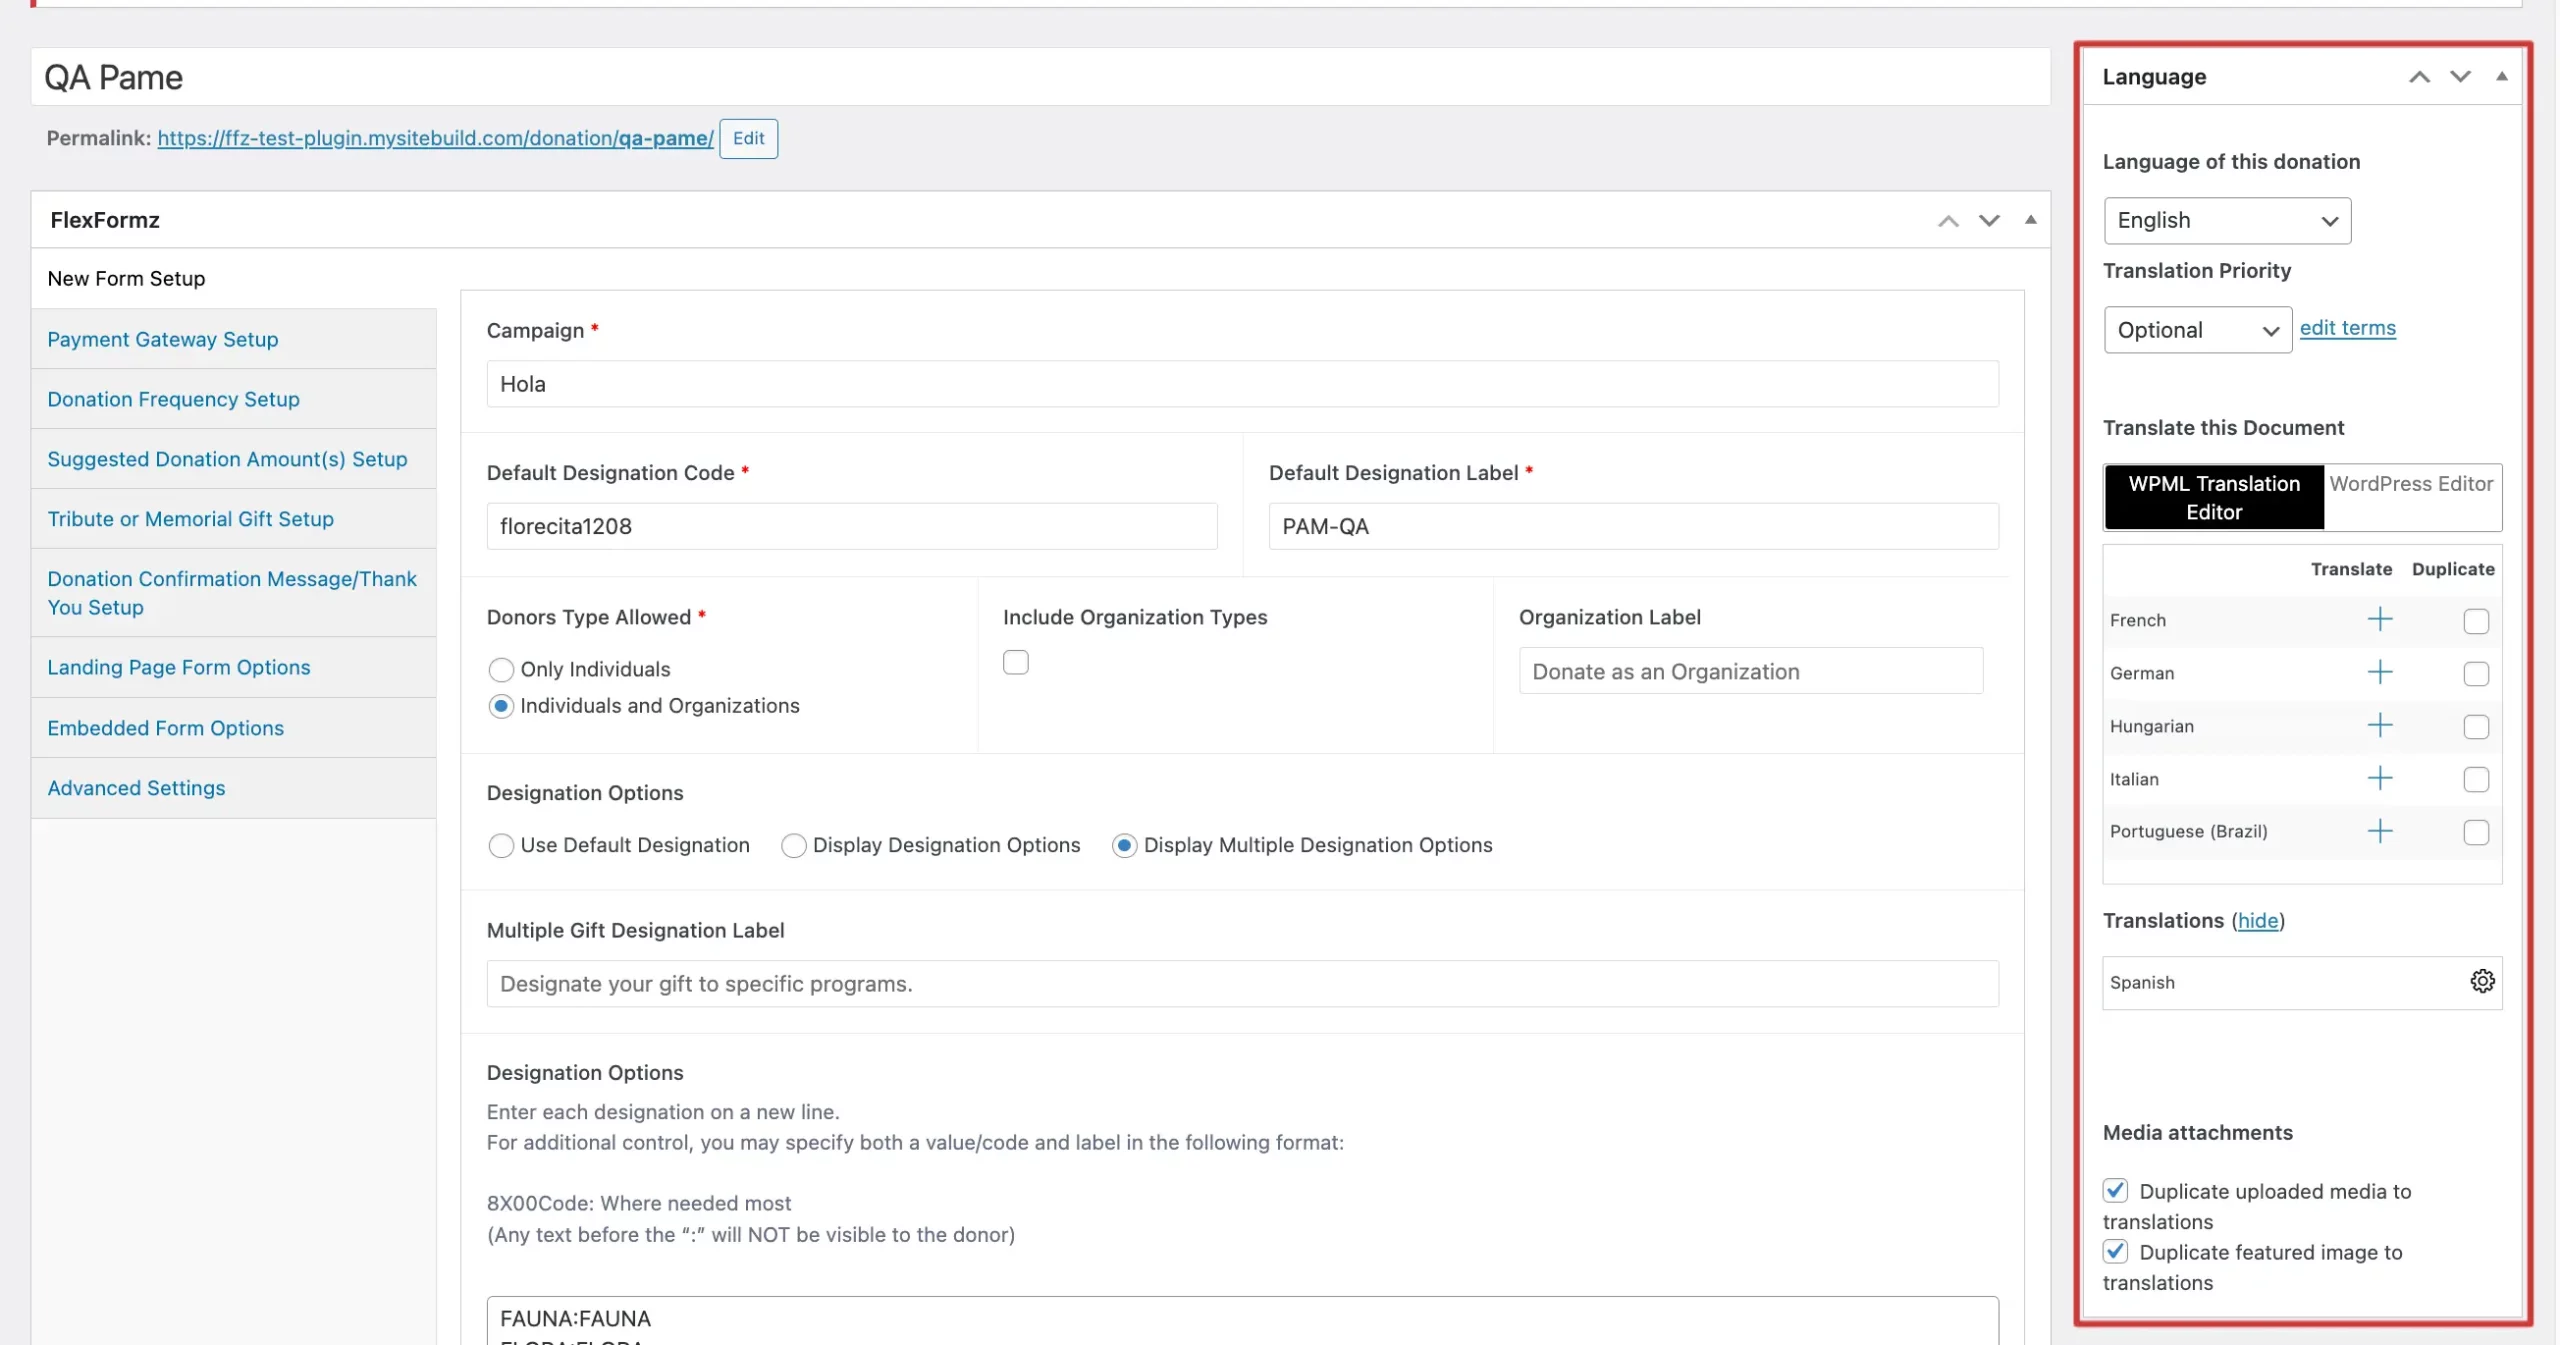
For more information go to WPML
Currency
USD is the default currency, to make available more currencies activate the toggle
On your WP Admin page → On the Sidebar → Flexforms → Settings → Payment Gateway Settings→ Enable International Currency
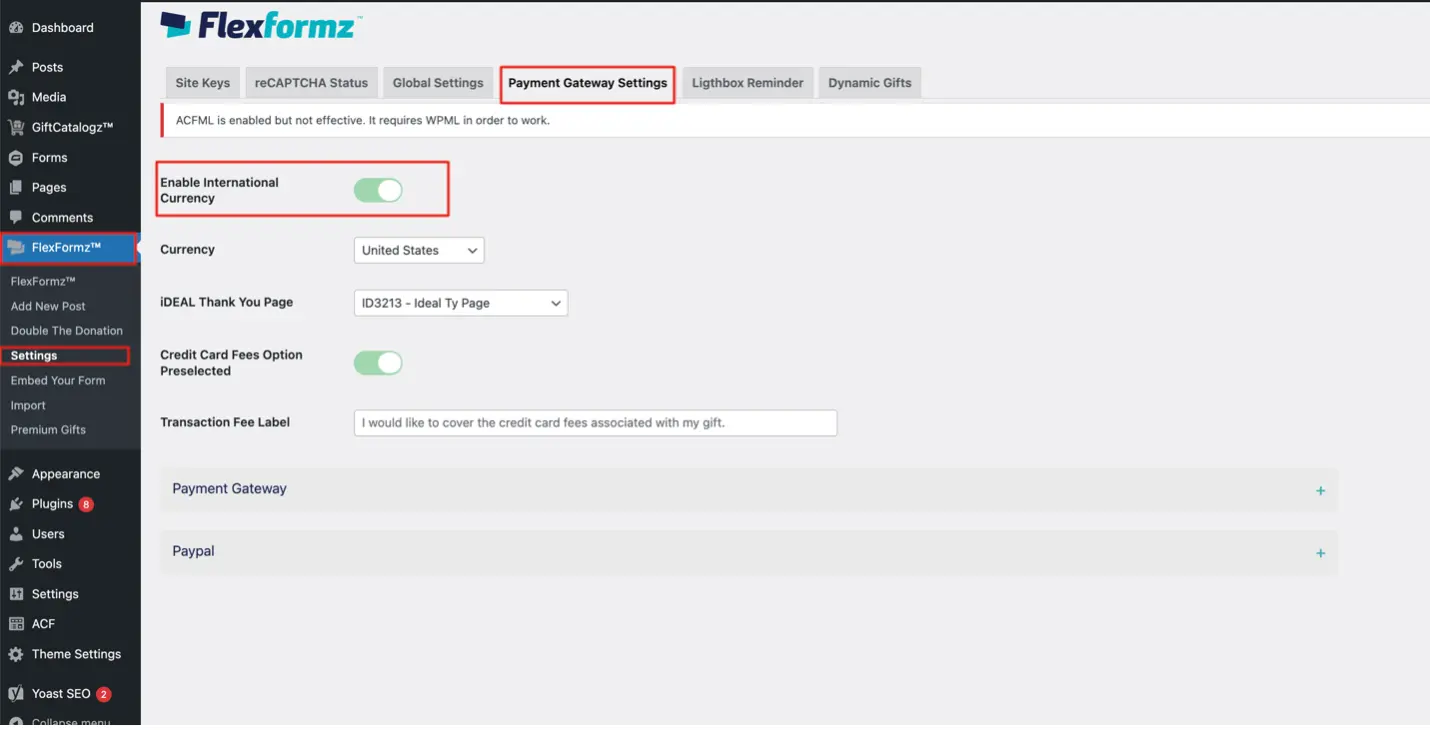
Every currency works with one or more specified payment methods, and you can make them available on your form configuration.
On the Sidebar → Flexforms → Edit Donation Form (On the selected form) → Payment Gateway Setup
Currently, the available currencies and payment methods are:
USD – Accepts payments made by Bank Transfer, PayPal, and Credit Card
CAD – Accepts payments made by Credit Card
MXN – Accepts payments made through OXXO and Credit Card
EUR – Accepts payments made through Credit Card, iDeal and SEPA
Remember:
For now, Express Donate is only available for USD
Advanced Settings
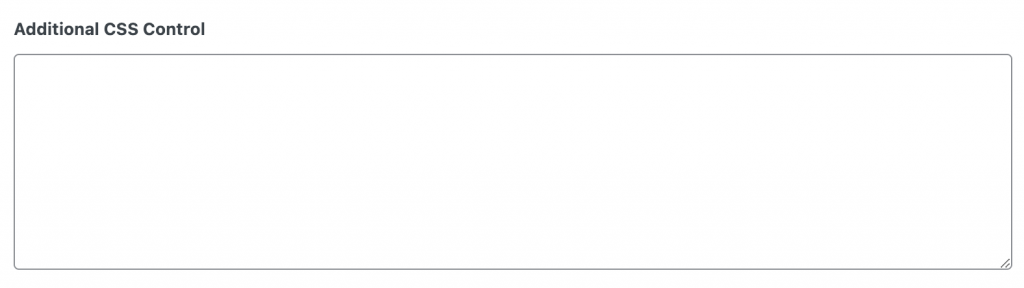
Additional CSS Control (for experienced professional developers only)
This field allows you to adjust the look and feel of your FlexFormz using CSS Styles.
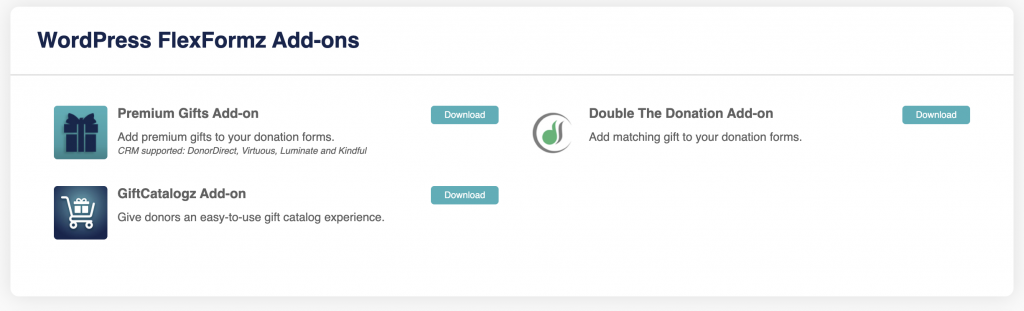
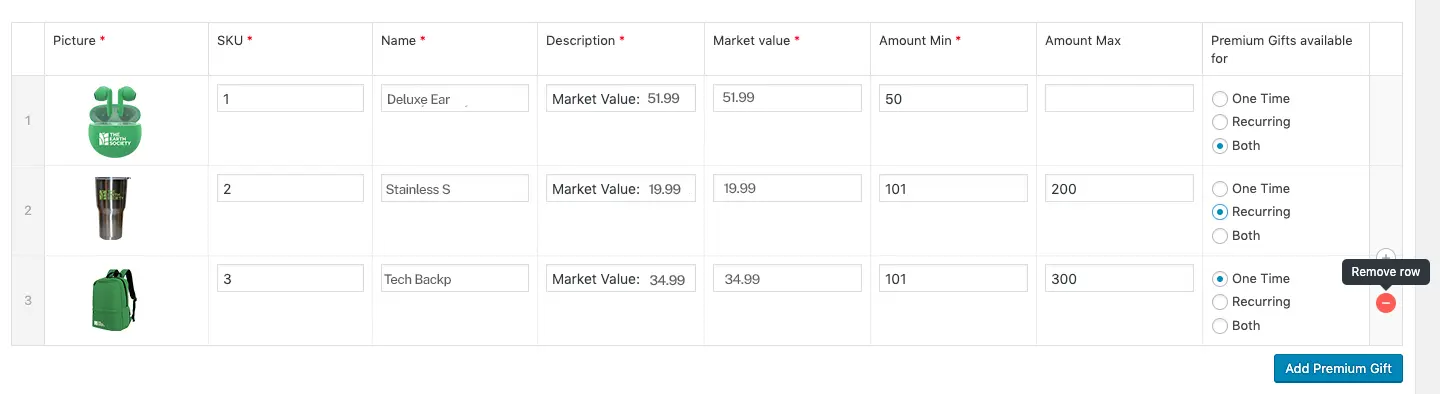
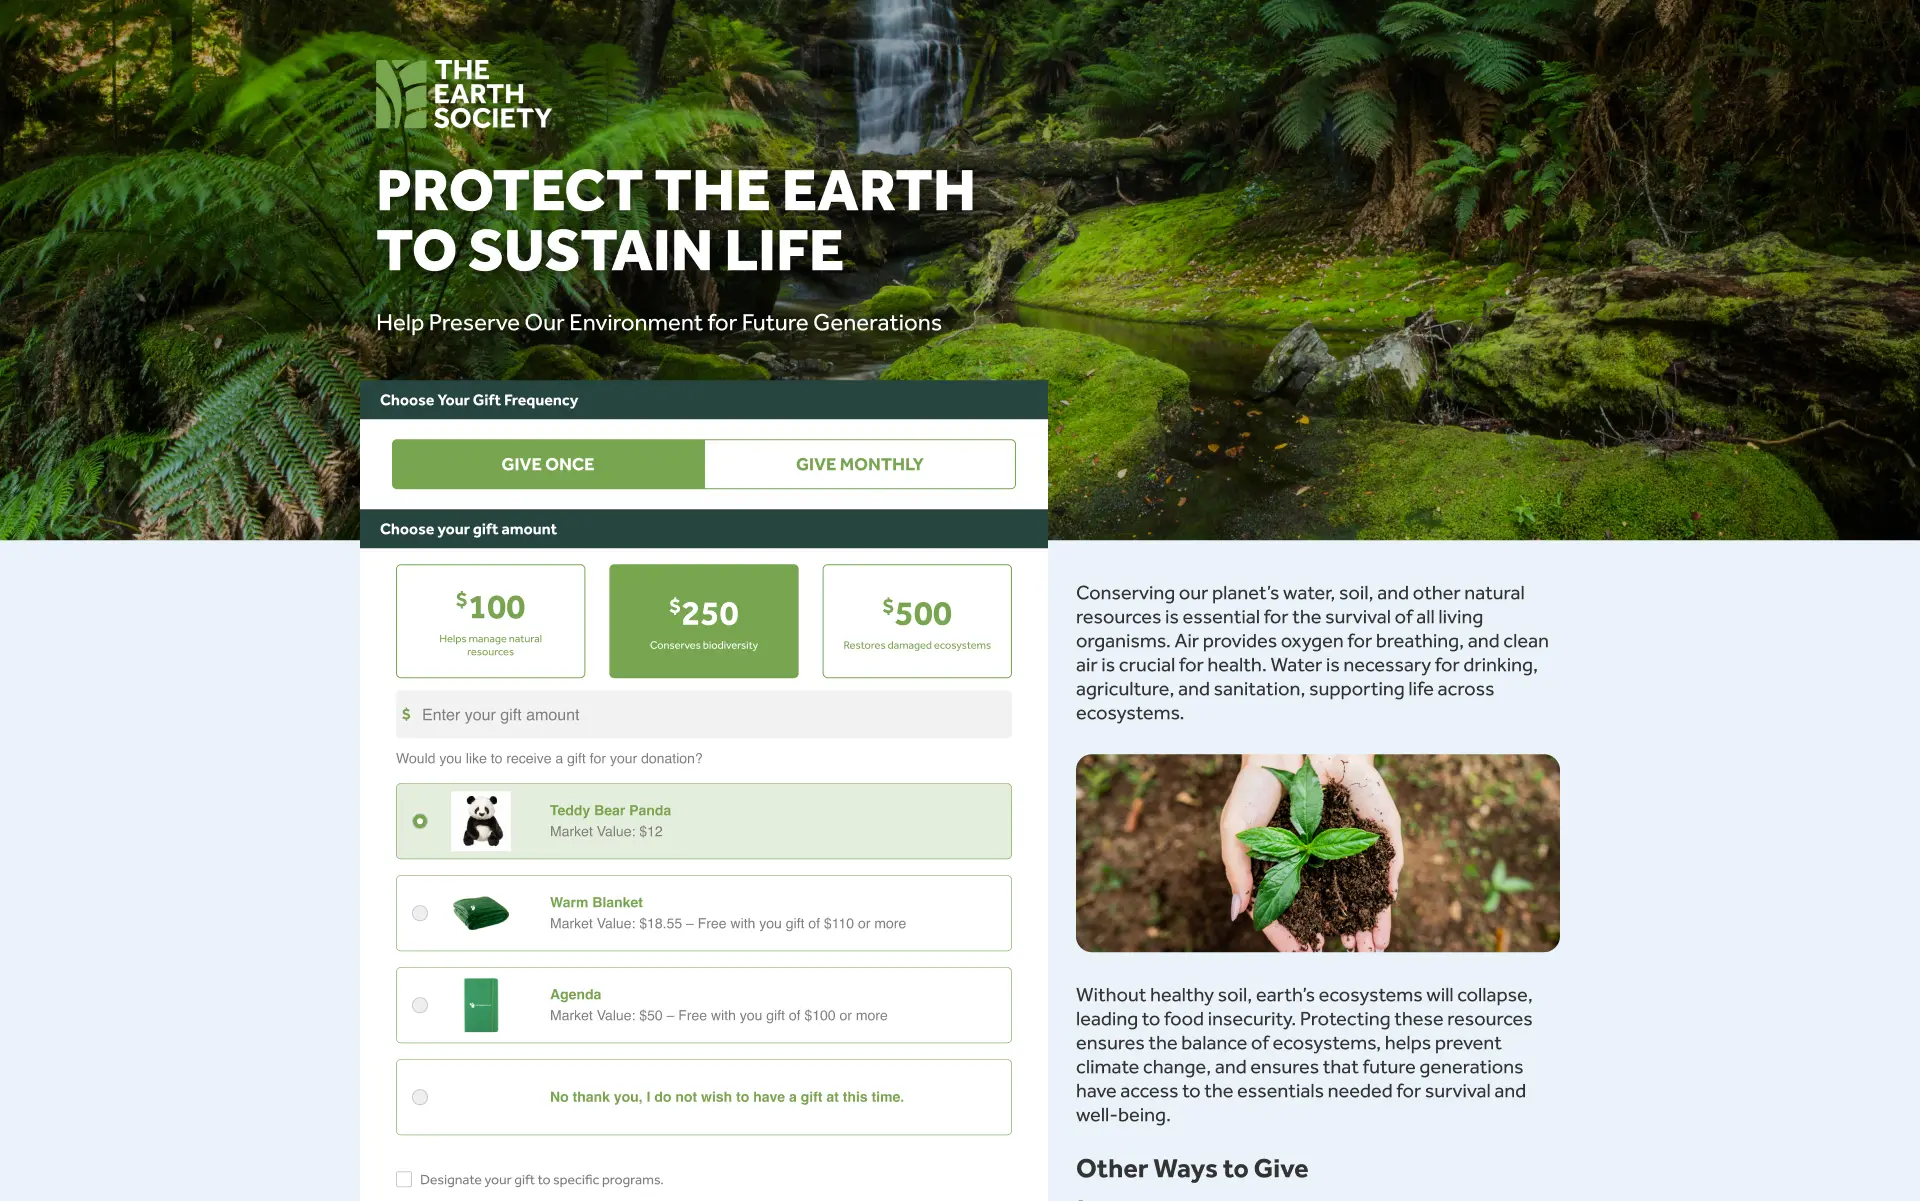
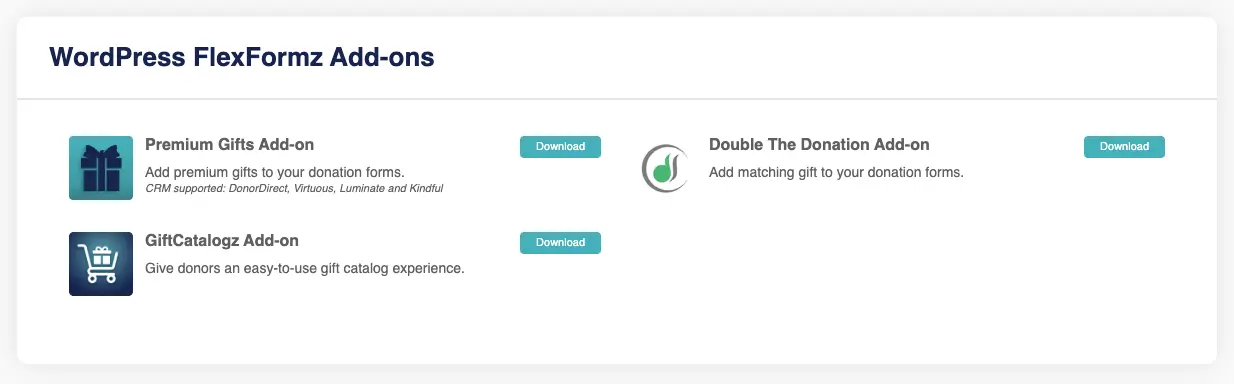
Premium Gifts
Go to the FlexFormz Dashboard https://dashboard.flexformz.com and download the Premium Gift Add-on, located in the Settings menu.
Proceed to install the plugin on your WordPress website on the left menu Plugins – Add New – Upload New. Please upload the file that you downloaded on the previous step.
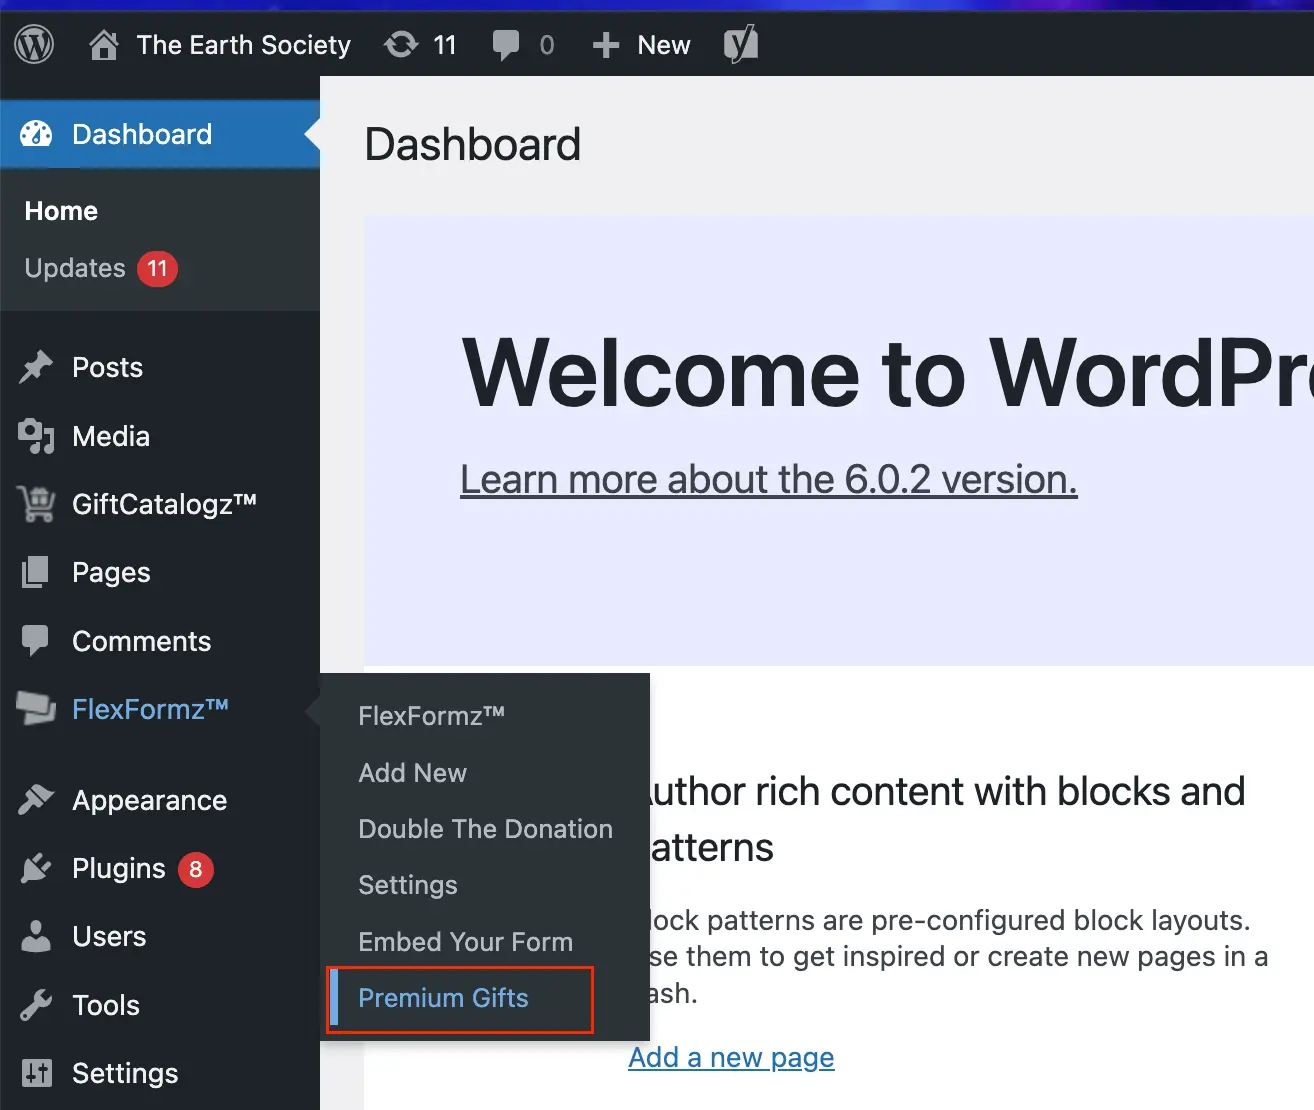
Inside the FlexFormz menu options click on the Premium Gifts submenu.
On this screen, you can change the title field.
Next, you need to add all the gifts that you would like to offer by clicking on the button “Add Premium Gift”
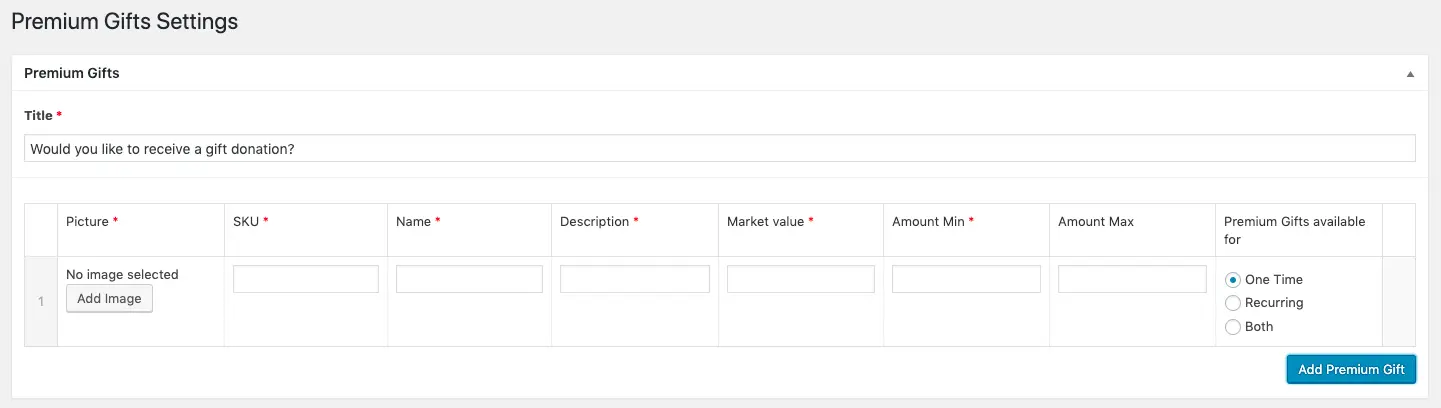
Fill out the information for each gift:
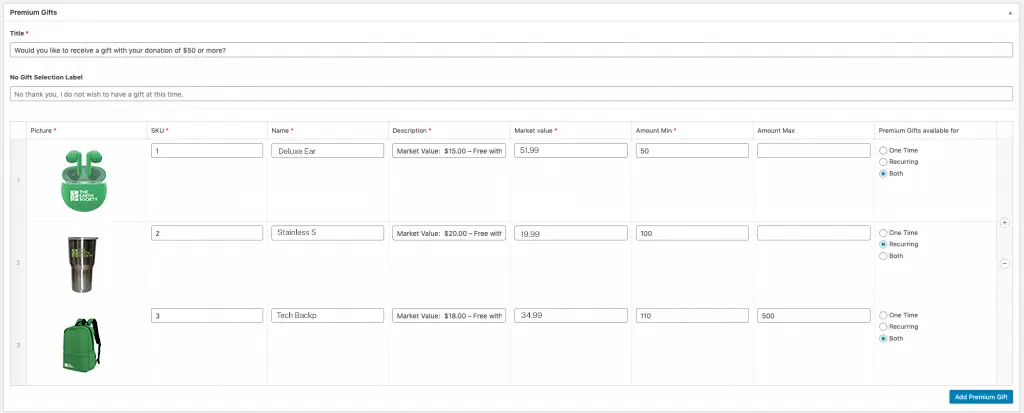
– Amount Max is not a required field.
– The gifts that you add will be available to activate on each of your FlexFormz.
The “No Gift Selection Label” is the option for the user to decline the gift. The copy on that option is editable, but when left blank, the default text will be displayed.
To save the changes, click on the Update button.
Deleting A Premium Gift
Place your cursor on the last column, hovering over the row that you would like to remove, and a red minus sign will appear. Click on this button and confirm the action.
Adding Premium Gifts to Your FlexFormz
On each FlexFormz you will see a section called “Premium Gifts” where you can see all of the premium gifts that were added on the Premium Setting page. Select which premium gifts you would like to have available for that particular form and save the changes.

Designate an item as the default gift
Navigate to the premium gift menu and ensure that the desired gift is set to “Both” in the “Premium Gifts available for” column on the right.
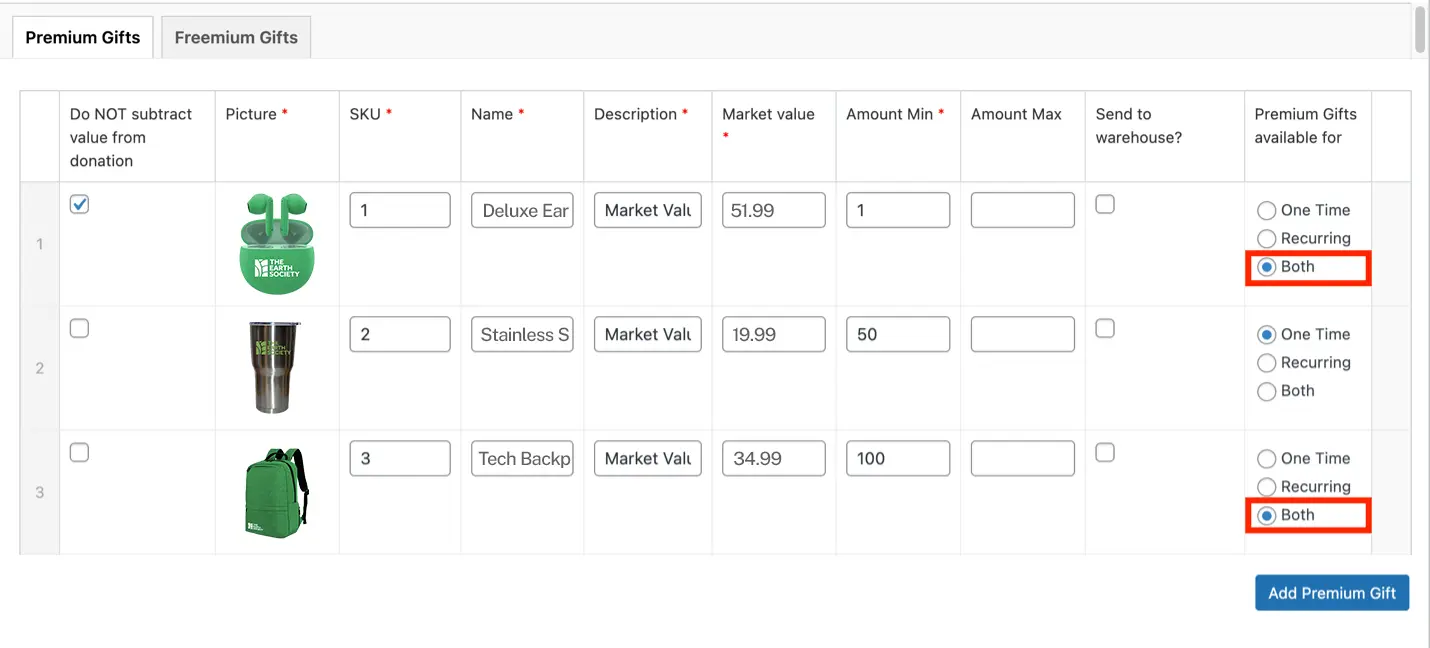
Go to the Freemium Gifts tab and provide the necessary information.

Access the FlexFormz menu and locate the form for which you wish to activate the option. Click on “Edit.”

Once the edit page is open, scroll to the bottom and locate the “Premium Gifts Setup” box.
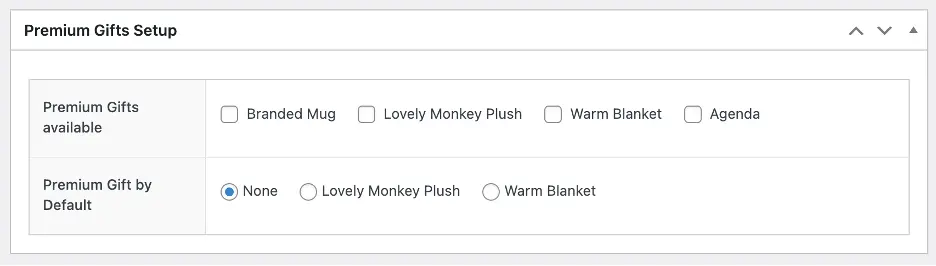
Confirm the availability of premium gifts for your form and select the desired default gift. Note: The premium gift selected must be one of the Premium Gift by Default.

Update your form through the Publish menu (found on the right sidebar at the top of the page).

When displaying the edited form, ensure that the premium gift designated as default is selected.
Send to warehouse
Note: For this option to work, your FlexFormz dashboard must be integrated to a provider such as Deposco. ( https://ffz-docs.mysitebuild.com/dashboard-configurations/#deposco)
For the data being sent into the application, in the Premium Gifts menu check the boxes in the column “Send to warehouse?”
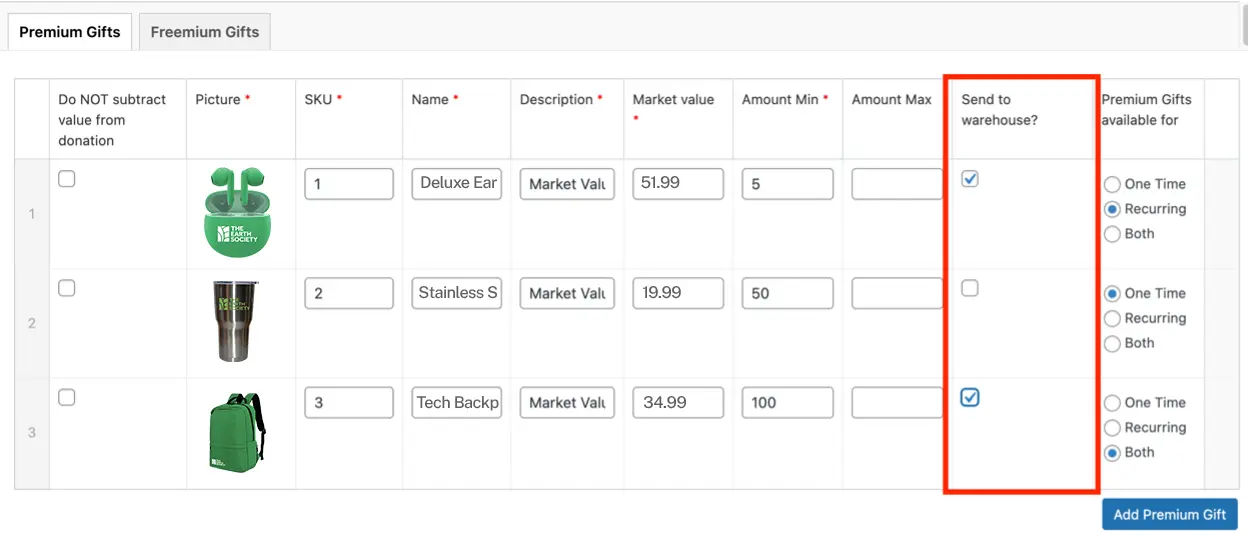
This way all the donation forms that have that item and option selected will transmit the requisite information to the Despoco application.
Adding a Premium Gift to your CRM
Virtuous
To be able to save the premium information on your Virtuous Dashboard, you need to match the Virtuous Premium Name with the Flexformz Premium Name and also the Virtuous Premium Code with the Flexformz Premium SKU.
For example:
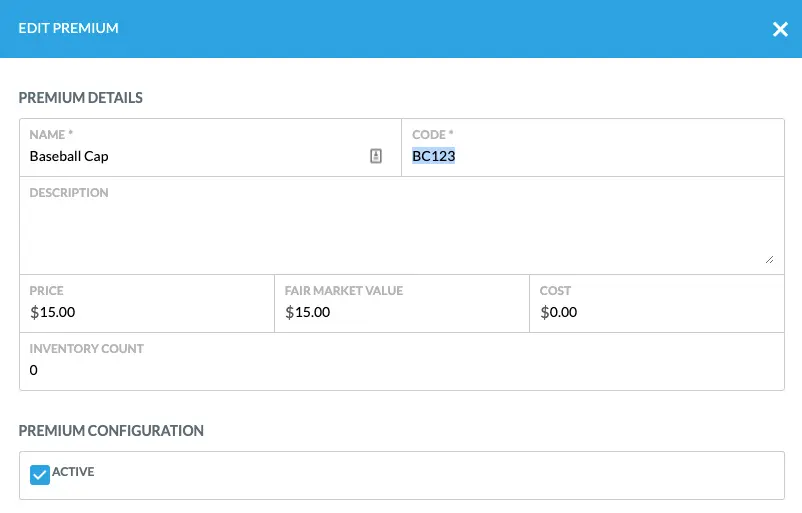
If your Virtuous Premium is named Baseball Cap and the premium code is BC123, you need to set your Flexformz premium as shown in the image below:

Luminate
For a correct Premium report on Luminate you need to match the Flexform premium SKU with the Luminate Premium ID.
Example:
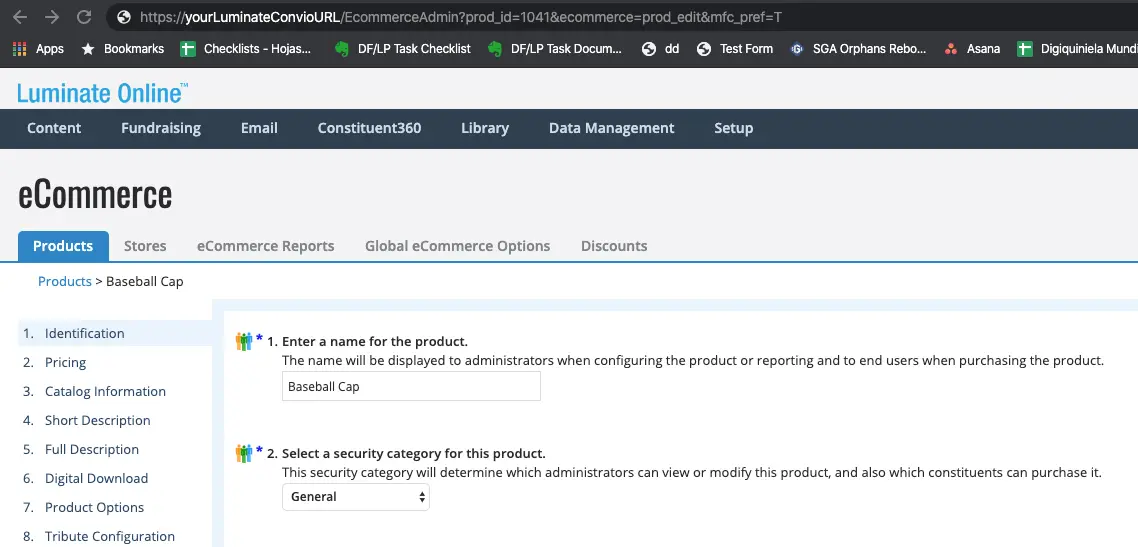
In the example above the value is 1041. This value needs to be set as the SKU of your premium in FlexFormz.

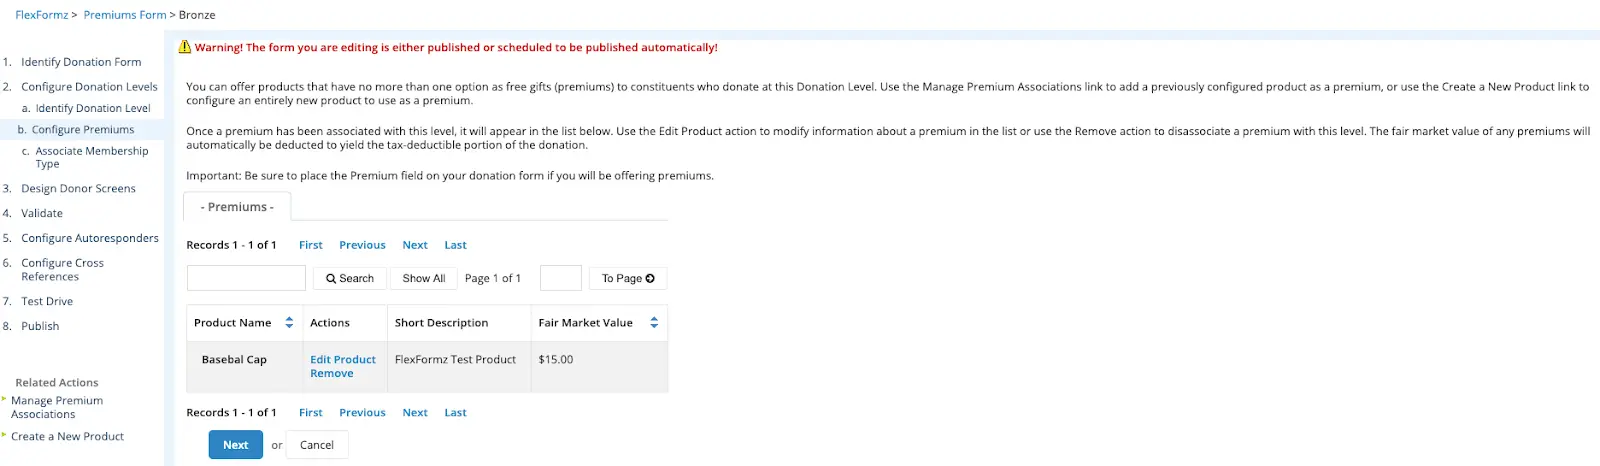
You will also need to set the premium gift on the donation levels of your Luminate form.
With this, you will be able to check the premiums assigned to a donation made through FlexFormz.
Donor Direct
Premium Gifts are currently being saved in the General Note section of each transaction on Studio Enterprise. If you would like to have more customized information saved on Donor Direct, please contact support@flexformz.com to submit your request.
Kindful
Premium Gifts are currently being saved in the note section of each transaction. Kindful has no additional support for Premium gifts.
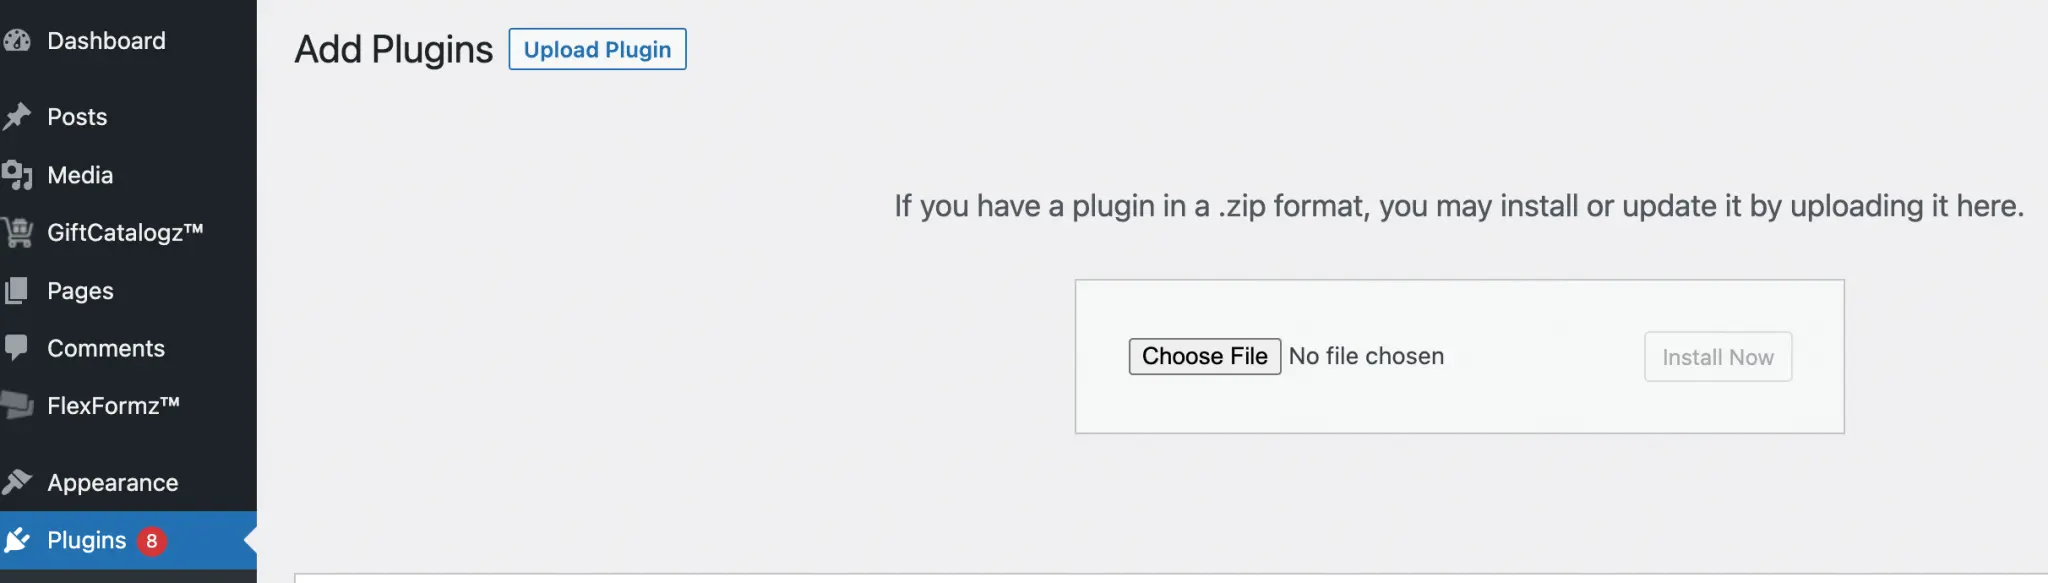
GiftCatalogz
On the FlexFormz Dashboard, https://dashboard.flexformz.com download the GiftCatalogz add-on located on the sidebar in the Plugin & Integrations menu. A zip file will be downloaded to your computer.
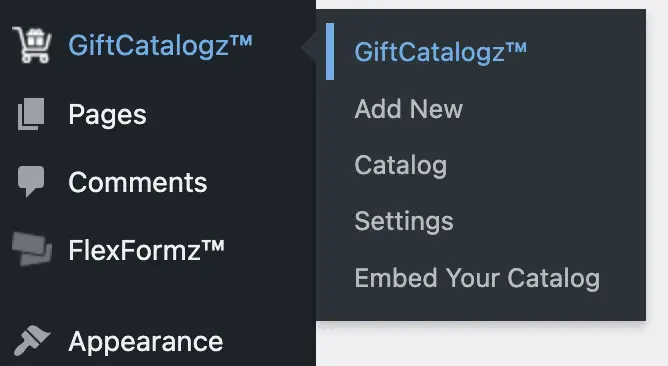
Install the plugin on your WordPress website on the left menu Plugins -> Add New -> Upload Plugin. Please locate the zip file that was previously downloaded and install it.

You will now see the GiftCatalogz plugin on the sidebar. Once here, you can:
- Create new item
- Add a catalog section
- Configure general settings
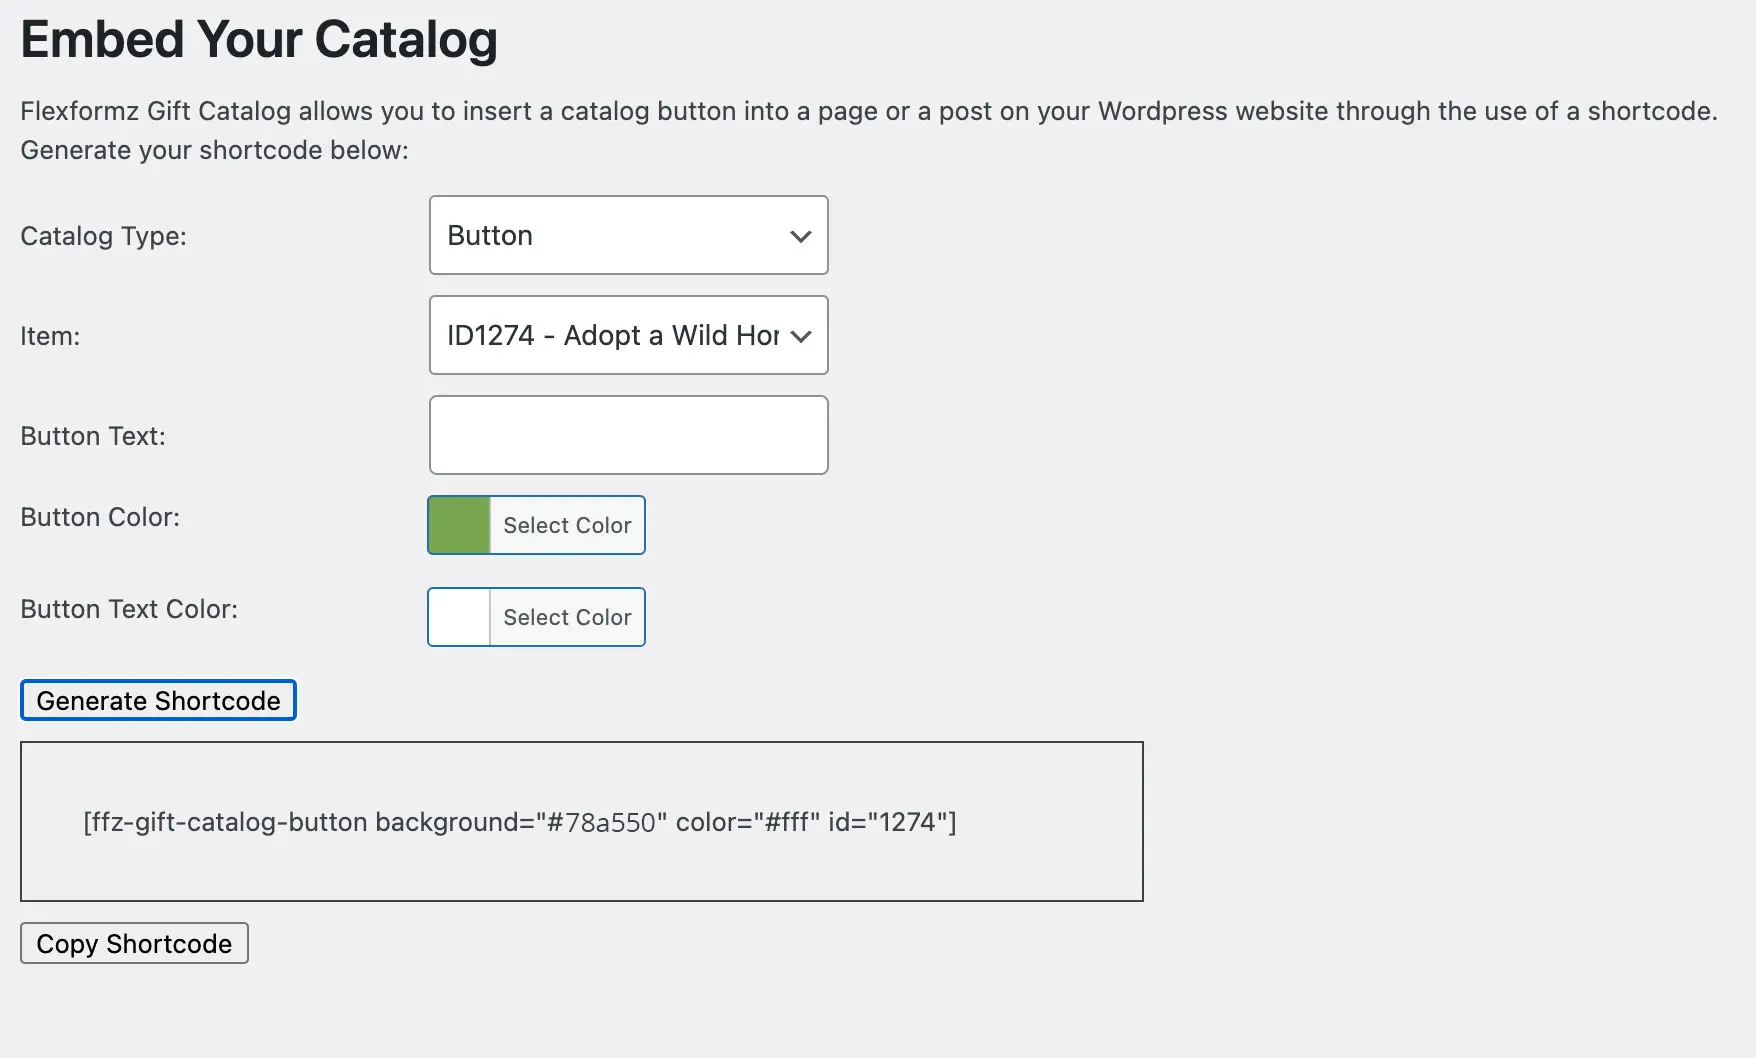
- Embed your GiftCatalogz
- Generate a shortcode for a collection
- Generate a shortcode for a button
Configure General Settings
Select an existing full-page Flexformz from your forms which will be used as the checkout form. You can select default colors for the buttons and text.
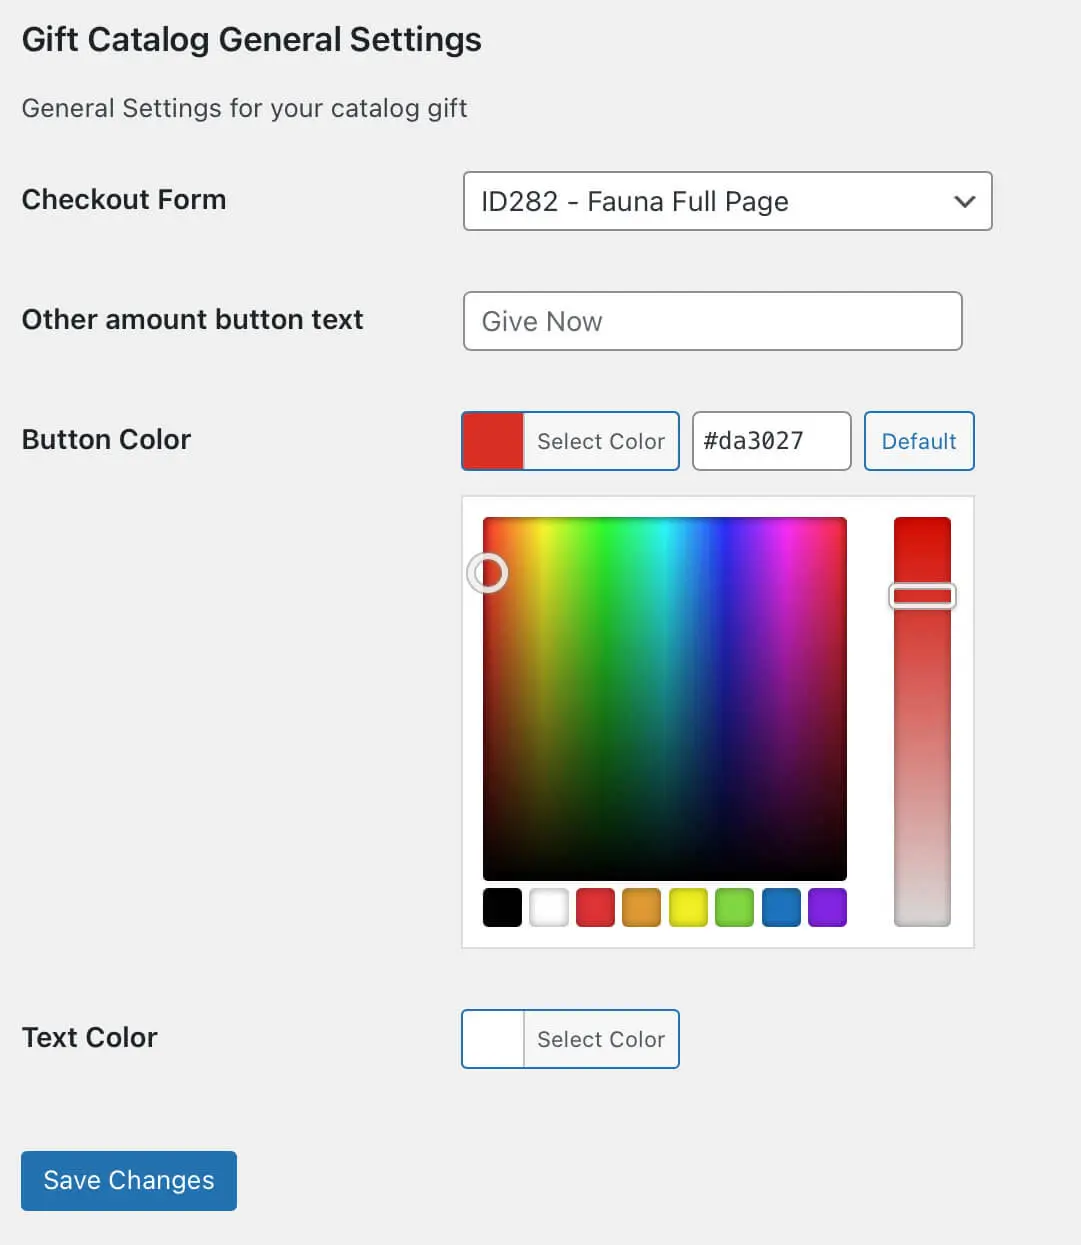
Notes:
- Our recommendation is to create a new FlexFormz form to use as the checkout form.
- Default Button Color: #45AFB9.
- Default Text Color: #FFF.
- Default button text that opens the other amount input: Give Now
- GiftCatalogz buttons have a plus symbol icon to identify them.
Example of a default button:

Examples for the button/link that open the other amount input:

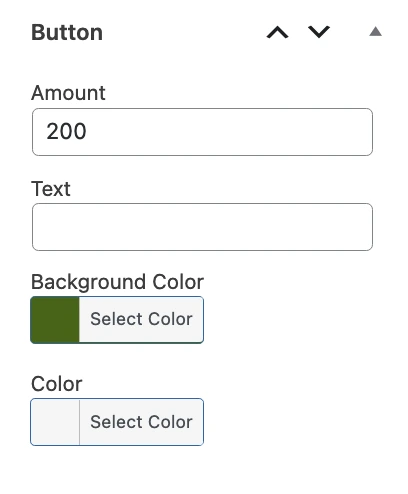
Create New Item
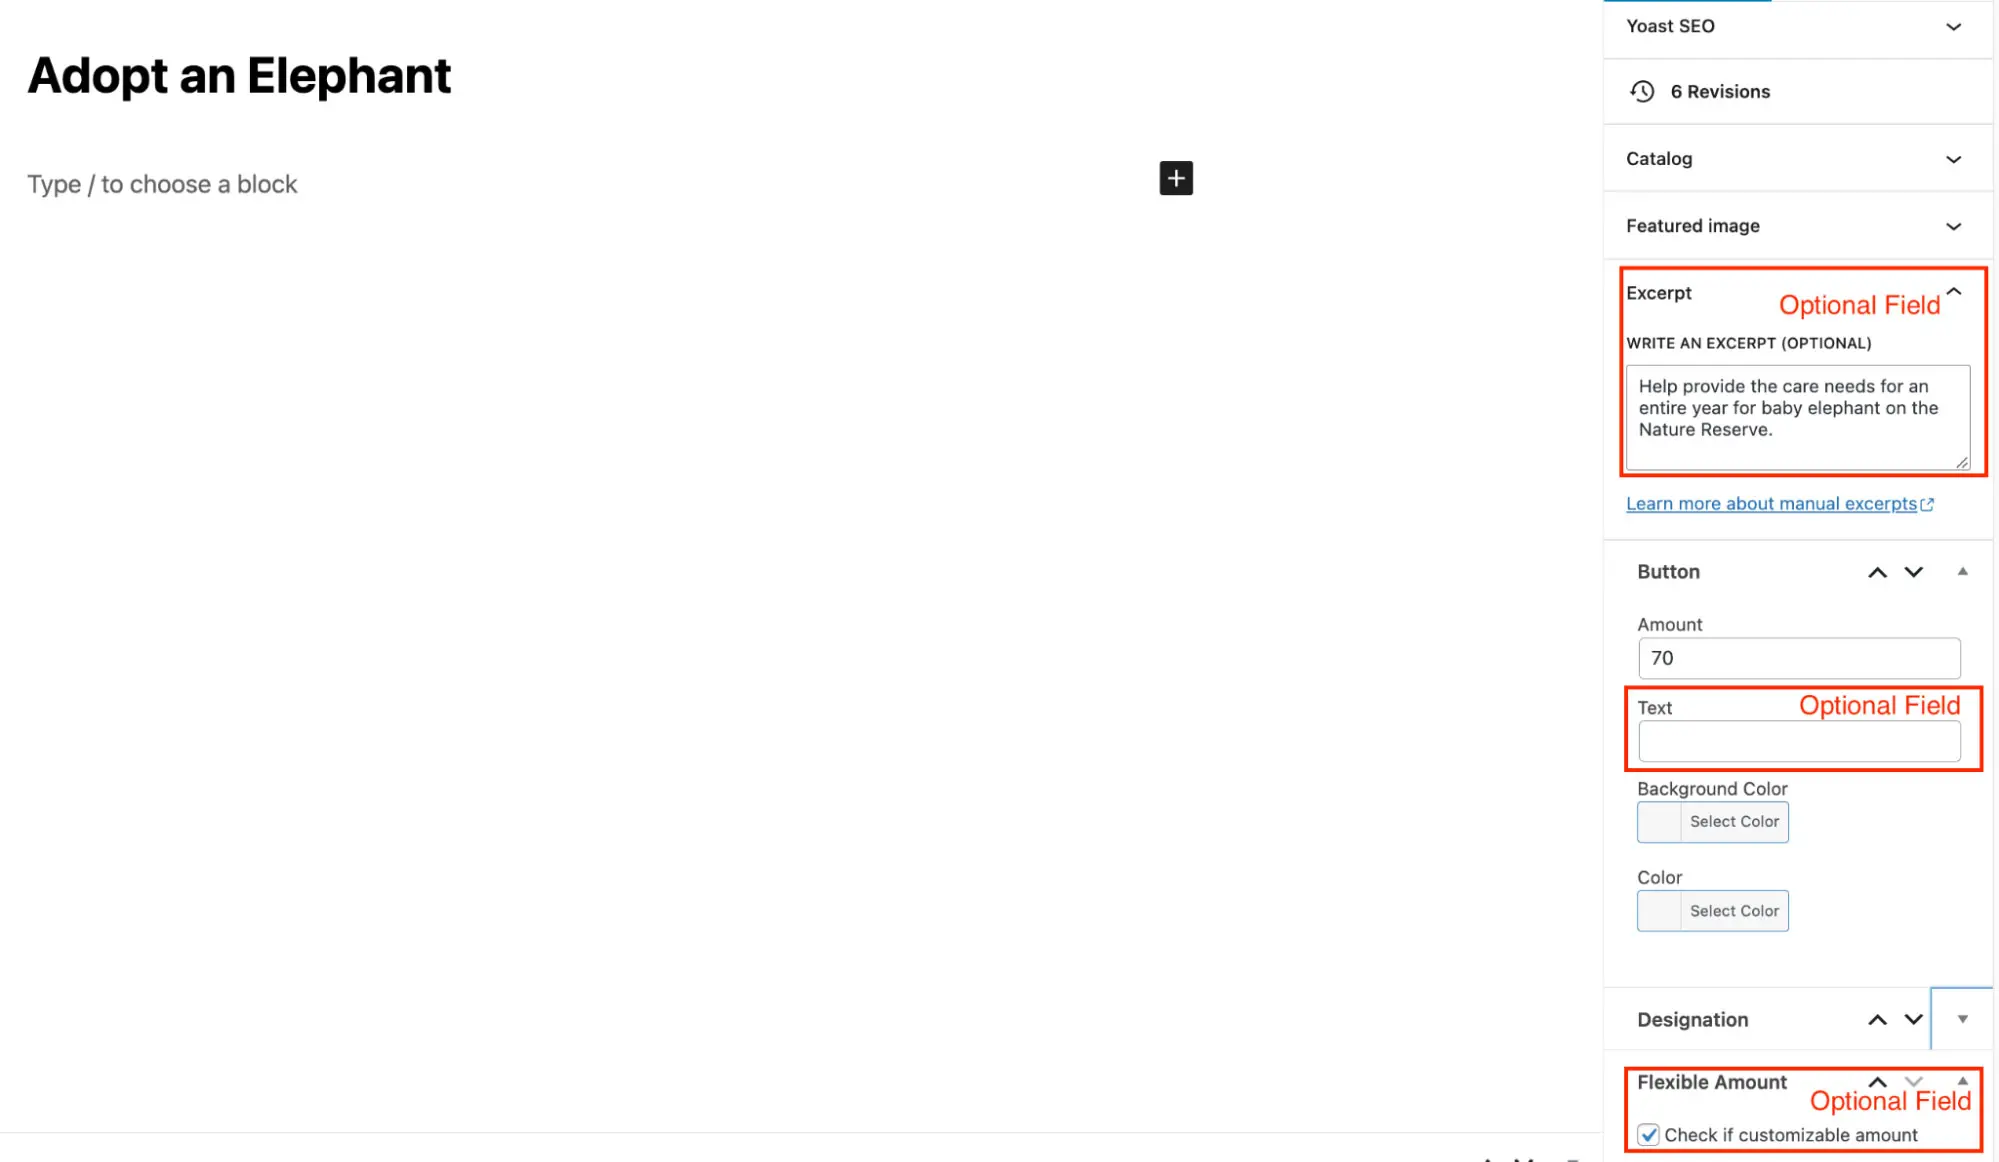
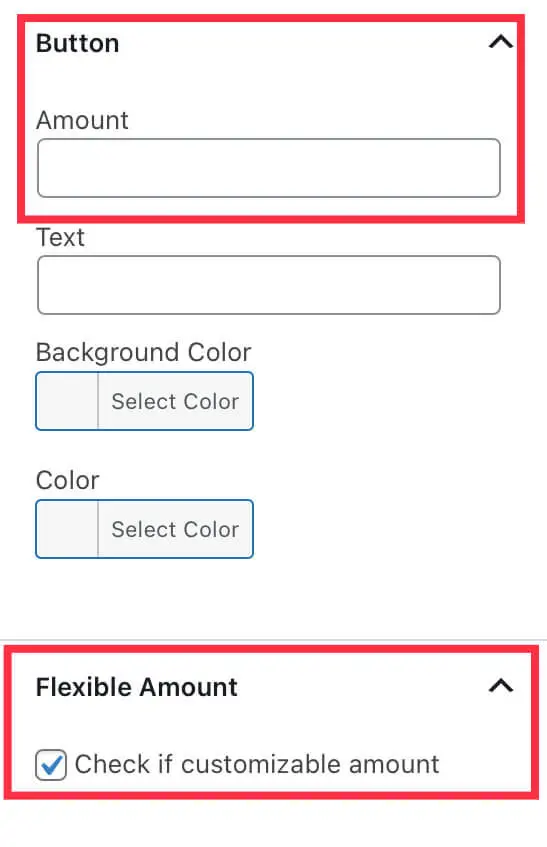
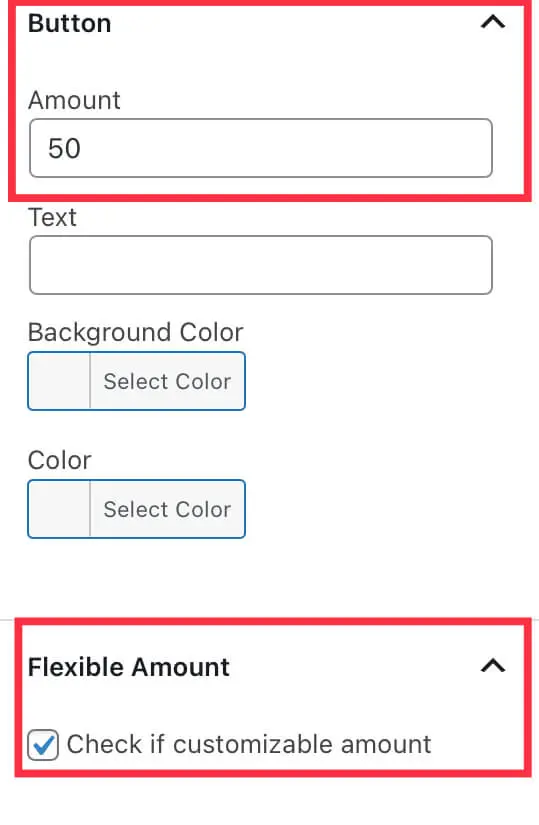
When you create a new item for your catalog, there are some required fields.
- Title
- Code
Without these fields, the button or Gift Catalog item won’t be visible to the donor.
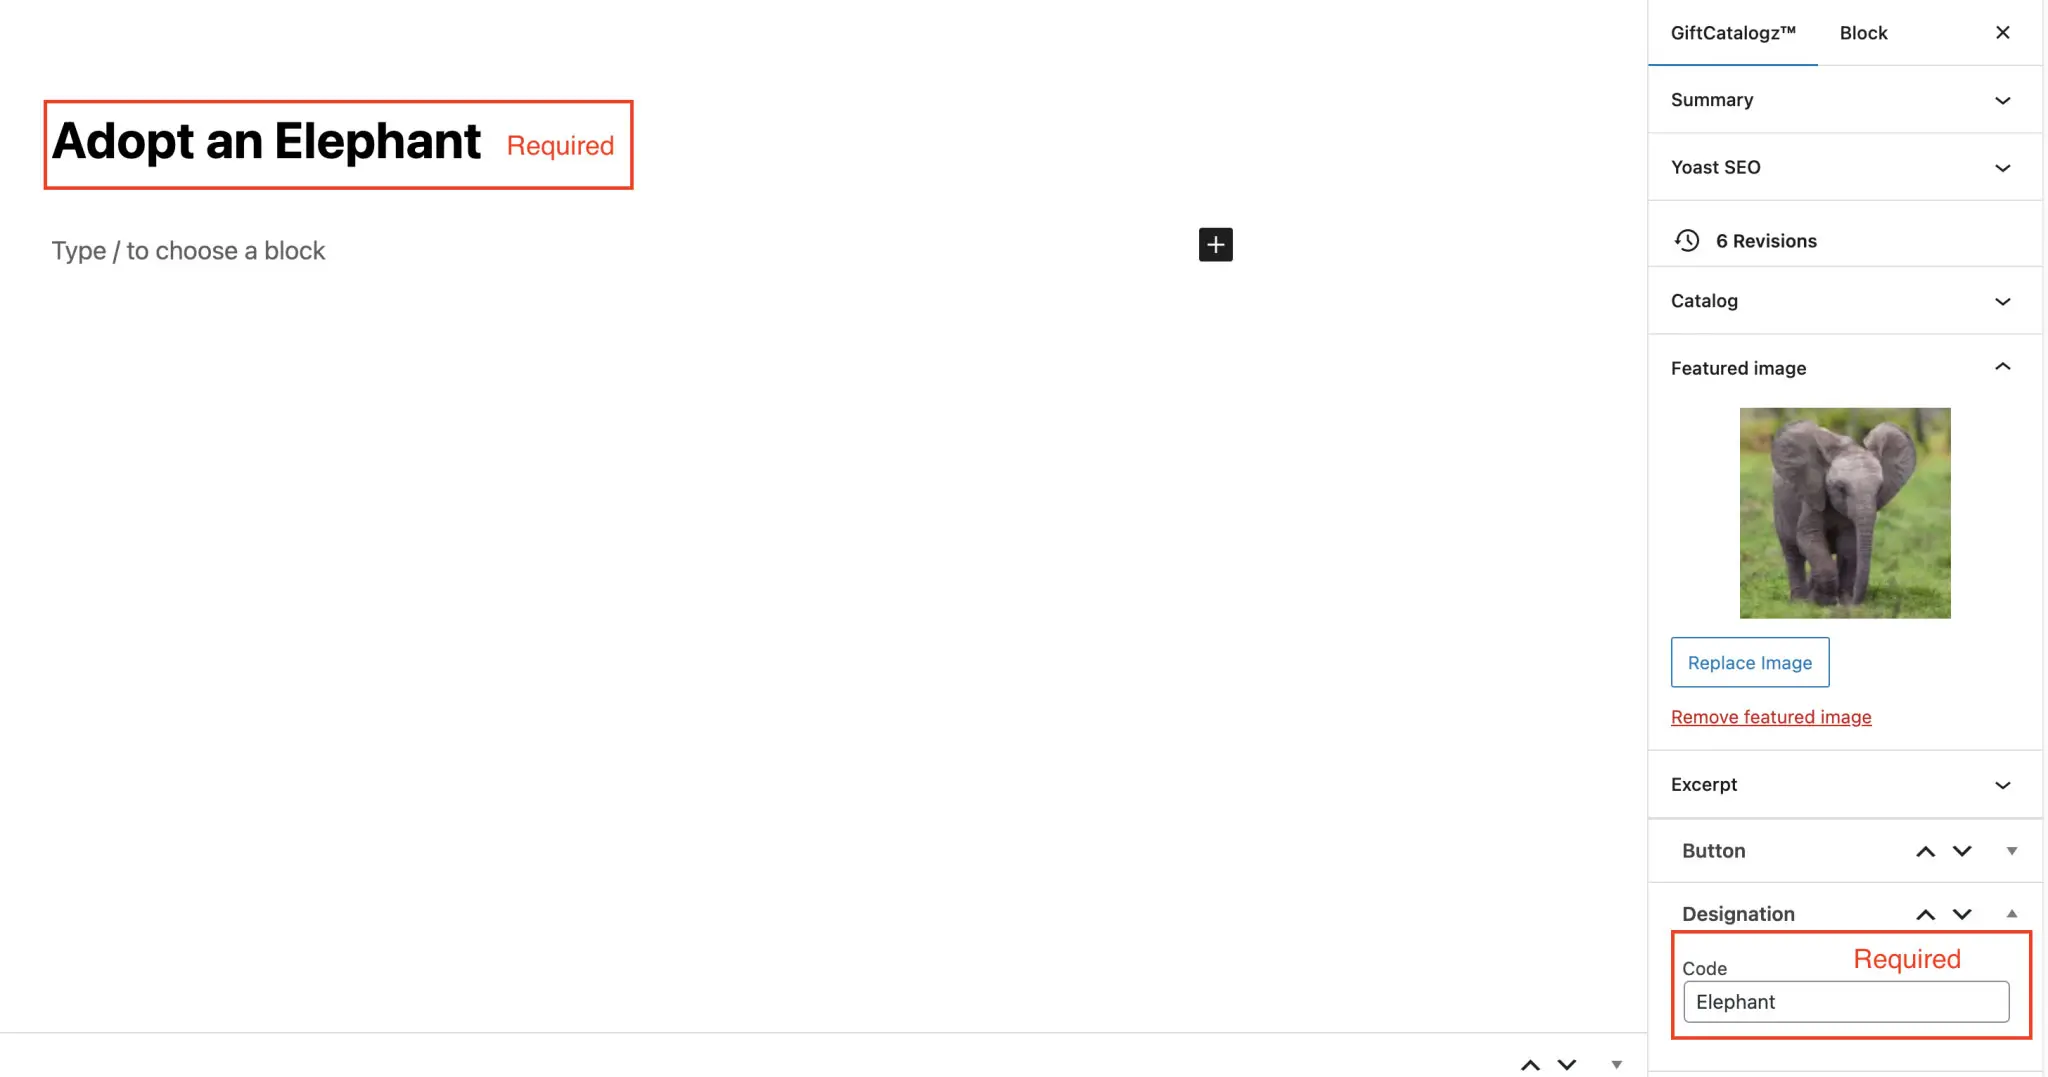
There are other optional fields
- Text (current default is: Add To My Gifts)
- Background Color (current default is: #45AFB9)
- Text Color (current default is: #FFF)
- Thumbnail image
- Excerpt (limited to 25 words)
- Checkbox to open other amount input
- Item order number
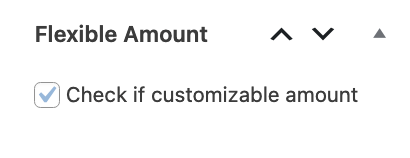
- Flexible amount
- Frequency options
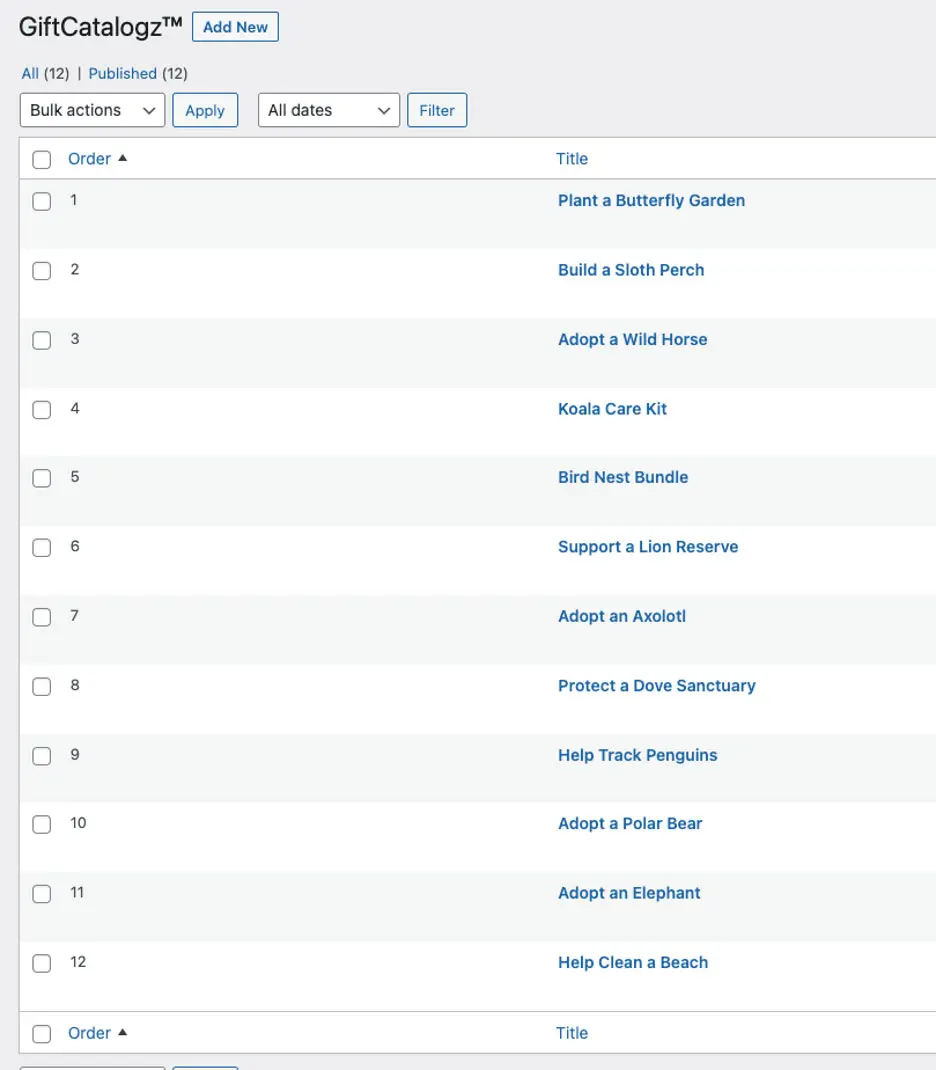
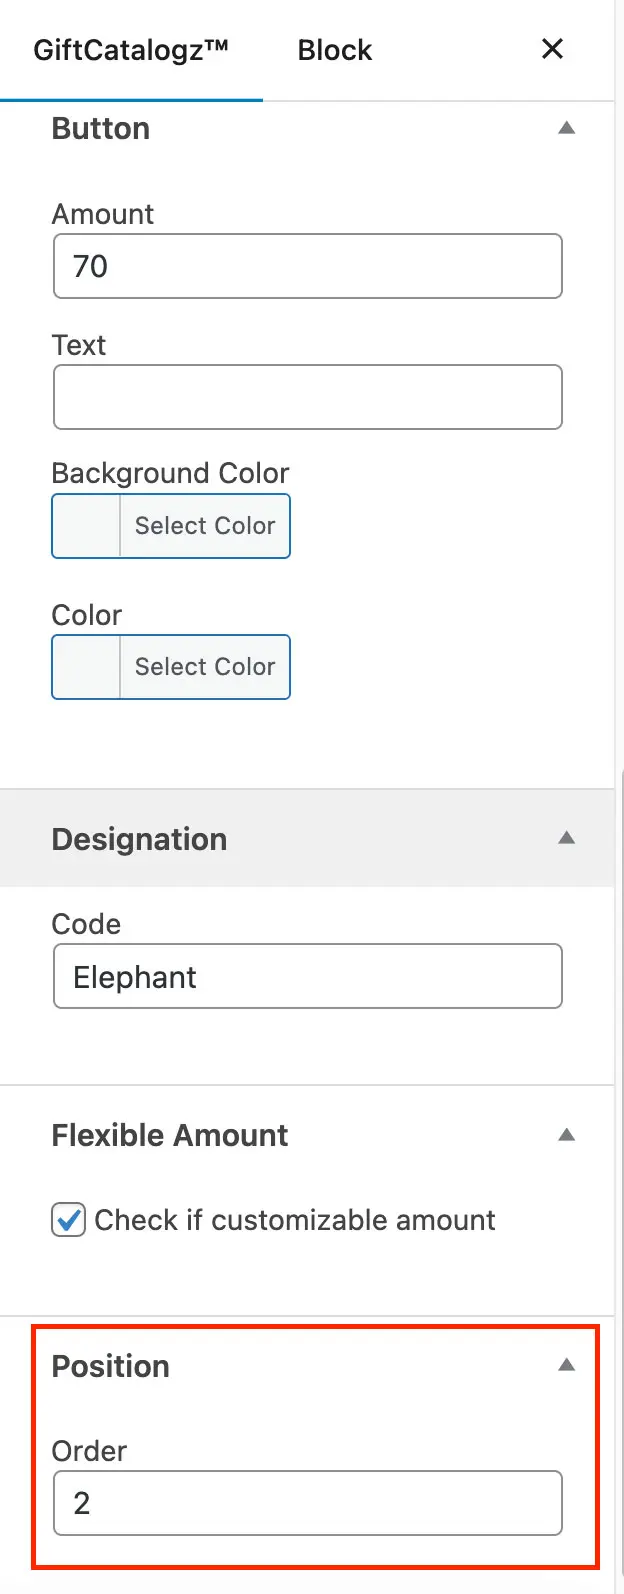
Sorting gift items
Inside each item you’ll find an order field to be able to have gift items display in a certain order. The order of the items will be from lowest to greatest in number. (i.e 1, 2, 3, … 10). For easy sorting there is a column with the order of each item.
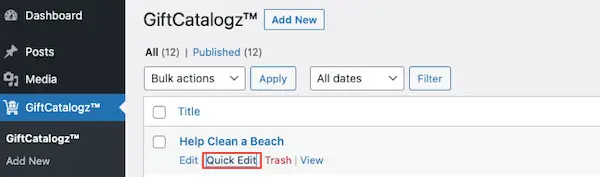
Adding a Catalog Section
In order to use multiple catalogs, you will need to add catalog sections or tags. By doing this you will be able to categorize your items and use multiple catalogs simultaneously (i.e. End Of Year, Giving Tuesday…) You can create as many catalogs as you need.
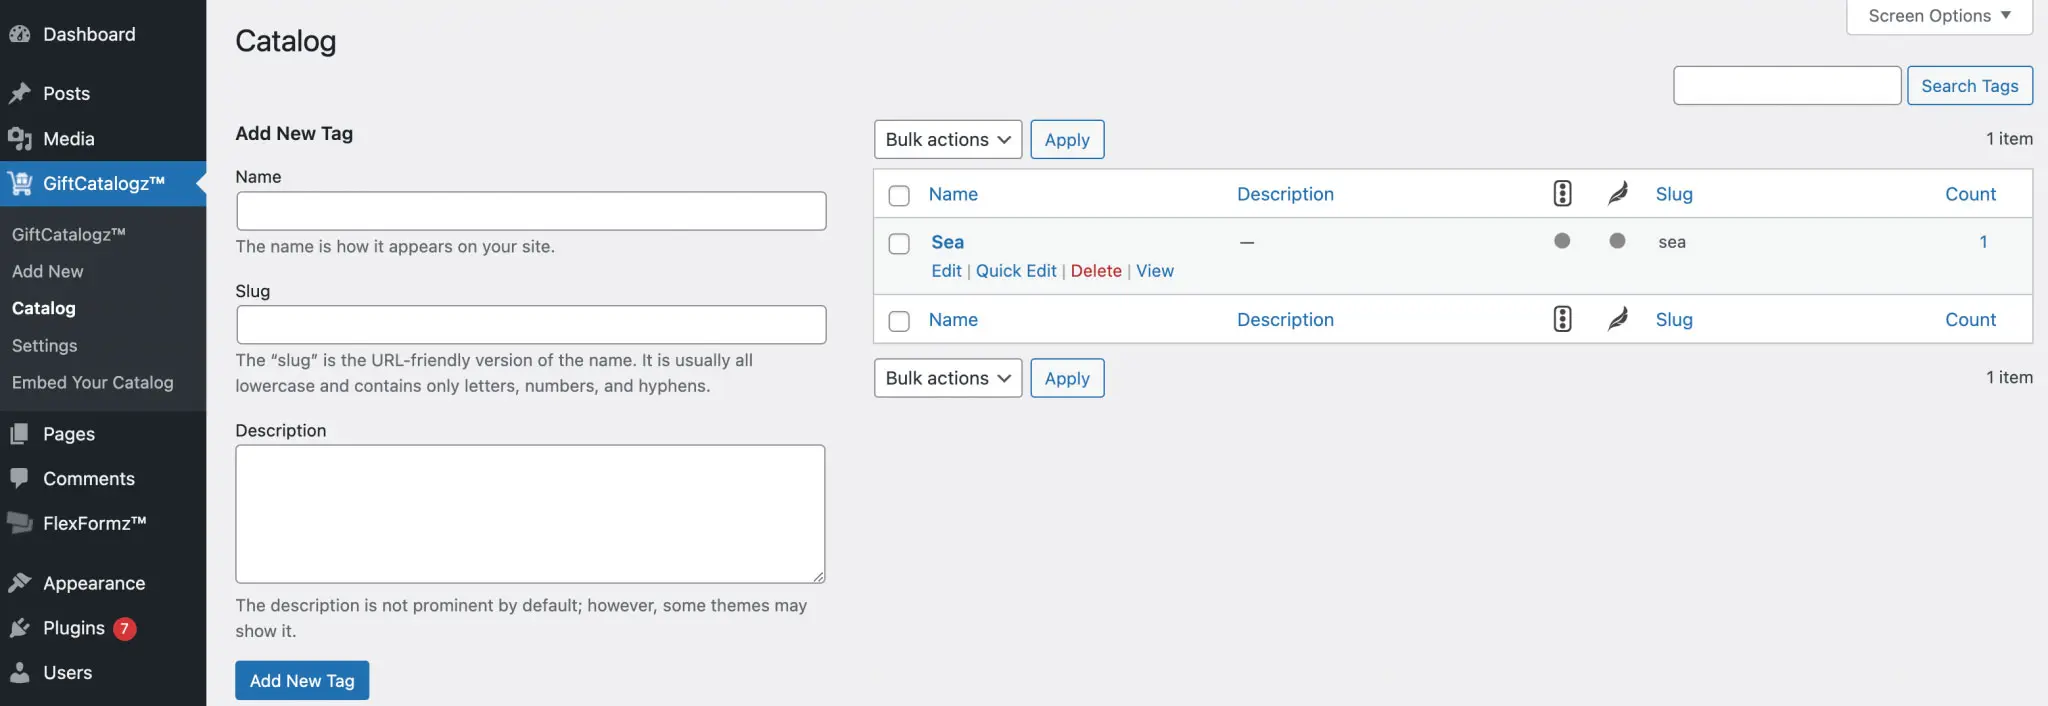
To link an item to a specific catalog search for the item you want to link and click on Quick Edit. Add your catalog name in the Tag field and finally click on the update button.

When you embed your catalog, make sure you define what catalog you want to display!
Collection
Collections allow you to easily display your catalog in two view modes: mosaic and list view. The system will display 9 initial items with a load more button if you have more than 9 items in your catalog.
Collection Shortcode Options
- Button Text Default: Add To My Gift
- Catalog: Pulls all gift items unless otherwise specified
- Button Color Default: #45AFB9
- Button Text Color Default: #FFF
- Button Text Default that displays the open amount: Give Now
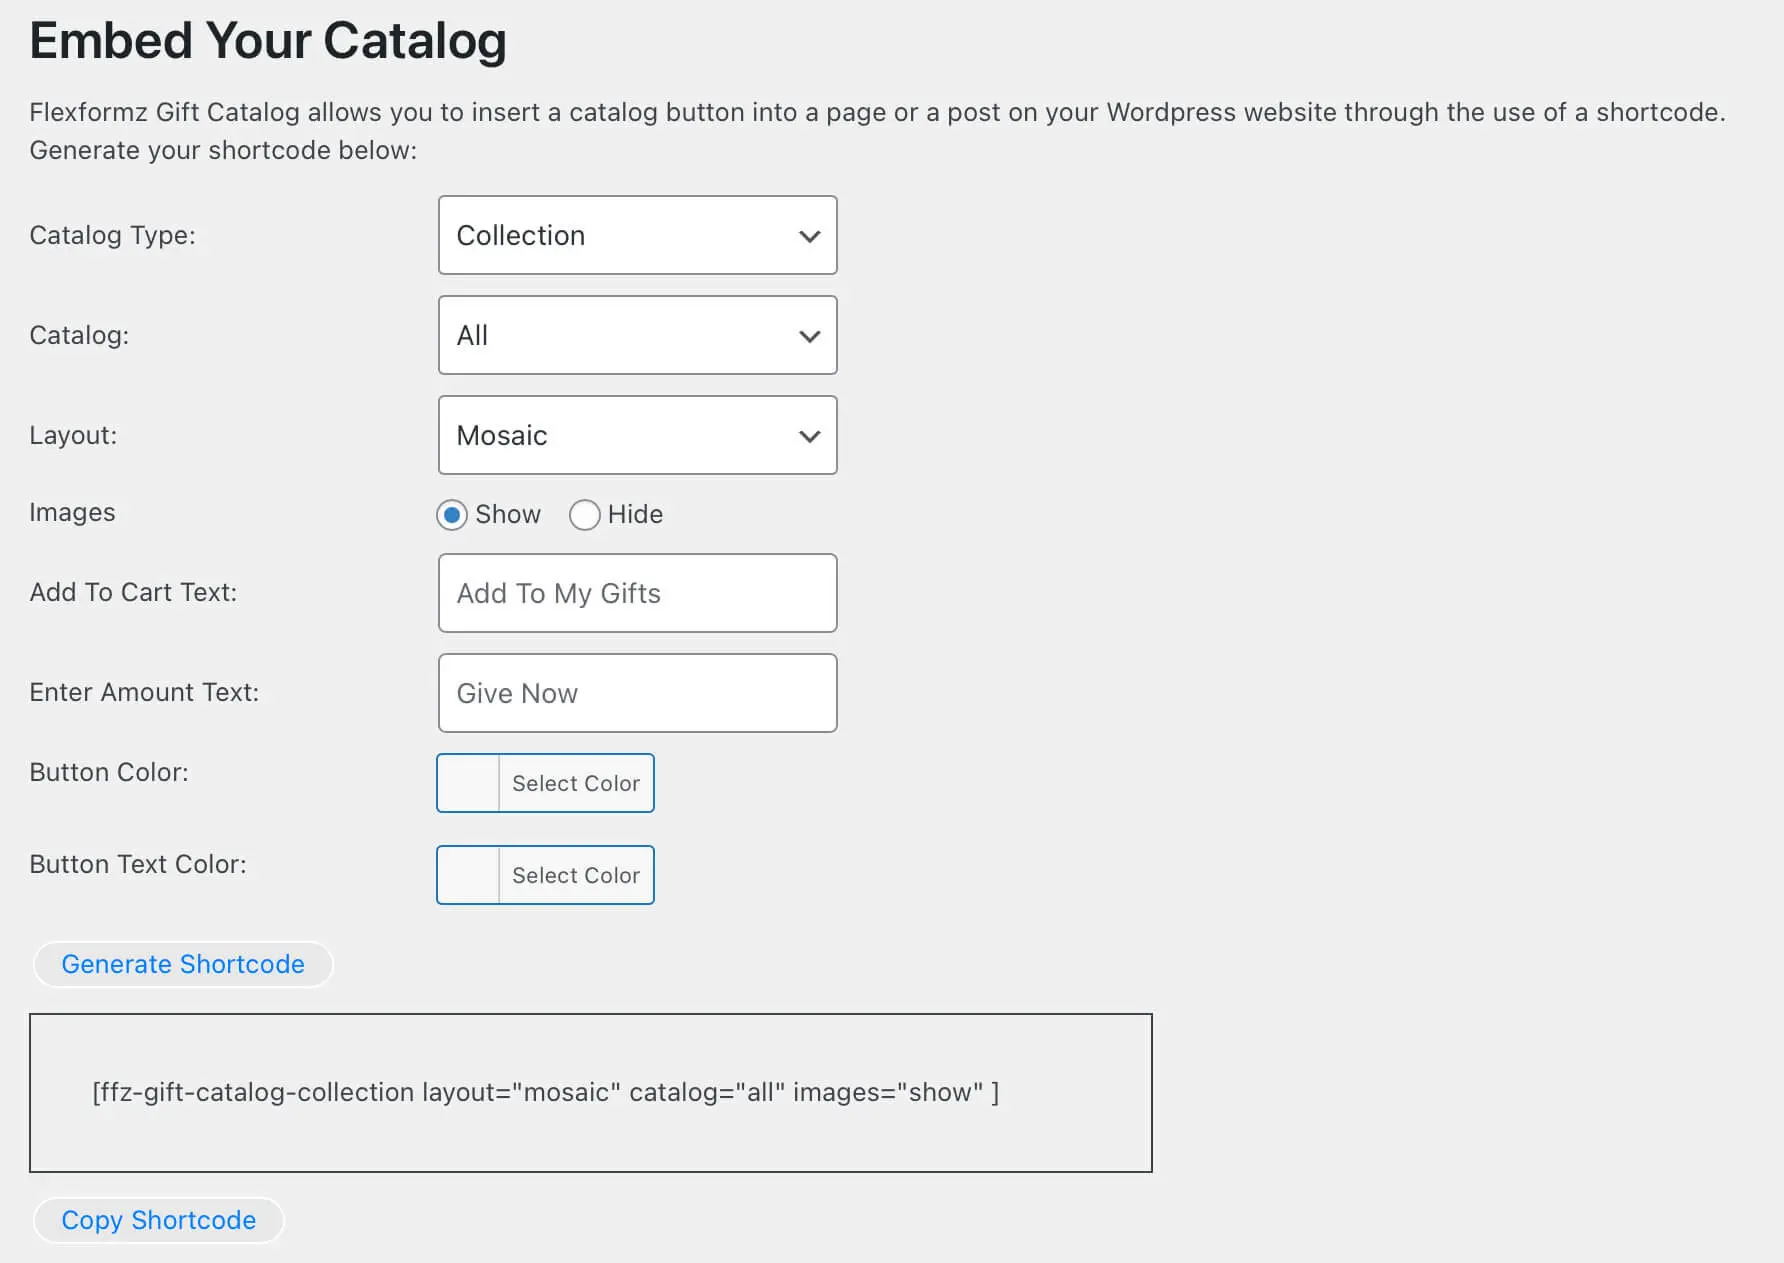
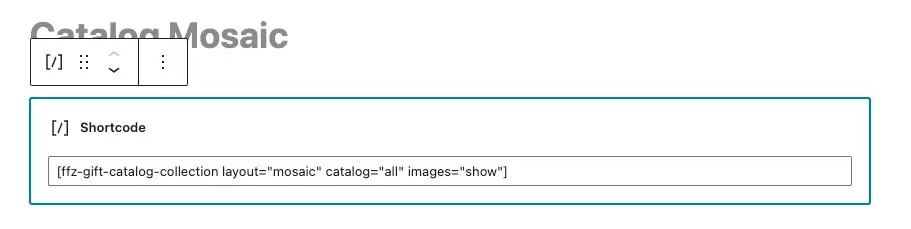
Simply copy the shortcode and paste it in a shortcut block type on any page of your WordPress site.
Result:

Other Amount Feature
This feature is only available for collections. You can find the checkbox inside each item.
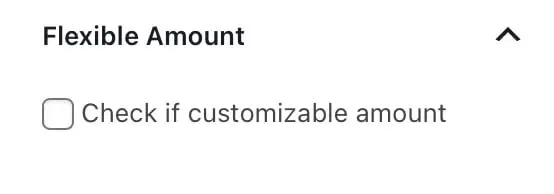
There are two different ways it will display:
- Display as a button
- Display as a link
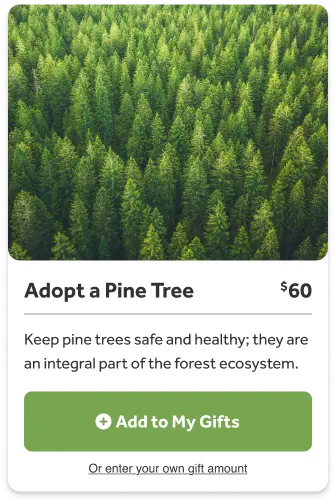
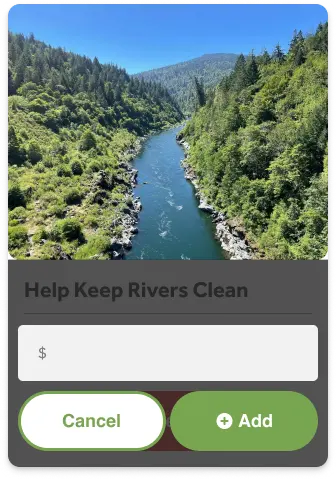
Display Open Amount Button
If the item does not have a default amount and you want to show only the button that displays the open amount input, then you need to clear the amount of the post item and the checkbox can be checked or unchecked.
Result:

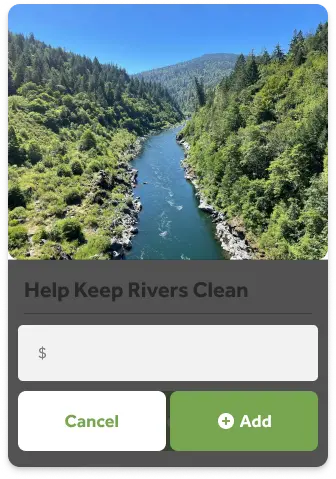
Display Open Amount Link
If you want to display both the button for Add to cart and the link to display the other amount input, then you need to set up the amount for each item and check the checkbox to display the open amount.
Result:
How does the custom amount look?
When the donor clicks over the button/link this is how it will display:
Button
We want you to have absolute freedom when designing your GiftCatalogz, so you can choose to display individual buttons for your own custom design. That way, you can create any layout you wish, even across multiple pages, and simply trigger the GiftCatalogz with a button.
You can override the color set up on the post inside the shortcode.
Result:

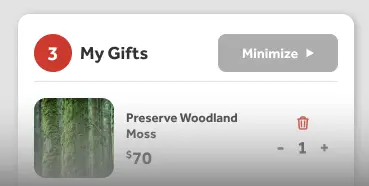
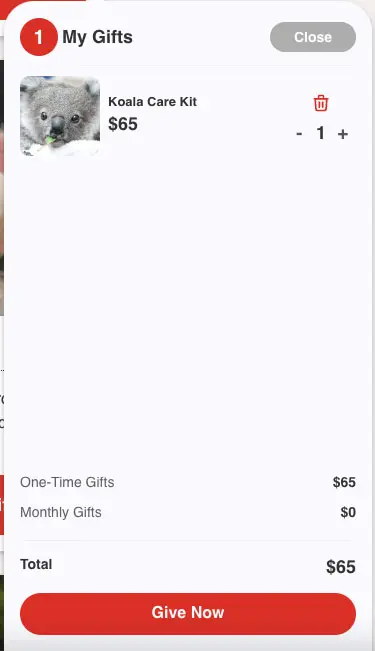
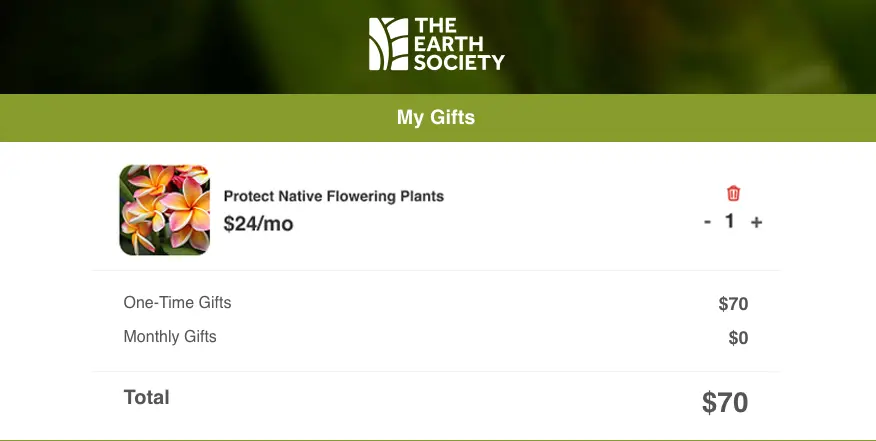
What does the cart look like?
The donors will always see a minimized version of their cart when there are items in it.
When they click to view it, they will see a full list of items in their cart.
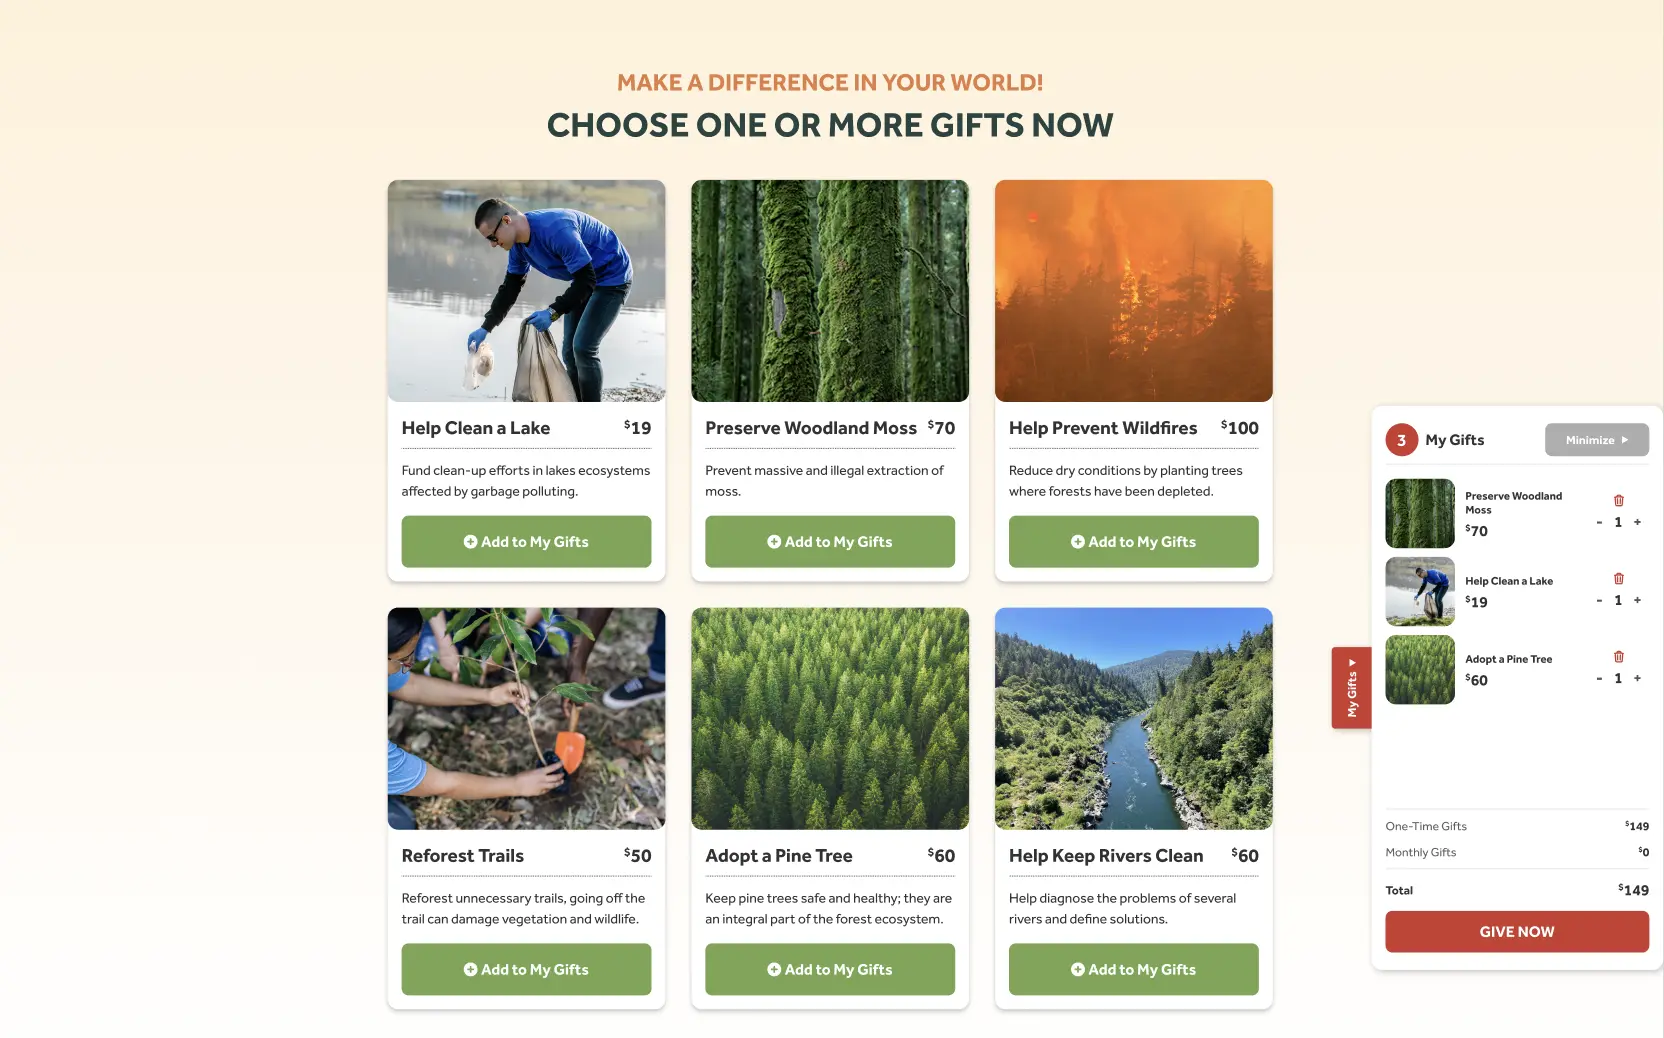
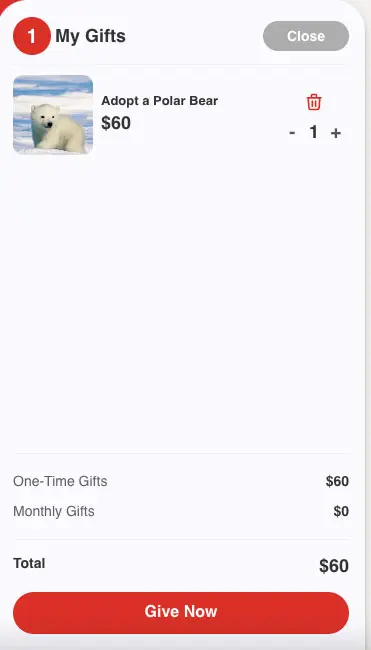
What does the checkout look like?
The donor can remove the item or update the item quantities.

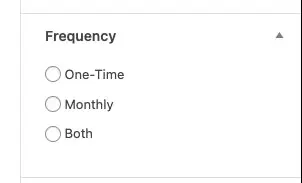
Frequency
You can choose from three frequency options for items in your gift catalog:
One-Time
When a donor adds this item to their cart, the gift will be a one-time gift only.

Monthly
When a donor adds this type of item to their cart, the frequency of the gift will be monthly.

Both
With this flexible type of option, donors can choose the gift frequency for the item and they can change it any time through the Self Service Portal.

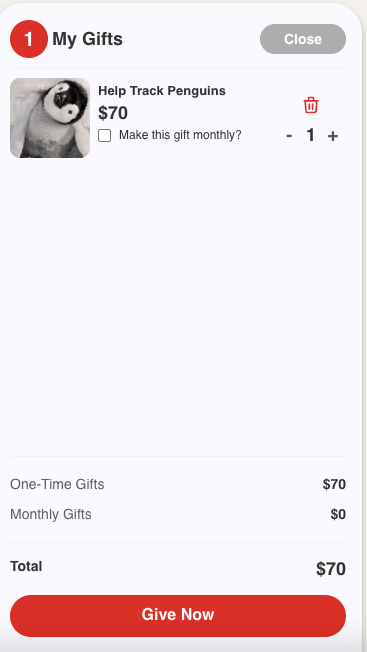
How it looks in the checkout:
Hierarchy button and background color
Shortcodes will override individual button text and color settings.
| 1. Shortcode | 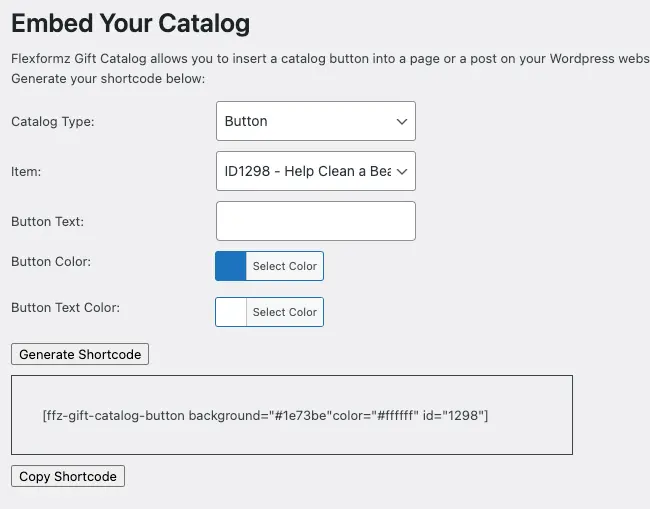 |
When the shortcode is generated, you can choose colors for the text and background of the button. |
| 2. Custom Post Type | 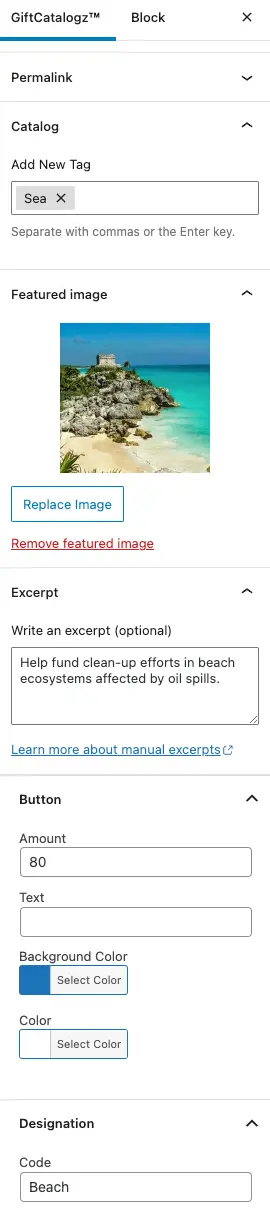 |
Inside each GiftCatalogz you can choose colors for the text and background of the button. |
| 3. General Settings | 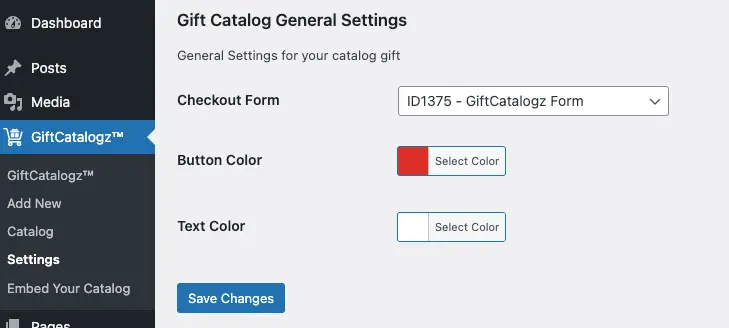 |
|
| 4. Our Defaults |
|
Event Management
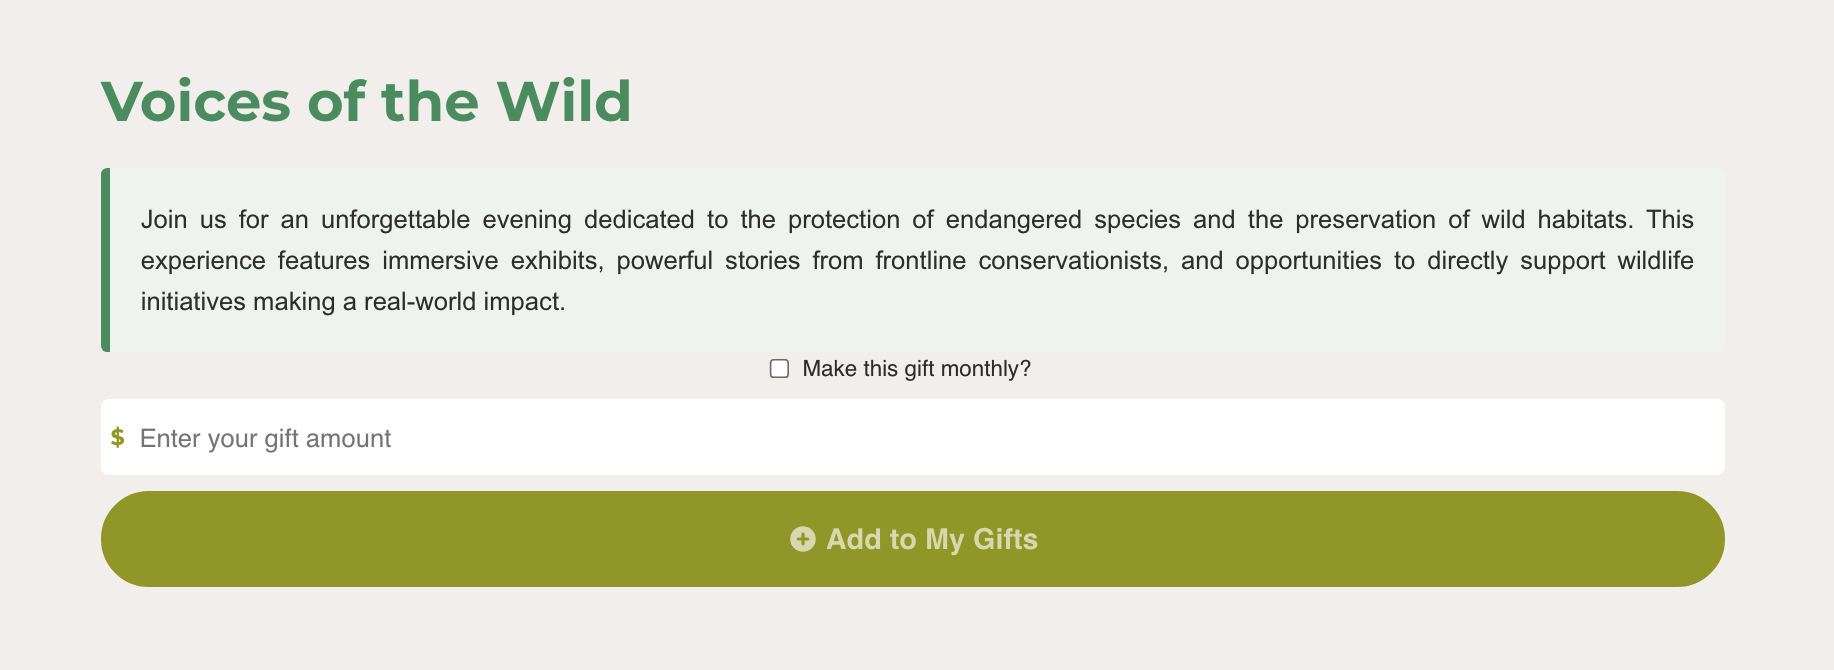
The Events feature is a new enhancement in the GiftCatalogz plugin. It lets you use standard catalogs to manage event attendance, ticket sales, and donations—all in one place.
With this feature, you can:
- Add event-specific details to a catalog
- Sell tables and seats
- Register attendees
- Accept donations
Create an Event
In the Catalog section, check the box labeled “Is this an event?” to categorize it as an event. Once selected, additional fields will appear to enter event details.
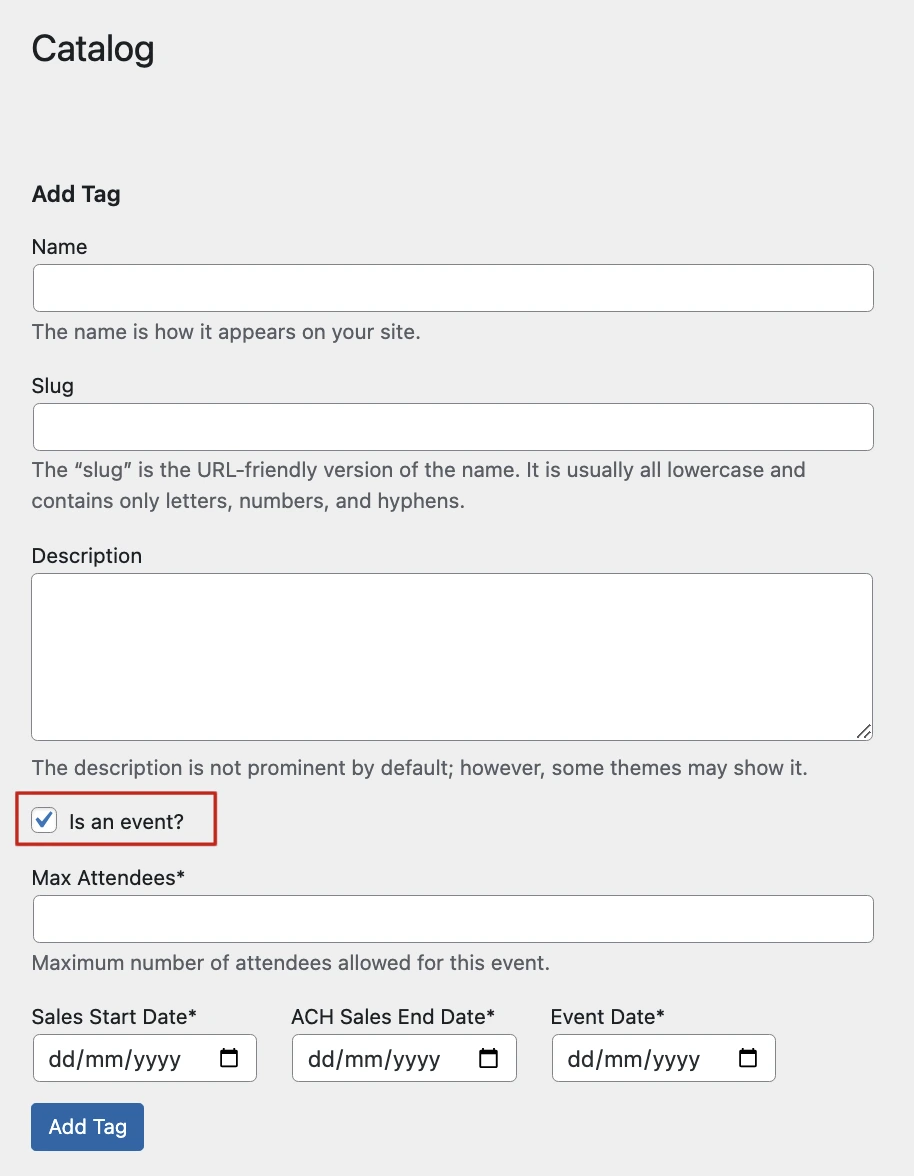
If this option is enabled, all of the following fields are required:
- Max Attendees: Total number of people allowed.
- Sales Start Date: When sales begin.
- ACH Sales End Date: Last day to accept ACH payments.
- Event Date: Date of the actual event.
Important Rules:
- ACH payments must end at least 10 days before the event.
- Once published, events cannot be edited.
- Do not change the event tag after publishing.
- Existing catalog fields behave the same as always.

Create an Event Item
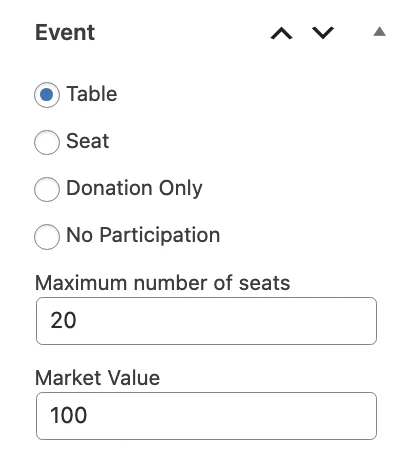
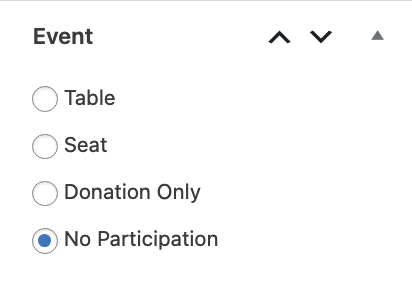
When creating an item in the Add Post section of GiftCatalogz, you’ll see a new “Event” section. You can choose from four item types:
- Table
- Seat
- Donation Only
- No Participation
Table
Required fields:
- Amount: Fixed price for the table.
- Maximum number of seats: Total seats available at the table.
- Market Value: Estimated value for tax purposes.
Additional rules:
- Custom amounts are not allowed.
- Frequency is always one-time and cannot be changed.
- Market Value must be less than or equal to the Amount.
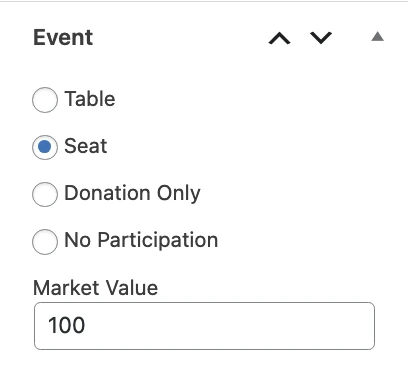
Seat
Required fields:
- Amount: Fixed price for the seat.
- Market Value: Estimated tax-deductible value.
Additional rules:
- Custom amounts are not allowed.
- Frequency is always one-time.
- Market Value must be ≤ Amount.
Donation Only
This option configures contributions without affecting attendance tracking.
Required: Frequency

Additional rules:
- The amount is not fixed and can be customized.
No Participation
Select this when the item doesn’t relate to any event activity.
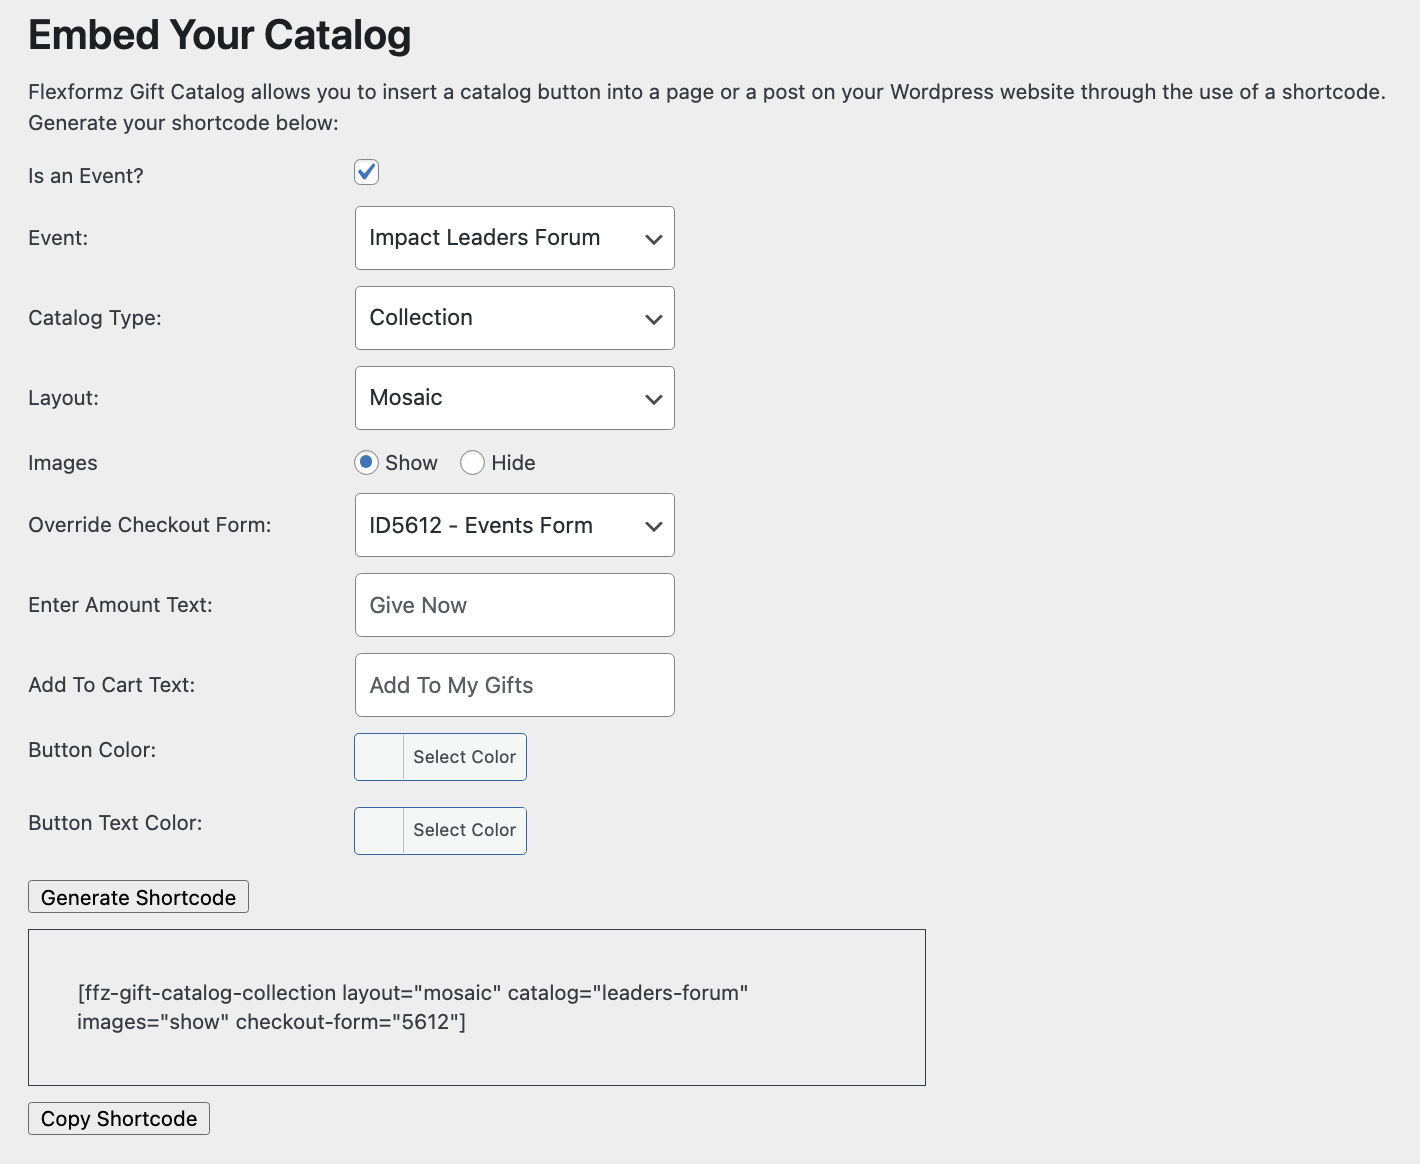
Embed your Events
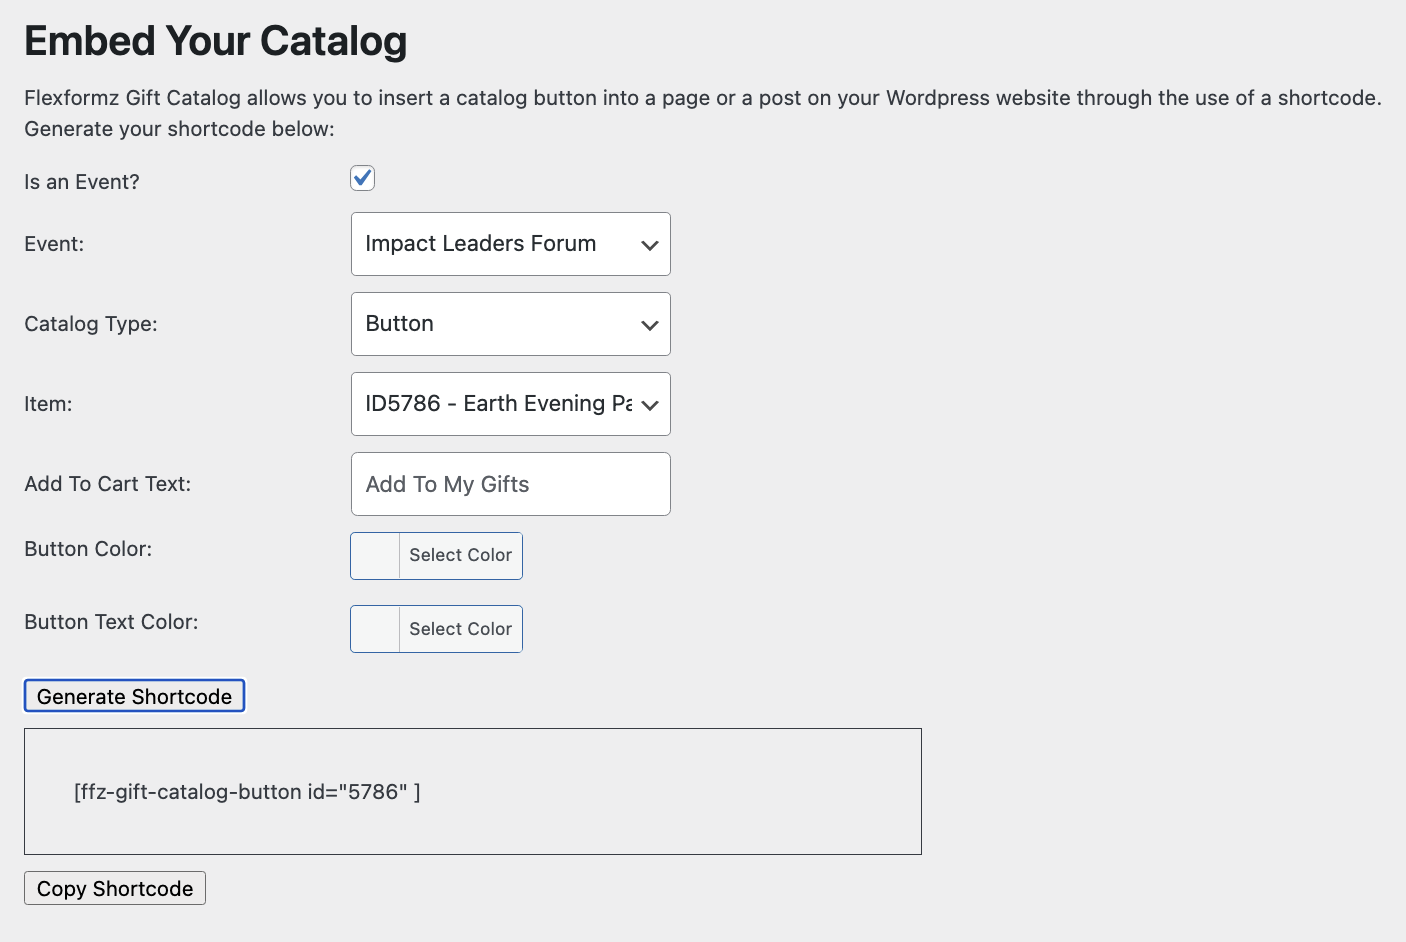
In the Embed Your Catalog section, check the “Is this an event?” box to reveal event-specific options.
Collection
- Event: Select a previously created event (required to display items).
- Checkout Form: Choose a checkout form (optional; defaults to catalog settings if not selected).
Embedded Collection

Button
Select an event to associate with the item.
Embedded Button
If the Sales Start Date hasn’t arrived, transactions are blocked with this message:
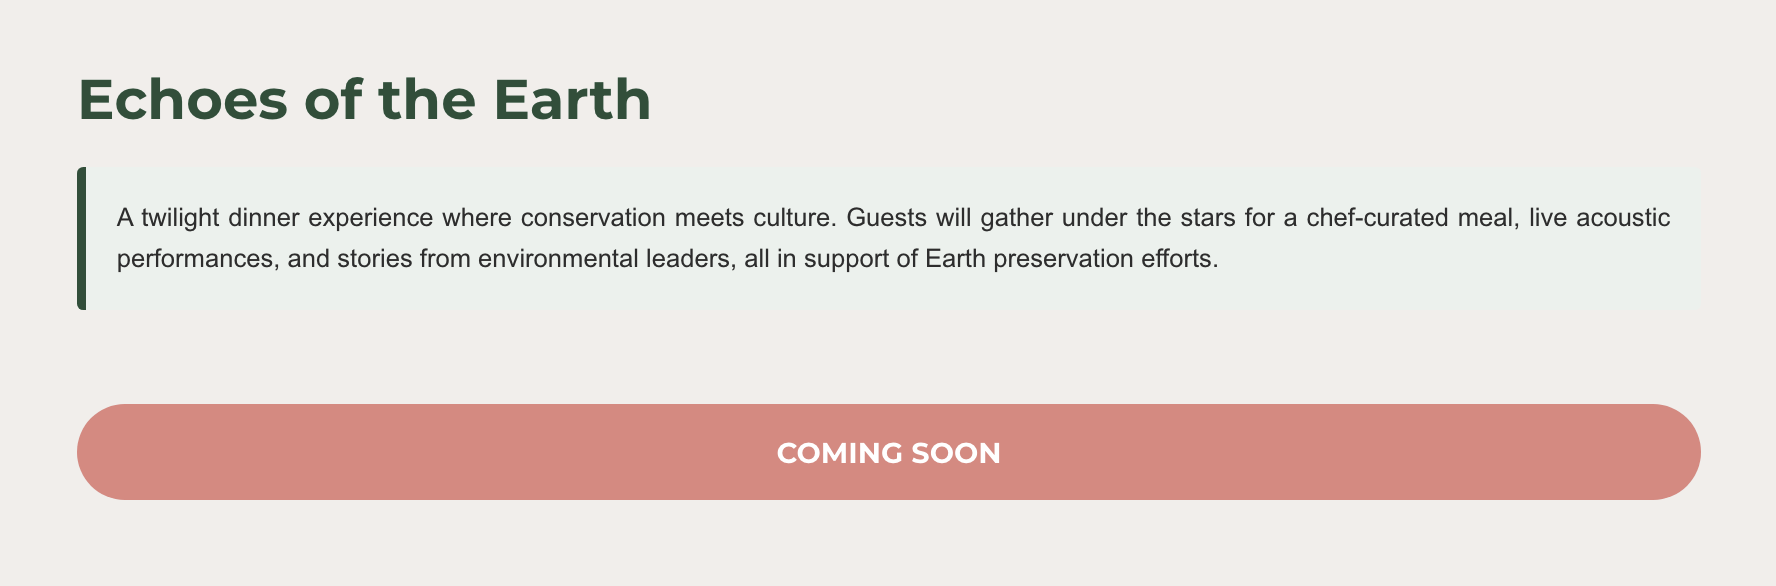
Note: Once the event date has passed, the event is no longer shown.
Checkout Form
Only one-column or two-column layouts are supported.
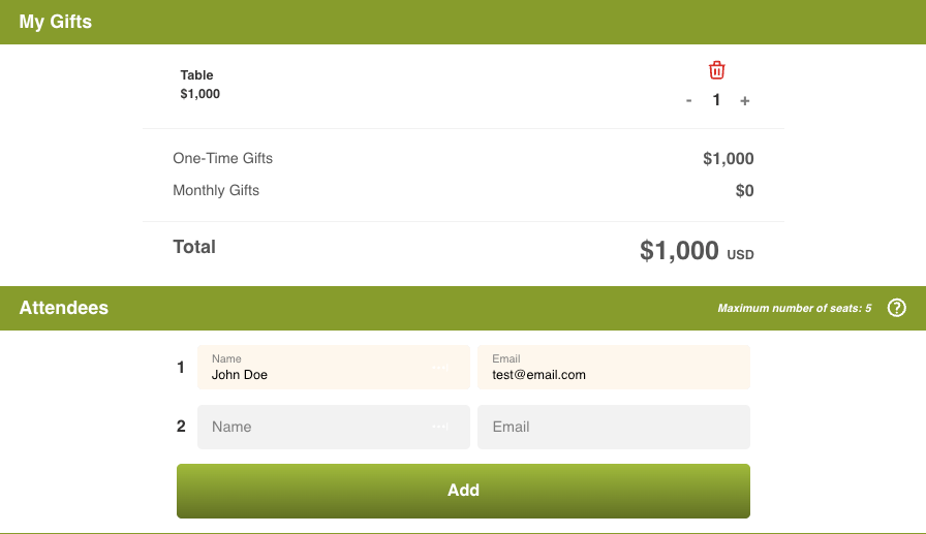
If an item involves multiple attendees (Tables or Seats), you can enter their details so they receive invitations. Guest info is optional.
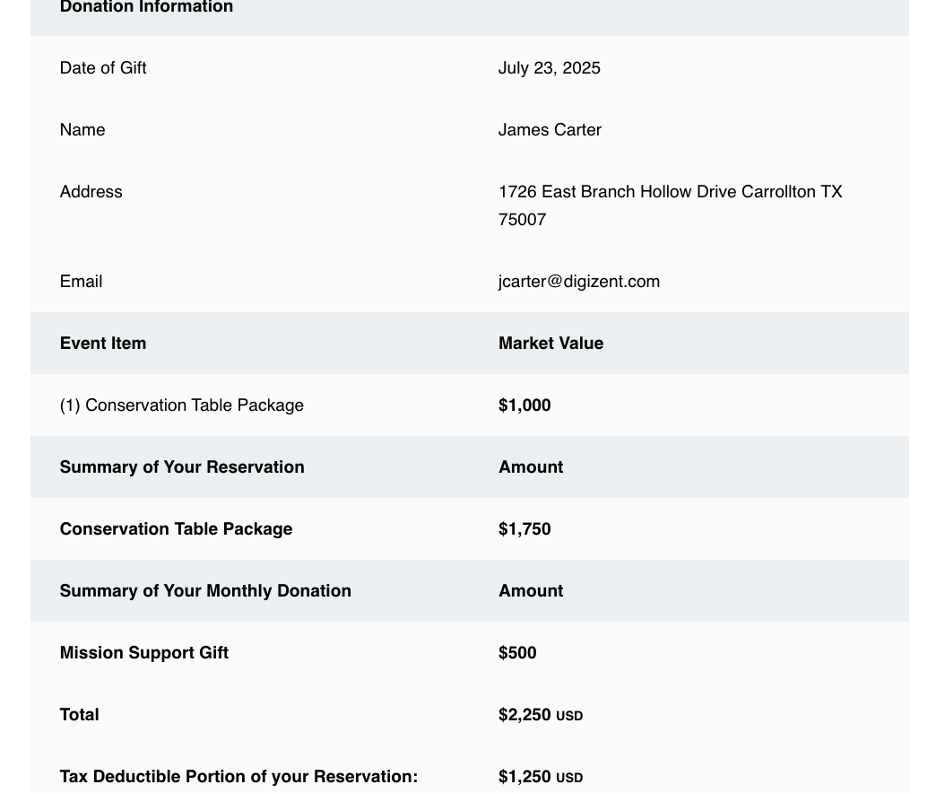
Receipt
- Each item displays its market value.
- Total and deductible amounts are calculated automatically.
Best Practices
- If you need to update an item, either:
- Create a new one, or
- Wait at least 1 hour before processing new donations.
Don’t:
- Modify a published item.
- Assign more than one event tag to an item.
- Mix items from different events in the same cart.